
Configuration of Bulk Product and Order Editor for WooCommerce
Editing Products in Bulk
Go to WP Admin Panel > Products > Bulk Edit > Bulk Edit Products. A bulk products editor will appear through which you can filter your products in store and edit them in bulk for numerous settings.

Applying Filters to Edit Products
Filter Products: Begin by filtering the products based on your criteria using the available filters.
- Product Title: Filter products based on the entered product title.
- Product SKU: Filter products based on the entered product SKU.
- Product Category: Filter products based on the selected product categories.
- Catalog Visibility: Filter products based on visibility status:
- Shop and Search Results
- Shop Only
- Search Only
- Hidden
- Product Tags: Filter products based on selected product tags.
- Allow BackOrders?: Filter products based on backorder settings:
- Allow
- Do Not Allow
- Allow But Notify Customer
- Product Regular Price: Filter products based on regular price.
- Product Sale Price: Filter products based on sale price.
- Product Weight (kg): Filter products based on weight.
- Stock Quantity: Filter products based on stock quantity.
- Stock Status: Filter products based on stock availability:
- In Stock
- Out of Stock
- On Backorder
- Product Status: Filter products based on product status:
- Published
- Draft
- Pending Review
- Private
- Product Type: Filter products based on product type:
- Simple
- Variable
- Grouped
- External/Affiliate

After specifying your filters, click on “Save Changes” to apply them and proceed with bulk editing.
Selecting Products to Edit in Bulk
After filtering the products and obtaining them in the table, follow these steps to select multiple products for bulk editing:
Selection Process:
- Click and select the desired products from the table.
- Once selections are made, proceed by clicking on “Bulk Edit Products”.
Customization and Editing Settings:
A popup will appear, allowing customization of numerous settings listed below:
1. Configuring the General Settings of the Products:
Title: Choose one of the following options and specify the title accordingly.
- Set New
- Prepend
- Append
SKU: Choose one of the following options and specify the SKU accordingly.
- Prepend
- Append
Description: Choose one of the following options and set a custom description.
- Set New
- Prepend
- Append
Short Description: Choose one of the following options and set a short description.
- Set New
- Prepend
- Append
Purchase Note: Choose one of the following options and set a purchase note.
- Set New
- Prepend
- Append
Menu Order: Choose one of the following options and specify the menu order.
- Set New
- Increase by Value
- Decrease by Value
- Delete
Enable Reviews: Choose from the following options.
- No Change
- Yes
- No
Sold Individually: Choose whether to sell the product separately.
- No Change
- Yes
- No
Product Status: Specify the product status.
- No Change
- Published
- Pending Review
- Draft
- Private
Image: Choose to set a new image.
- No Change
- Set New
- Delete

2. Setting the Pricing of the Products:
Configure regular and sale prices by selecting appropriate options.
Regular Price: Choose the regular price of the product.
- Set New
- Increase by Value
- Decrease by Value
- Increase by Percentage
- Decrease by Percentage
Sale Price: Select the sale price of the product.
- Set New
- Increase by Value
- Decrease by Value
- Increase by Percentage
- Decrease by Percentage
- Delete
Tax Status: Specify the tax status of the product.
- No Change
- Taxable
- Shipping only
Tax Class: Choose a tax class.
- No Change
- Reduced Rate
- Zero Rate

3. Specifying Categories and Tags to Products:
Choose to add, remove, or set new:
- Categories
- Tags

4. Adding Product Attributes in Bulk:
Choose to add, remove, or set the following new product attributes in bulk:
- Free Gift
- Radio
- Mug Size
- Mug Style
- My Custom Attribute
- Package Size
- Quantity
- Radio
- Size

5. Managing Product Stock in Bulk:
Configure stock management settings.
Manage Stock: Choose to manage stock.
- No Change
- Yes
- No
Stock Status: Specify the stock status from the following options.
- No Change
- In Stock
- Out of Stock
- On Backorder
Stock Quantity: Set stock quantity.
- Set New
- Increase by Value
- Decrease by Value
Low Stock Threshold: Configure low stock threshold.
- Set new
- Increase by Value
- Decrease by Value
Allow Back Orders?: Enable/Disable backorders.
- No Change
- Allow
- Do Not Allow
- Allow, But Notify Customer

6. Specifying Shipping Details for the Products:
Enter shipping class and specify:
- Weight (kg)
- Length (cm)
- Width (cm)
- Height (cm)

7. Configuring Advanced Product Settings:
Product Type: Specify the type of product using the following options:
- No Change
- Simple product
- Grouped product
- External/Affiliate product
- Variable product
Featured: Choose whether the product should be featured using the options below:
- No Change
- Yes
- No
Virtual: Indicate if the product is virtual with the following options:
- No Change
- Yes
- No
Downloadable: Determine if the product is downloadable:
- No Change
- Yes
- No
Download Limit: Set, increase, decrease, or remove the download limit for downloadable products.
Download Expiry (days): Set, increase, decrease, or remove the download expiry period for downloadable products.
Date: Enter a specific date associated with the product.
Catalogue Visibility: Control where the product appears in your store’s catalogue:
- No Change
- Shop and Search Results
- Shop Only
- Search Results Only
- Hidden

After configuring the desired settings, click on “Apply” to proceed with the bulk editing process.
Customizing the Products Table
Go to WooCommerce > Settings > Bulk Edit Settings > Product Settings to customize the display of the products table.
Products Per Page: Specify the number of products to display per page. The default value for products per page is 10.
Show/Hide Columns: Choose which columns to display in the products table. Available columns for display customization include:
- Product ID
- Product Title
- Product Image
- Regular Price
- Sale Price
- Product Type
- Product Category
- Date
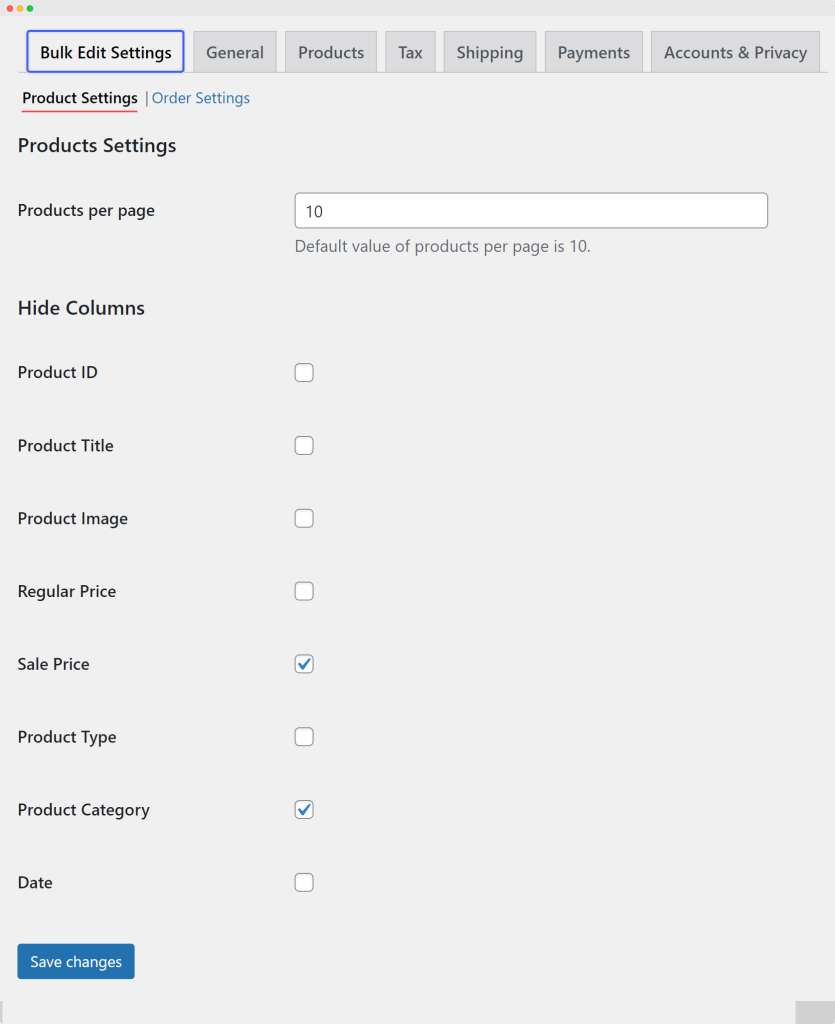
Click “Save Changes” to apply the settings.
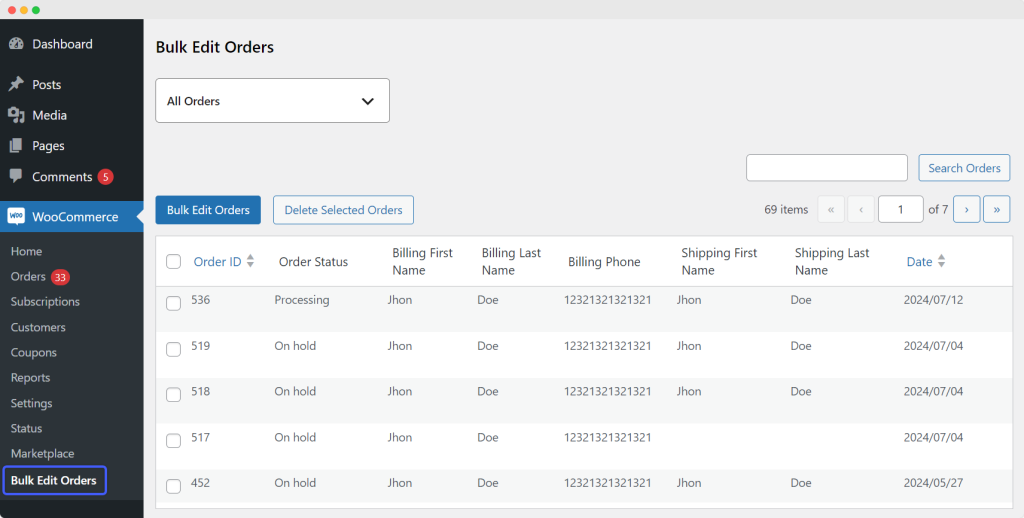
Editing Store Orders in Bulk
Go to WooCommerce > Bulk Edit > Bulk Edit Orders. In the bulk order editor interface, you can filter orders based on various criteria to narrow down the selection for bulk editing.
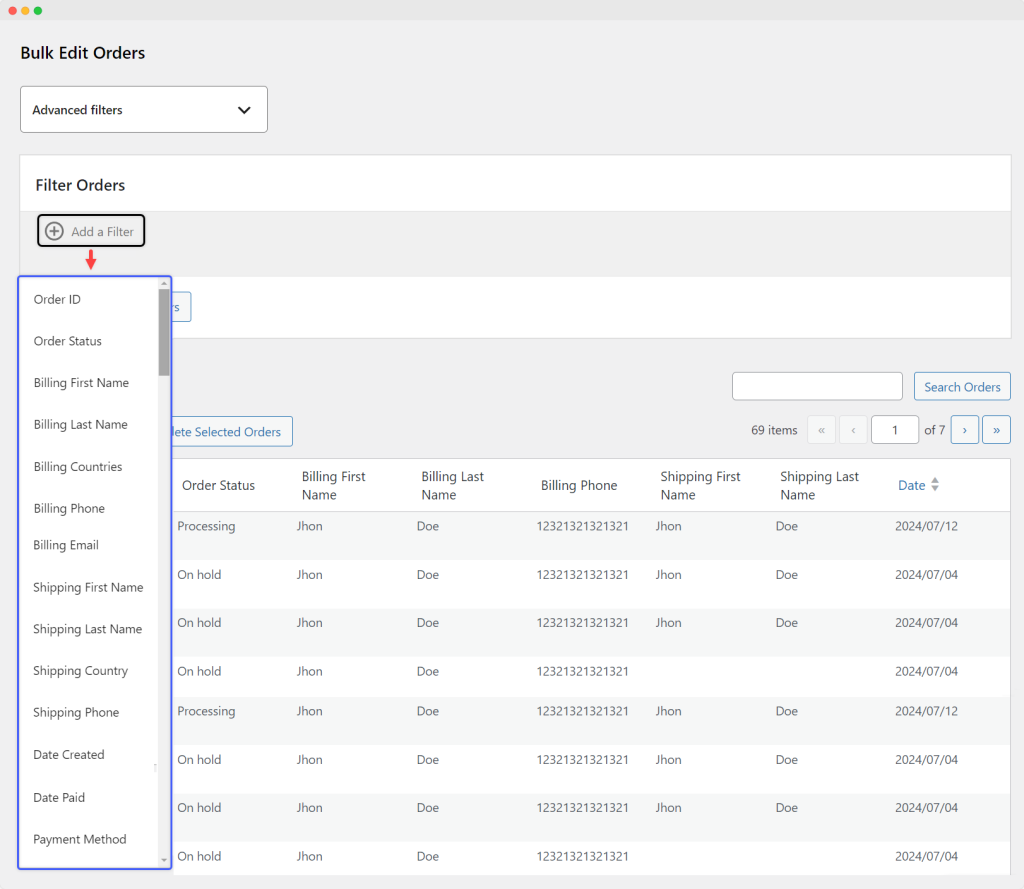
Choosing Filters to Edit Orders
Filter Orders: Select the filters settings to apply specific criteria for filtering orders. Available filters include:
Order ID: Filter orders with the exact chosen order ID.
Order Status: Filter orders based on chosen order statuses such as:
- Pending Payment
- Processing
- On Hold
- Completed
- Cancelled
- Refunded
- Failed
- Draft
Billing First Name: Filter orders based on the billing first name provided.
Billing Last Name: Filter orders based on the billing last name provided.
Billing Countries: Filter orders based on chosen billing countries.
Billing Phone: Filter orders based on the entered billing phone number.
Billing Email: Filter orders based on the billing email provided.
Shipping First Name: Filter orders based on the shipping first name provided.
Shipping Last Name: Filter orders based on the shipping last name provided.
Shipping Countries: Filter orders based on chosen shipping countries.
Shipping Phone: Filter orders based on the entered shipping phone number.
Date Created: Filter orders that were created on a specific entered date.
Date Paid: Filter orders that were paid on a specific entered date.
Payment Method: Filter orders based on chosen payment method, including:
- Direct Bank Transfer
- Check Payments
- Cash on Delivery
After specifying the desired filters, click on “Save Changes” to apply them and proceed with bulk editing the selected orders.
Selecting Orders to Edit in Bulk
Once you have filtered the orders and obtained them in the table, follow these steps to select multiple orders for bulk editing:
Navigate to the filtered orders table. Click and select the desired orders from the table. After making the selection of the desired orders, click on “Bulk Edit Orders”. A popup will appear, allowing customization of numerous settings listed below:
1. Configuring the General Settings of the Orders:
Order Status: Choose from the following options.
- No Change
- Pending Payment
- Processing
- On Hold
- Completed
- Cancelled
- Refunded
- Failed
- Draft
Date Created: Specify the creation date of the orders.
Payment Method: Choose from the following options.
- No Change
- Direct Bank Transfer
- Check Payments
- Cash on Delivery
Order Actions: Choose from the below order actions:
- Email Invoice/Order Details to Customer
- Resend New Order Notification
- Regenerate Download Permissions
Customer-Provided Note: Enter a custom message provided by the customer.

2. Entering the Billing Info of Orders in Bulk:
When bulk editing orders, you can enter billing information for multiple orders simultaneously. Here’s how you can specify billing details:
- Billing First Name
- Billing Last Name
- Billing Company
- Billing Phone
- Billing Email
- Address Line 1
- Address Line 2
- Billing City
- Postcode/ZIP
- Billing Country

3. Specifying the Shipping Info of Orders in Bulk:
Similarly, you can also specify shipping information for multiple orders at once. Here’s how you can enter shipping details:
- Shipping First Name
- Shipping Last Name
- Shipping Company
- Shipping Phone
- Address Line 1
- Address Line 2
- Shipping City
- Postcode/ZIP
- Shipping Country

Once you have entered or updated the billing and shipping information for the selected orders, click on “Apply” to save the changes and proceed with updating the orders accordingly.
Personalizing the Orders Table
Go to WooCommerce > Settings > Bulk Edit Settings > Order Settings.
Displays Orders Per Page: Specify the number of orders to display per page. The default value for orders per page is 10.
Hide Columns: Choose which columns to display in the orders table. Available columns for display customization include:
- Order ID
- Order Status
- Billing First Name
- Billing Last Name
- Billing Phone
- Shipping First Name
- Shipping Last Name
- Date


