
1. View Detailed Affiliate Dashboard
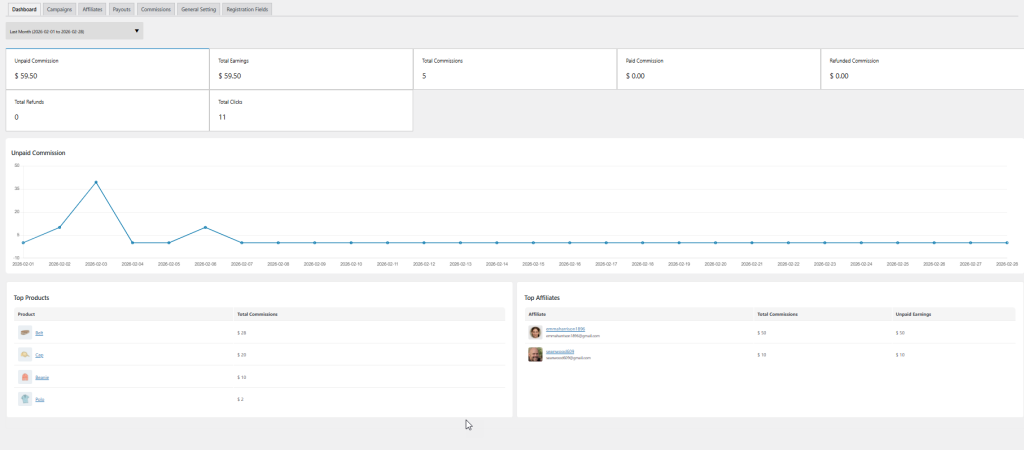
Access a centralized dashboard to track complete performance of your affiliate programs. You can view the following insights:
- Unpaid Commissions
- Total Earnings
- Total Commissions
- Paid Commission
- Refunded commissions
- Total Refunds
- Total Clicks
You can also view an interactive graph for each metric and analyze the entire campaign results.
Top Products
View best performing products from your affiliate campaigns and view details like:
- Product name
- Total commissions
Top Affiliates
Manage top affiliates and view their:
- Emails
- Total commission generated till now
- Unpaid earning
2. Creating a New Affiliate Campaign
To create a new affiliate campaign, go to WP Admin Panel > WooCommerce > Affiliate Marketing > Campaigns. Here you can view a separate log for each created campaign and manage the list of rules along with the following details:
- Tille
- Commission rate
- Expiry date
You can also edit the rule by clicking on any rule/campaign:
- Now, to add a new campaign, click on “Add Campaign” and fill in the following details:
- Add custom title for the new affiliate campaign
- Apply to all products: enable the option to offer an affiliate campaign on all products. Disable it if you want to select specific products.
- Apply on Specific Products: select specific products on which you want to offer affiliate campaigns
- Apply on Specific Categories: add specific categories on which you want to offer an affiliate campaign
- Apply to specific brands: select specific brands on which you want to offer affiliate campaigns
- Set Price Range for Affiliate Products: This helps you enable affiliate campaigns only for the products that fall within the selected price range. Now add:
- Minimum Price Range: Enter the lowest price range limit
- Maximum Price Range: Enter the highest price range limit
- Inform Existing Affiliates About New Campaign: Enable this to inform existing affiliates about new campaign updates
- Affiliate Commission: choose to apply affiliate commission rate as:
- Fixed amount
- Percentage value
- Commission Rate: Add the desired commission rate.
NOTE: This commission rate will only be used if no commission is set at the product level. You can leave this field empty if you want to use a tiered commission from General Settings or an Affiliate-specific commission from the affiliate’s profile.
Expiry Date: Add expiry date for the campaign

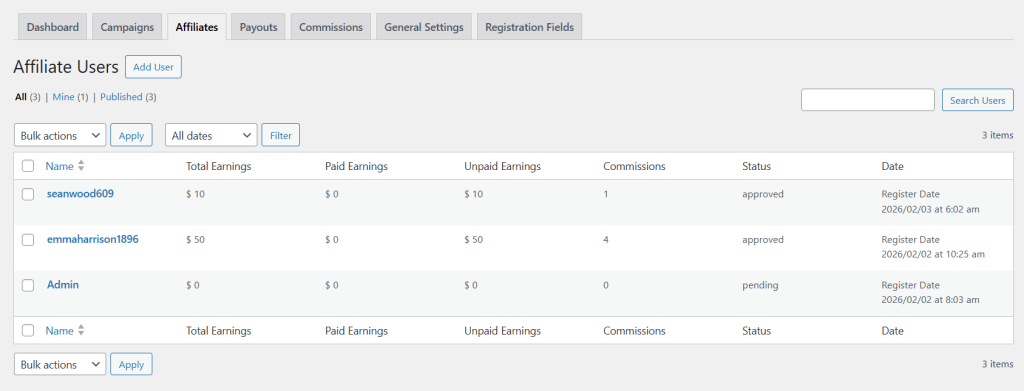
3. Managing Affiliate Details
To manage affiliate details, go to WP Admin Panel > WooCommerce > Affiliate Marketing > Affiliates. Here you can access a separate log to manage each affiliate user and view their:
- Total earnings
- Paid Earnings
- Unpaid Earnings
- Commissions
- Status
- Date
You can also select “Edit” to update each affiliate’s commission and other key details.
3a. Adding a New Affiliate Customer Manually
To add a new affiliate user, go to WP Admin Panel > WooCommerce > Affiliate Marketing > Affiliates and select “Add User”. Now fill in the following details:
Add a custom title for the new affiliate
- Details
- Commission Rate Type: Define the commission rate as:
- Fixed Amount
- Percentage Value
- Commission Rate: Enter the desired commission for the new user
- Affiliate Status: Set their status as:
- Approved
- Suspended
- Automatic Payment Method: Select payment method for the user:
- Credit/Debit Card
- Notify On: leave the option empty if you want to notify customers whenever the
- Commission is paid
- New commission is added
- Account Info: From this section, you can add affiliates:
- First Name
- Last Name
- Tell
- Payment Info: From this section, you can connect the payment with Stripe or choose to add:
- PayPal Email
- Min Earning
- Max Earning
- Withdrawal Limit
- Affiliate Payout Log: From this log, you can track:
- Affiliate Name
- Transaction ID
- Payment Method
- Custom payout
- Payout Amount
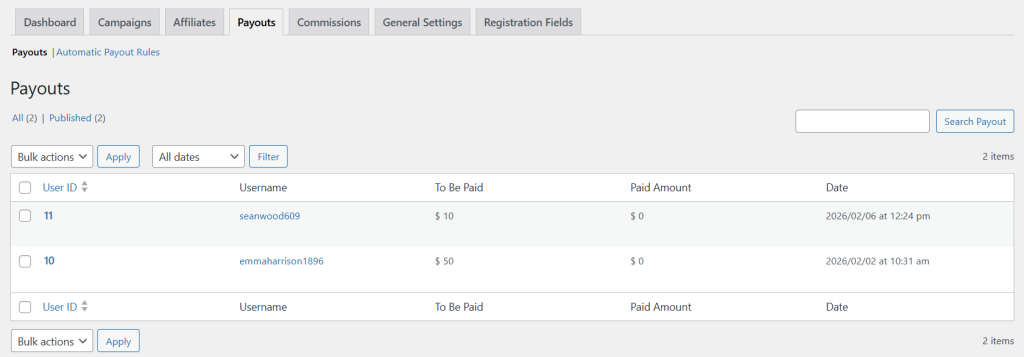
4. Managing Payouts Rules
To manage payouts, go to WP Admin Panel > WooCommerce > Affiliate Marketing > Payouts. From this section, you can:
- View a detailed list of payout transactions and track necessary details such as:
- User ID
- Username
- To be Paid
- Paid Amount
- Date
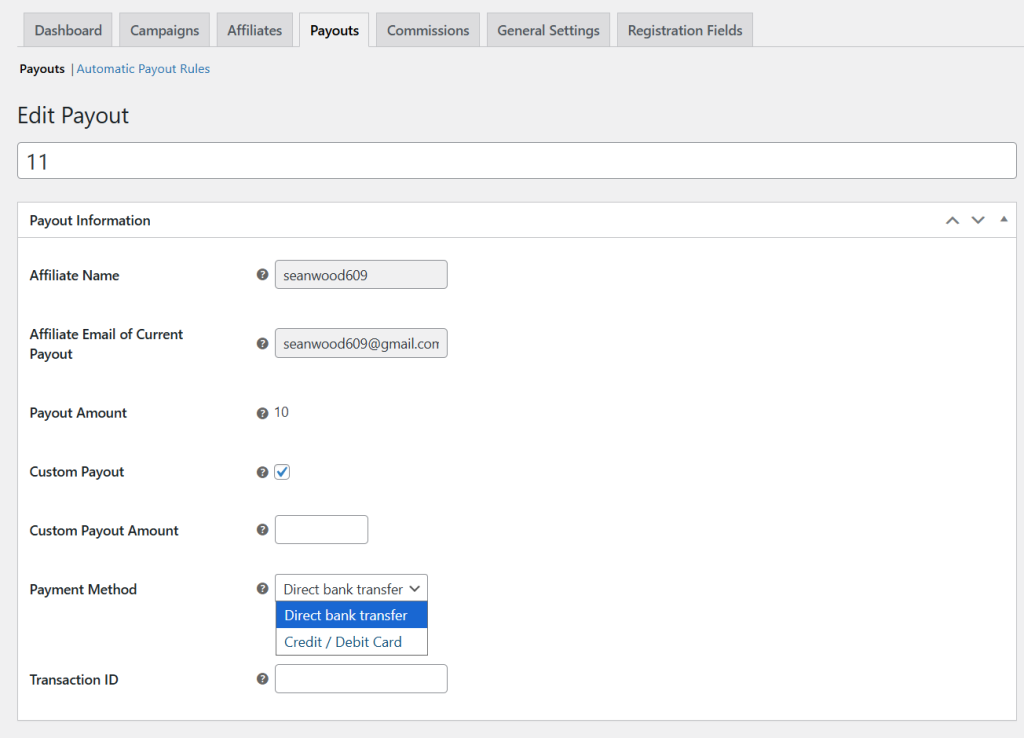
4a. Setting Manual Payout Rules
To add manual payout rules, go to WP Admin Panel > WooCommerce > Affiliate Marketing and click Payouts. From the log, you can select any affiliate customer, click on “Edit”, and:
- View affiliate name, current email, and payout amount
- Enable Custom Payout option to specify a new amount that you wish to payout instead of the defined payout amount.
- From the dropdown, you can add following payment methods:
- Direct Bank Transfer
- Credit/Debit Card
- Add transaction ID
4b. Setting Automatic Payout Rules
To add a new payout rule Go to WP Admin Panel > WooCommerce > Affiliate Marketing > Payouts and select Automatic Payout Rules. Now, fill in the following details:
- Automatic Payout Payment Method: From the dropdown, you can select from the following payment methods for automatic payouts:
- Credit/Debit Card
- Stripe
- PayPal
- Automatic Payout Rules: From the table, select “Add New” and create multiple payout rules by adding:
- Name: Add custom name for the rule
- Priority: Add priority for the rule
- Payout Amount: Add the desired commission required to trigger an automatic payout
- Payout Type: From this section, you can configure automatic payouts based on
- Threshold: Select this option if you want to add a specific amount for an affiliate to reach before they can withdraw their earnings
- Date: Select this option to choose a specific date on which affiliate payouts will be released automatically
- Day: Select this option if you want to add a specific day on which affiliate payouts are released automatically
- Payout Condition: According to the selected payout type, define the required condition
- Status: Now, select the status for the rule as:
- Active
- Inactive
- Action: Select “Remove” to delete the rule.

5. Managing Commissions Log
To manage commissions, go to WP Admin Panel > WooCommerce > Affiliate Marketing > Commissions. Here you can track the following details
- User ID
- Username
- Order ID
- Type
- Products
- Total
- Commission Rate
- Commission Earned
- Refunded Status
- Date

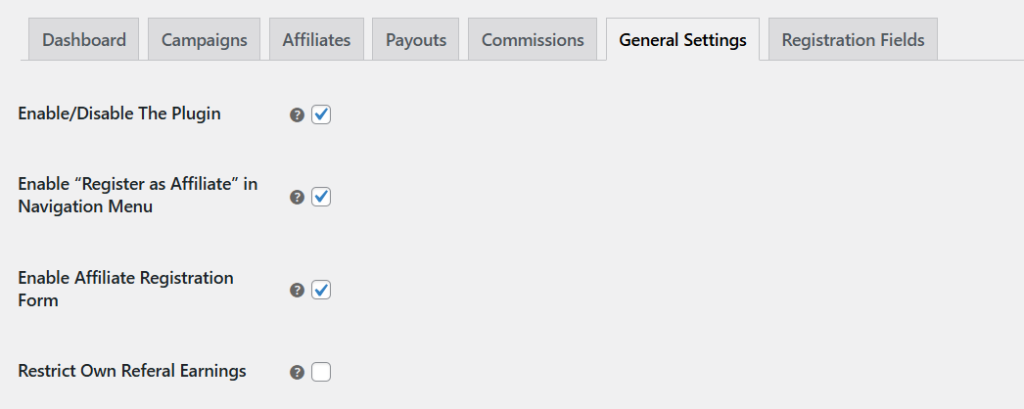
6. General Settings
Go to WP Admin Panel > WooCommerce > Affiliate Marketing and select General Settings. Here you can:
- Enable/Disable the plugin
- Enable “Register as Affiliate” in Navigation Menu: Enable this option to display “Register as Affiliate” link in the navigation menu and allow users to access the affiliate signup page easily.
- Enable Affiliate Registration From: Choose to enable or disable the registration form on my account page.
- Restrict Own Referal Earnings: Enable the option to restrict affiliates from earning commissions on their own purchases
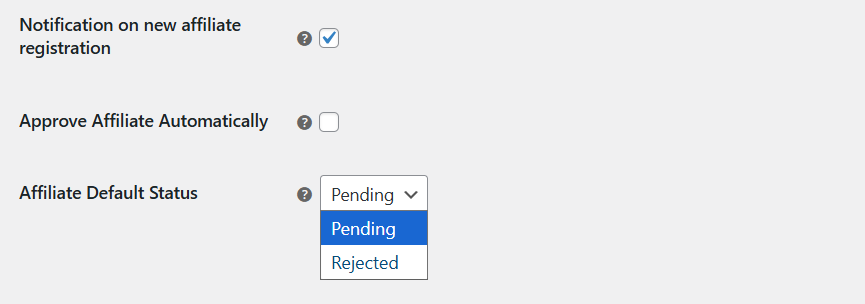
- Notification on New Affiliate Registration: Enable this option to send email notifications to admins whenever a new affiliate registers.
- Approve Affiliate Automatically: Enable the option to approve the affiliates automatically. Disable it if you want to add a default status
- Affiliate Default Status: Select default status for the new affiliate registration forms as:
- Pending
- Rejected
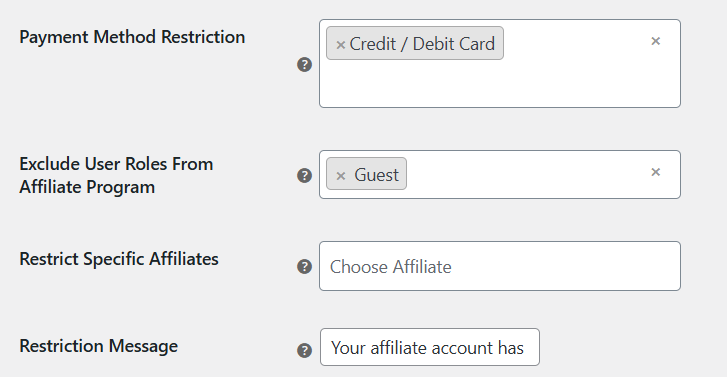
- Payment Method Restriction: Add specific payment methods for affiliate payout transactions
- Exclude User Roles From Affiliate Program: Restrict specifc user roles from affiliate program. Leave it empty to apply to all.
- Restrict Specific Affiliates: Search and add specific usernames of the affiliates you want to restrict from the campaign.
- Restriction Message: Add a custom restriction message that will be displayed on my account page if a user is restricted by admin.
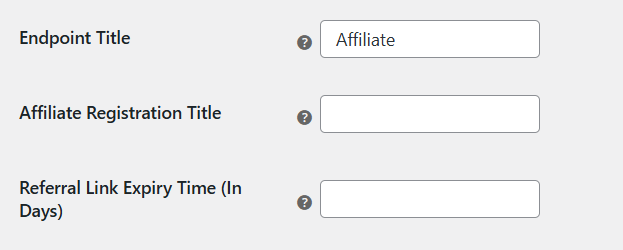
- Endpoint Title: Add a custom tab label to display on my account page
- Affiliate Registration Title: Add a custom header title to display on my account page
- Referral Link Expiry Time: Enter the referral cookie expiry time in days. This will apply to the links generated in My Account Page.
6a. Adding Tiered Commissions
Go to WP Admin Panel > WooCommerce > Affiliate Marketing > General Settings and navigate to Tiered Pricing section. Now fill in the following details:
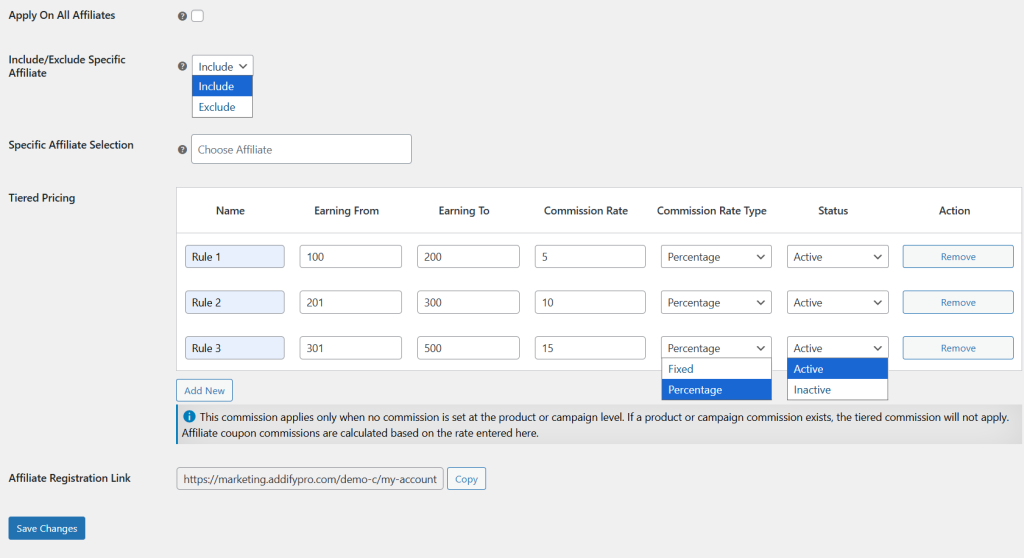
Apply to all affiliates: Enable the option to apply tiered commissions on all products. Disable it if you want to include or exclude specific affiliates.
Include/Exclude Specifc Affiliate: From the dropdown, select include if you want to add a tiered commission for a specific affiliate. Select exclude if you want to remove specific affiliates from tiered commission.
- Tiered Commission: Click on “Add New” and fill in the following details:
- Name: Enter the name for the affiliate
- Earning From: Add minimum earning amount for this tier
- Earning To: Add the maximum earning limit for this tier
- Commission Rate: define the commission amount
- ( If an affiliate’s earnings fall within the defined range, the corresponding commission rate will be applied)
- Commission Rate Type: Now, select the commission rate as:
- Fixed
- Percentage
- Status: select its status as:
- Active
- Inactive
- Action: Click “Remove” to delete any created commission
NOTE: This commission will only apply when no commission is configured at the Product Level. If a commission is already set at the product or campaign level, the tiered commission will be ignored. Affiliate coupon commissions will also be calculated based on the rate defined here.
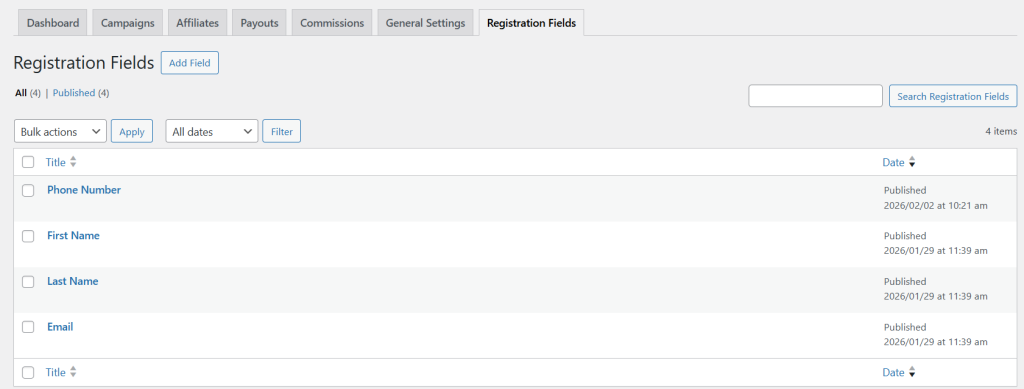
7. Customizing Affiliate Registration Form
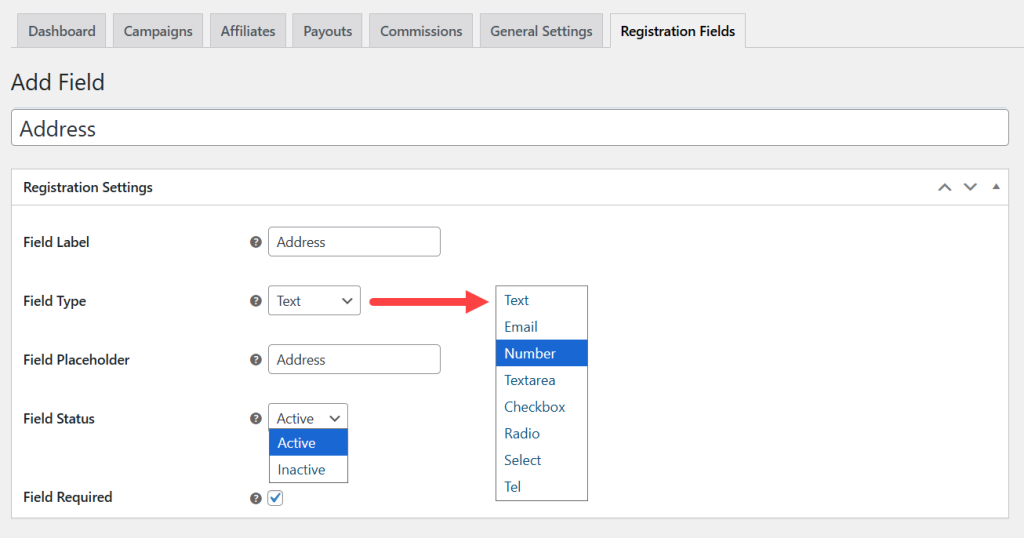
To add affiliate registration form fields, go to WP Admin Panel > WooCommerce > Affiliate Marketing > Registration Fields. Now, to add a new field, select” Add Field” and fill in the following details:
- Field Label: Add a custom label for the field
- Field Type: select its type as:
- Text
- Number
- Textarea
- Checkbox
- Radio
- Select
- Tell
- ( Admins can add details according to each selected field)
- Field Placeholder: add a specific placeholder for the registration field
- Field Status: add its status as:
- Active
- Inactive
- Field Required: Enable the option to make this registration field required. Disable it if you want to make this field optional.
8. Product Level Settings
From product level settings, you can add desired commissions for selected products. Go to WP Admin panel > Products > All products, and from the list select any item for which you want to add a specific commission. Click on Edit, scroll down to Product Data, and select Affiliate Settings. Now, fill in the following details:
- Select User Roles: Select the following user roles that will be eligible to earn affiliate commission on this product:
- Administrator
- Editor
- Author
- Contributor
- Subscriber
- Customer
- Shop manager
- Affiliate
- Guest
- Set Commission Rate Type: Set commission rate type as:
- Fixed
- Percentage
- Set Commission Rate: Enter the desired commission rate for this specifc product
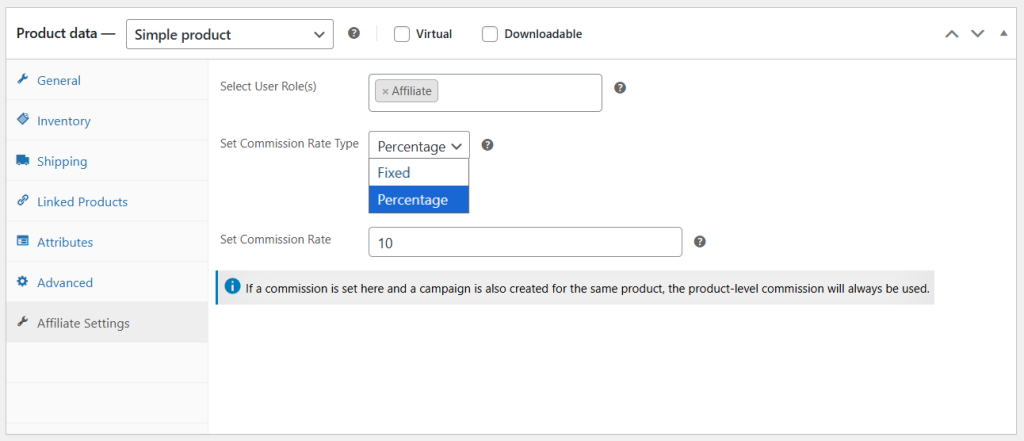
NOTE: If a commission is set here and a campaign is also created for the same product, the product-level commission will always be used.


