Hiding Products, Categories, or CMS Pages
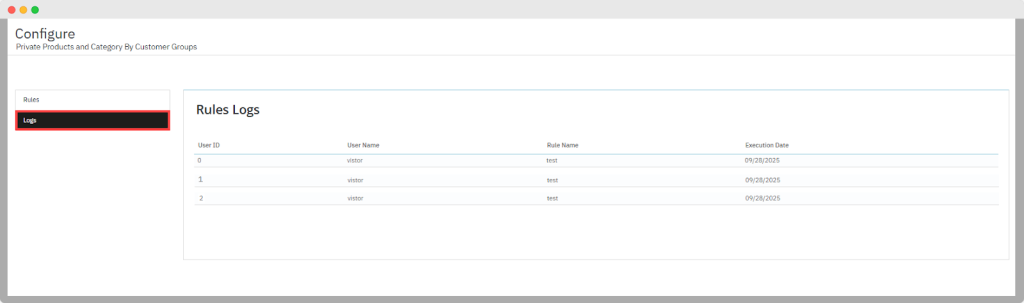
Viewing Restriction Rules in a Log
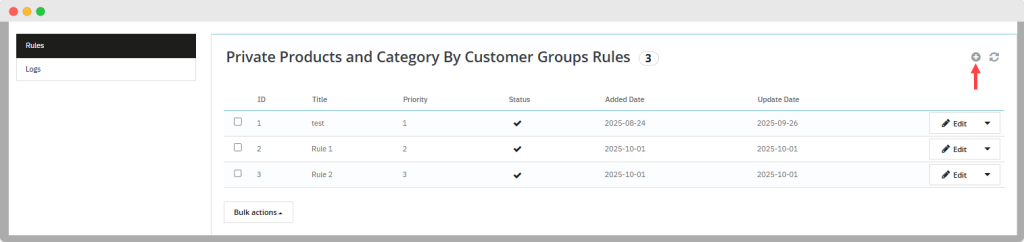
You can view the details of all existing rules in a grid view.
Grid:
- Add New (Add (+) icon): Used to create a new rule.
- Refresh grid (icon): Used to refresh the grid data.
Column name:
- ID: Display the rule ID.
- Title: Display the title of the rule.
- Priority: Show the rule priority.
- Status: Display the rule status, such as active or inactive.
- Added Date: Display the date when the rule is created.
- Update Date: Display the date when the rule is updated.
- Edit (icon): Used to edit the rule if needed.
Creating Multiple Catalog Restriction Rules
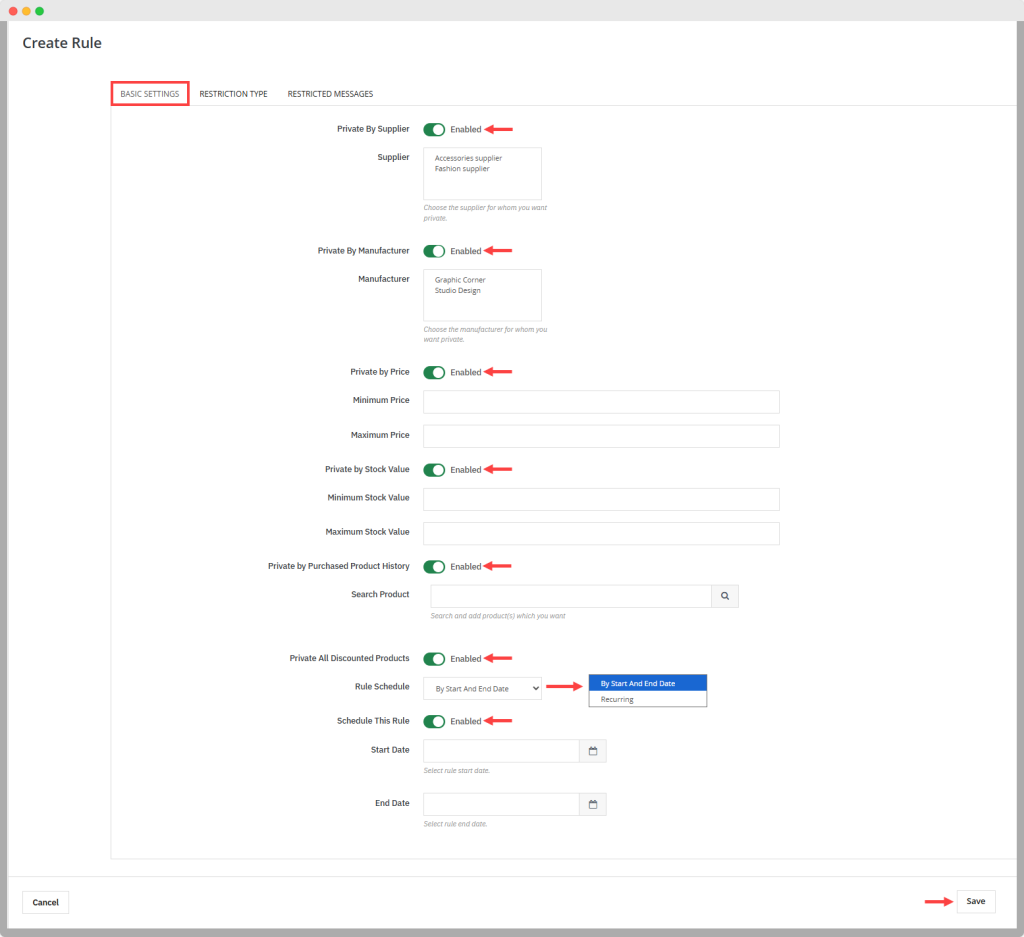
Click on the “Add New” icon, and the system redirects you to the create rule screen, where you can add the following information:
Basic Setting:
- Active: You can enable or disable the rule.
- Title: Add the title of the rule.
- Priority: Set the priority of the rule to handle multiple rules at once.
- Private By-Group: You can enable or disable this option. If enabled:
- ID: Show the ID of the customer group.
- Group name: Display the name of customer group
- Visitor
- Guest
- Customer
You can choose any of the groups along with ID or select all groups simultaneously and restrict them.
- Private By-Product: You can enable or disable this option. In case of enabling the:
- Search Product: The search product fields will be open; you can search and add the product to hide them.
- Private By-Categories:You can enable or disable this option. If enabled:
- Categories: The list of categories will open, where you can select the categories and restrict them.
- Private By-CMS pages: You can enable or disable these pages. In case of enabling, you can:
- CMS Pages home: Select the pages along with the ID and restrict them. You can also restrict all pages at once.

- Private By-Supplier:Enable or disable this option. If enable
- Supplier: The supplier field will be open where you can add the supplier that you want to be private or hide from the customer.
- Private By-Manufacturer:Enable or disable this option. If enable
- Manufacturer: Open the manufacturer field where you can make the manufacturer private or hide it by adding the name of the manufacturer in this field.
- Private By-Price: Enable or disable this option and make the price private. If you can enable this option, add the
- Minimum price: Add the minimum price of the product.
- Maximum price: Add the maximum price of the product.
- Private By-Stock: Enable or disable this option and make the stock details private. If you can enable this option, add the
- Minimum stock value: Add the minimum value of stock.
- Maximum stock value: Add the maximum value of stock.
- Private By Purchase Product History:Enable or disable this option based on your need. If you can enable this option:
- Search Product: Search and add the product from the history and make them private.
- Private All Discount Product: You can enable or disable this option based on your need.
- Reschedule Rule: You can reschedule the rule by selecting the following option in a dropdown:
- Start and End Date: Reschedule the rule by adding the start and end date.
- Recurring: Use for selecting the specific time frame when the rule is scheduled automatically. You can select the following options, such as
- Every first week of month
- Every last week of month
- Every first day of the month
- Every last day of the month
- Every selected day of the month
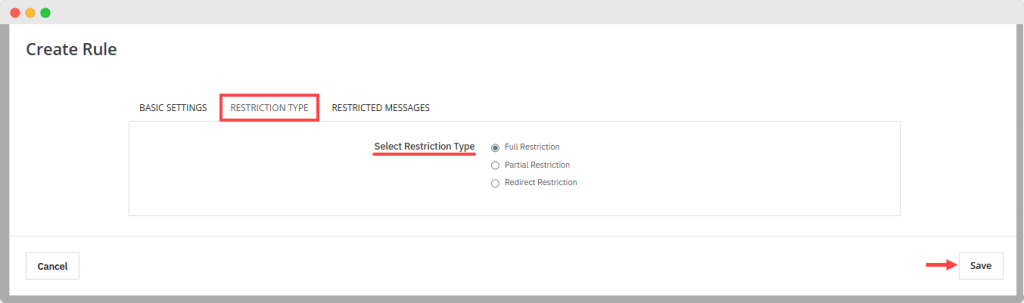
Restriction Type:
You can select the restriction type based on your requirements. You can choose
- Full Restriction: Select this if you want to restrict the whole product, category, or CMS pages.
- Partial Restriction: Select this option when you want to restrict the limited product, categories, or CMS pages. After selecting this, the following fields will open:
- Restriction: You can restrict the “Add to cart” button or the “Price and add to cart button” by selecting the value in a dropdown.
- Additional Restriction: You can add the product image, description, and name in this field and restrict them.
- Redirect Restriction: You can redirect the user to another page instead of displaying the restriction messages. For redirection, you can add the:
- Redirect URL: Add the custom URL for redirection.
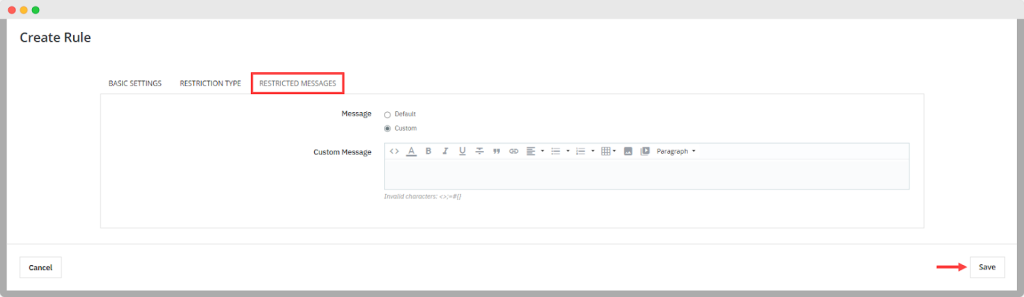
Restriction Message:
You can display the restricted message when the customer tries to access the restricted product, category, or CMS pages. You can set the two options:
- Default: Display the default message that is added to the system.
- Custom: Add the custom message based on your preference.
Save: Click on the save button to apply them.
Logs
Click on the logs option on the side menu, where you can view the following details in a grid view.
Grid:
- User ID: View the ID of the user.
- User name: View the name of the user.
- Rule name: View the name of the created rule.
- Execution Date: View the date of rule execution.