Creating A New Gift Card
Click on “Add New” to create a custom gift card.
You can easily create a new gift card by clicking on All Products.
Fill in the product data, choose the Gift card option from the drop-down menu, and now customize the following gift card options:
- Type of Gift Card: Create a physical gift card or make a virtual e-gift card by checking the box
- Enable Gift Card Value: Enter gift card value (The gift card coupon will be generated using this amount)
- Upload Custom Image: Enable the checkbox to allow customers to upload custom images for virtual gift card only
- Enter Button label: Add button label for custom image field
- Product As Gift: Enable the option to allow users to send products from your store as a gift
- Custom Amount: Enable checkbox to allow customers to enter custom gift card amount
- Min. Custom Amount: Set minimum amount limit
- Max. Custom Amount: Set maximum amount limit
Note: If “Custom Amount” is not enabled, you can offer discounts (Discount option does not work with custom amounts at the moment)
- Discount Type: Offer discount using the following option:
- None: No discount
- Fixed: Offer a fixed amount of discount
- Percentage: Offer a percentage discount (percentage of the original amount)
- Discount Amount: Enter discount amount to calculate percentage or fixed price
- Gift Card Coupon Expiry Date: Add a gift card coupon expiry date.
- Restrict Gift Card by User Roles: Select user roles for which you want to restrict gift cards.
- Gift Card Discount Applicable To: Choose products and categories to apply discounts:
- Products: Select the products to apply discounts.
- Categories: Select the category to apply discounts.
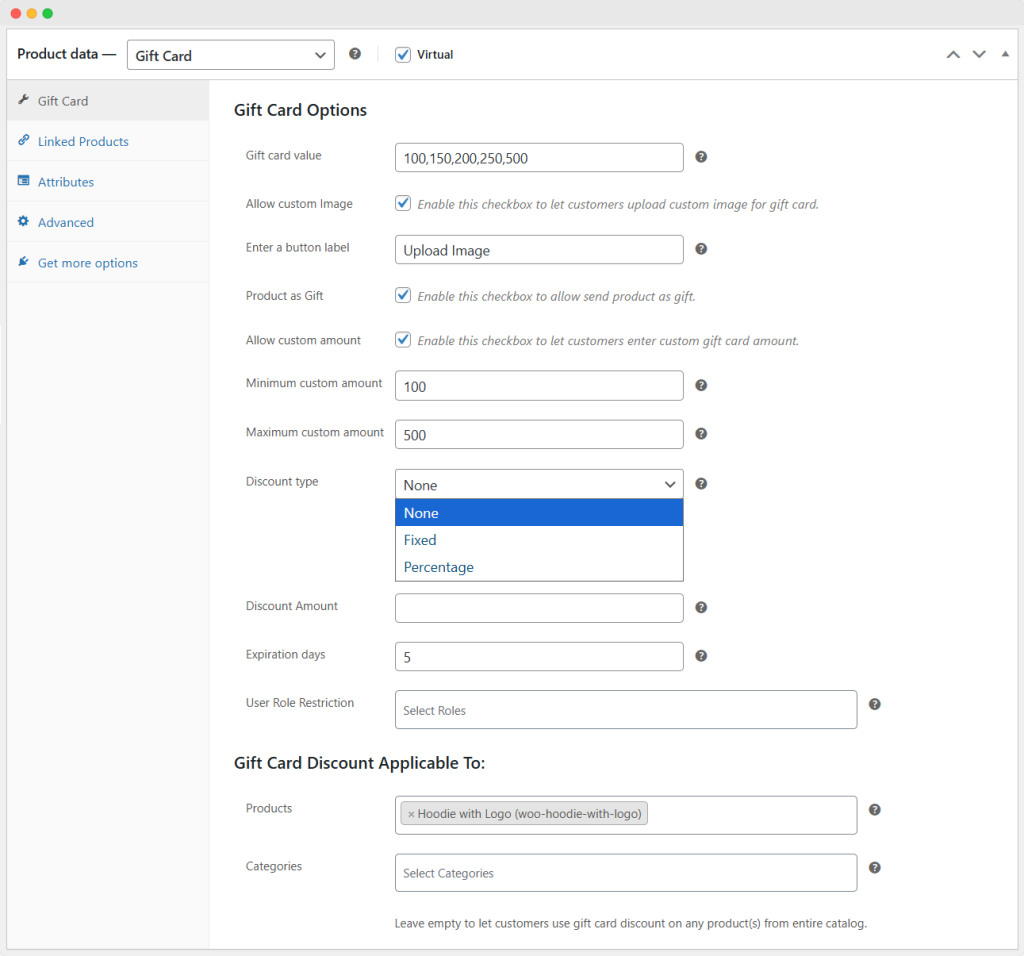
Note: Leave the fields empty to let customers use gift card discounts on any product(s) from the entire catalog.
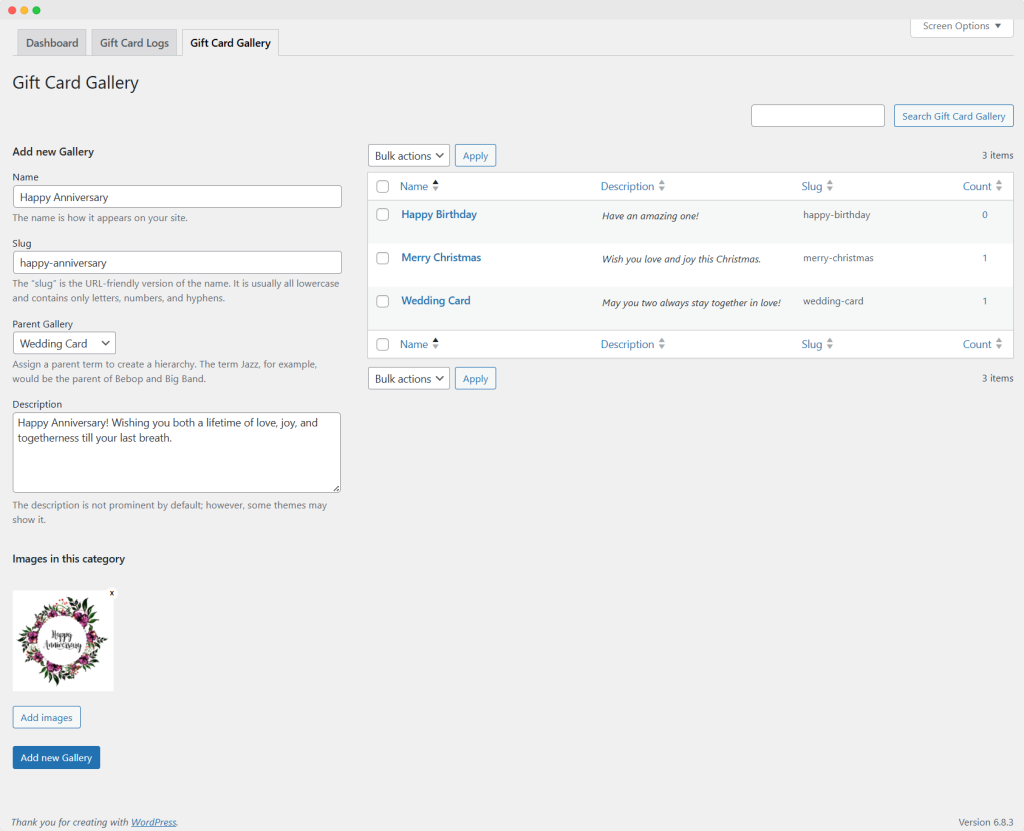
Creating a New Gift Card Gallery
Go to Products > Gift card Gallery to create a new gift card gallery. Configure the following options to get started:
- Name: Add a name that will appear on the site
- Slug: URL-friendly version of the name
- Parent Gallary: Choose a parent gallery from the list
- None
- Gift Card
- Birthday
- Christmas
- New Year
- Description: Add a description for the gallery
- Images: Add images in this category as you like
When you are done, click “Add New Gallery.”
Note: Once a gallery is created, you can make changes to it as required.
Viewing Gift Card Details
Go to WooCommerce > Gift Cards > Dashboard. From the dashboard, you can see the complete information of gift cards.
From the dashboard, you can see the Total Gift Cards (total number), Used Amount, Remaining Amount, and Total Amount at the top.
You can also view the complete list of each gift card on the dashboard. The details of each gift card include:
- Gift Card Codes
- Gift Card Names
- Gift Card Recipient
- Used Amount
- Remaining Amount
- Total Amount
- PDF Download Links
By clicking the gift card codes, you can see the nature of the gift card (physical or virtual), its status, and available balance. Other details include:
- Issued: Date of gift card issuance (year-month-time)
- Issued Amount: The price of the gift card
- Purchased Order: Order number (click the number to see order details)
- Redeemed Date: Date when the gift card is used in year-month-time
By clicking the order number, you can view the following order details:
- From: The card sender’s name
- To: The recipient’s name/email
- Message: Custom message
- Delivery date: Date of delivery (year-month-date)
- Expiry: Date of expiry (year-month-time)
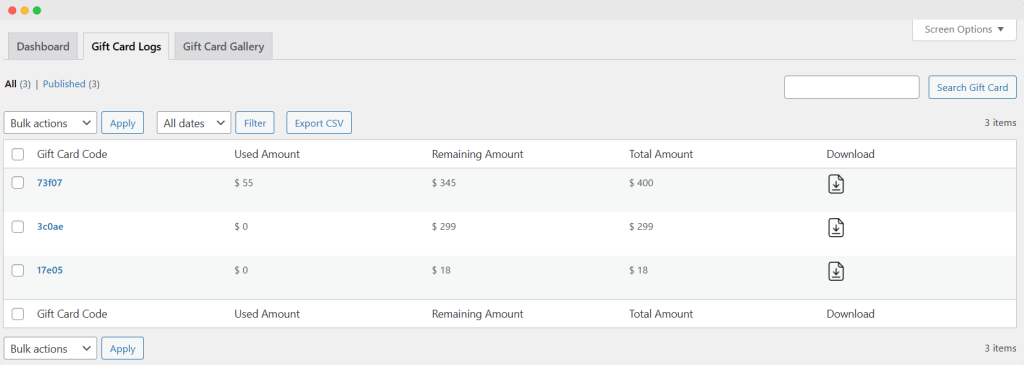
Viewing Gift Card Usage Information
Go to WooCommerce > Gift Card > Gift Card Log to view the gift cards that customers have purchased. In the Gift Card Logs, you can view the following list of information:
- Gift Card Codes: Code for each card (Clicking these shows detailed gift card info)
- Used Amount: Amount used by gift card recipient
- Remaining Amount: Balance amount
- Total Amount: Total amount collected
- PDF Download Link: PDF download link for each card
Customizing a Virtual Gift Card
Go to WooCommerce > Settings > Gift Card > Virtual Gift Card to customize a virtual e-gift card. The customization options include:
- Gift Card Gallery: Enable the gift card gallery to add an additional gallery to any gift card and set its custom title
- Title: Enter custom title for gift card gallery field
- Delivery Section: Set delivery settings from the following options:
- Title: Enter a title for this section
- “Email” checkbox Label: Enter a label for the email checkbox
- Required Field: Check the field to make email mandatory
- “Print At Home” checkbox label: Enter a label for print at the home checkbox
- Recipient Section
- Title: Enter a title for this section
- Enable Another Recipient: Check to enable another recipient option
- Text for Another Recipient Option: Enter a title for another recipient option
- Required Field: Check the option to make full name mandatory
- Required Field: Check the option to make email mandatory for recipient
- Sender Section
- Enable Sender Name: Check to enable the sender name
- Title: Enter a title for this section
- Required Field: Check the option to make message field mandatory
Click on “Save Changes” when you are done.

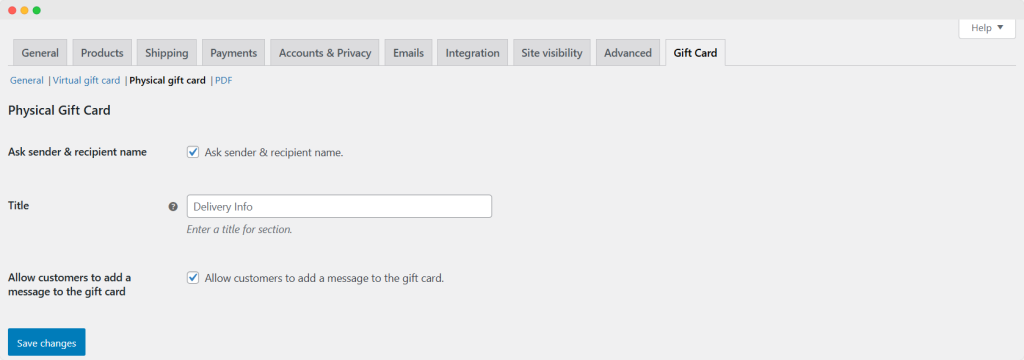
Customizing the Physical Gift Card
Go to WooCommerce > Settings > Gift Card > Physical Gift Card to customize a physical gift card. Use the following options to configure the Physical Gift Card settings:
- Ask Sender & Recipient Names: Enable this checkbox to ask sender & recipient names and enter a custom title for this section
- Allow Customers to Add a Message to the Gift Card: Enable this to allow customers to add a printed message to their gift card
Click on “Save Changes” when you are done.
Generating a PDF for Gift Cards
Go to WooCommerce > Settings > Gift Card > PDF to configure PDF gift card settings. These settings include:
- Store Name: Enable this setting to add a store name
- Store name
- Store Logo: Checkmark to enable the store logo and upload image
- Gift Card Image: Checkmark to enable Gift Card image
- Gift Card Name: Checkmark to enable Gift Card name
- Gift Card Price: Checkmark to enable Gift Card price
- Coupon Code: Checkmark to enable Gift Card code
- Gift Card Message: Checkmark to enable Gift Card Message
- Enter Gift Card Message
- Disclaimer: Checkmark to enable the disclaimer
- Disclaimer Text
Select Date Format: From the dropdown, choose preferable date format
- PDF File Name: Add a label for Users to enter pdf file name
- PDF email Prefix: Add prefix name here

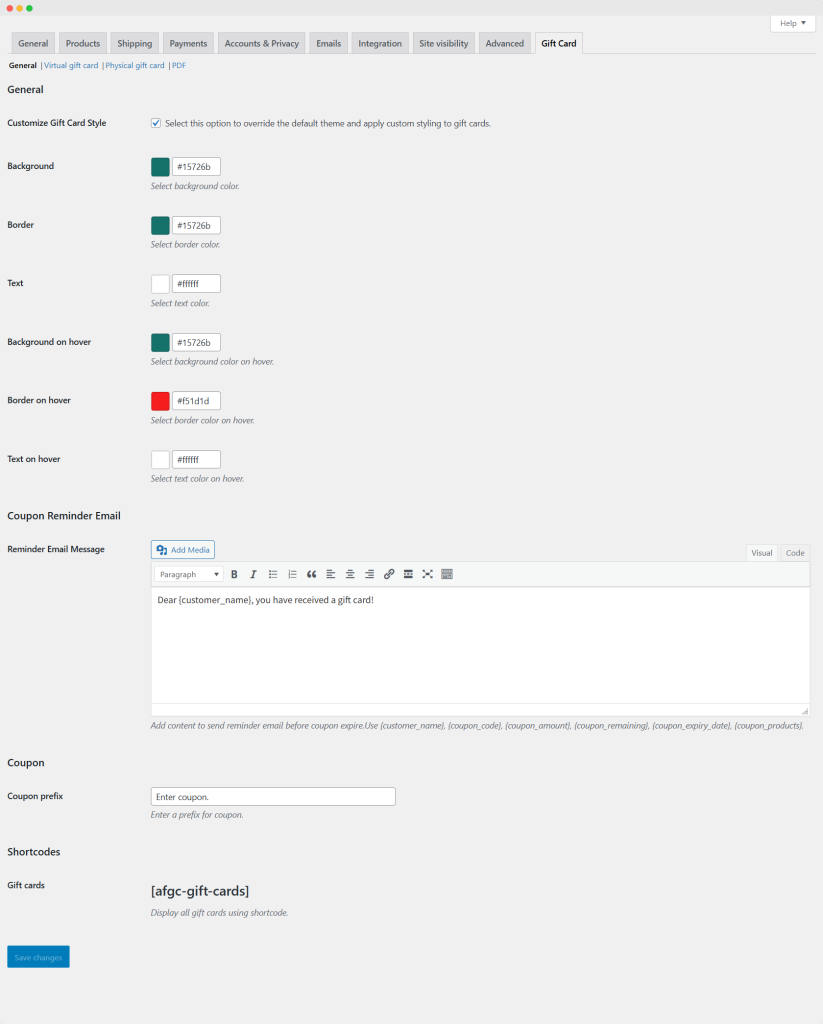
Customizing Gift Card Appearance
The plugin allows you to easily customize the appearance of gift cards on your store according to your requirements.
Go to WooCommerce > Settings > Gift Card > General. You have the option to change the default theme styling for the customer gift card in the general settings.
Select the ‘Customize Default Theme’ checkbox for custom settings.
- Background Color
- Border Color
- Text Color
- Background Hover Color
- Border Hover Color
- Text Hover Color
- Coupon Prefix
- Shortcodes: Display all gift cards using shortcodes
To list all of your gift card products, copy and paste shortcodes onto any page.
Click “Save Changes” when you are done.
Displaying (Send Product as a Gift) Option on Product Pages
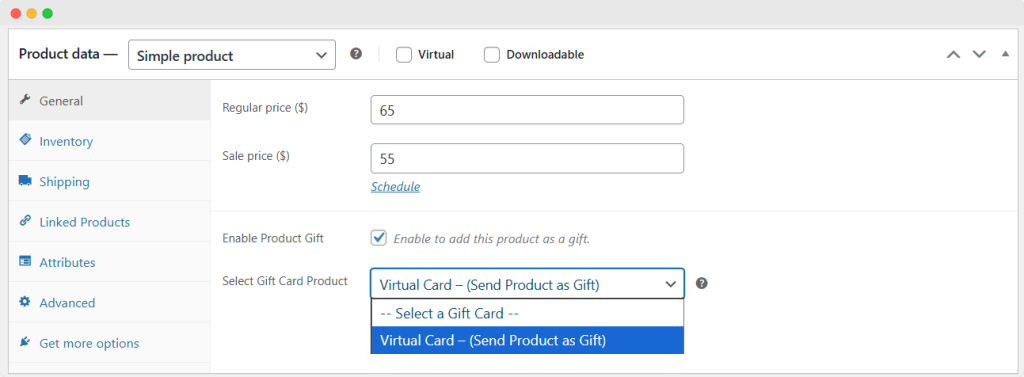
Once you’ve created a virtual gift card, you can also make any item from your store available to be sent as a gift. Go to your WP Admin Panel > Products > All Products. From the list, locate the item for which you want to enable “send as a gift” option. Click on “Edit” and then follow these steps:
- Scroll down to Product Data
- Click on General Settings
- Enable Product Gift: Enable the option to make selected item available to be gifted along with the gift cards.
- Select gift card product: From the dropdown, select the gift cards you’ve created. This item will only be available on that specific card.
- Now visit the frontend of your store, navigate to this gift card, and here you can see that the selected product is available for customers to be sent as a gift.
Note: This feature only works for virtual gift cards.