Configuration of Smart Customer Manager for WooCommerce
Viewing Customer Info in a Single Interface
Go to WooCommerce > Customer Manager > Customer Details.
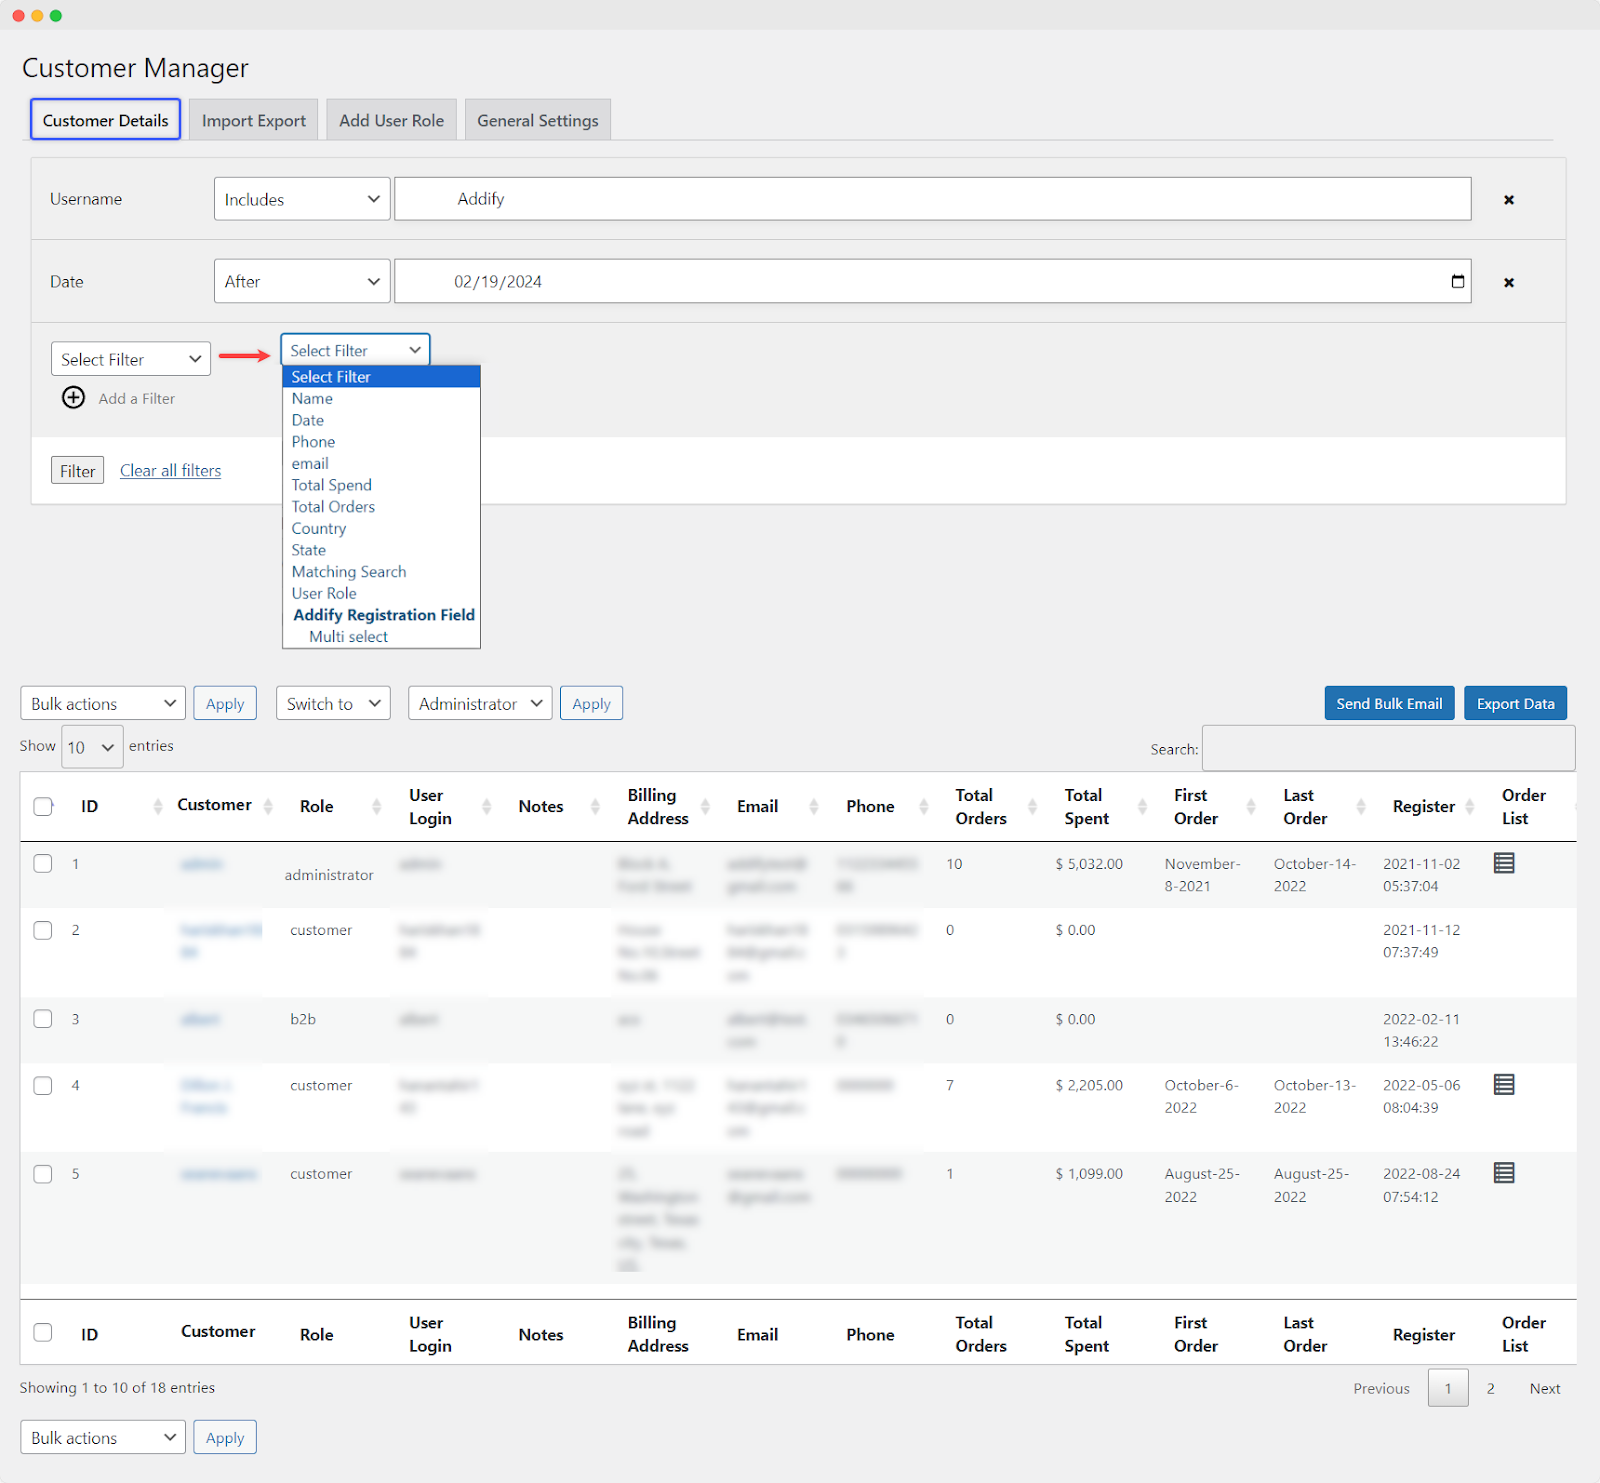
Filtering Customers:
Click on “Add a Filter” to begin filtering customers based on various criteria.
Choose from a range of options such as:
- Name
- Date
- Phone
- Total Spend
- Total Orders
- Country
- State
- Matching Search
- User Role
- Addify Registration Field
- Multi Select
Apply filters based on customer personal and order details, or search for specific customers using the search bar.
Viewing Customer Information:
Once filtered, view the details of each customer in a table format.
- Customer information includes ID, email, and user roles.
- Access user contact details, billing information, and registration dates.
- Explore the total number of orders and total amount spent by each customer.
- View the complete order history for each customer.
- Identify the date of the first and last order for each user.
Bulk Actions:
- Perform bulk actions on selected customers.
- Separate lists of guest and registered users are available from the search field.
- Delete customers in bulk or add new users as needed.
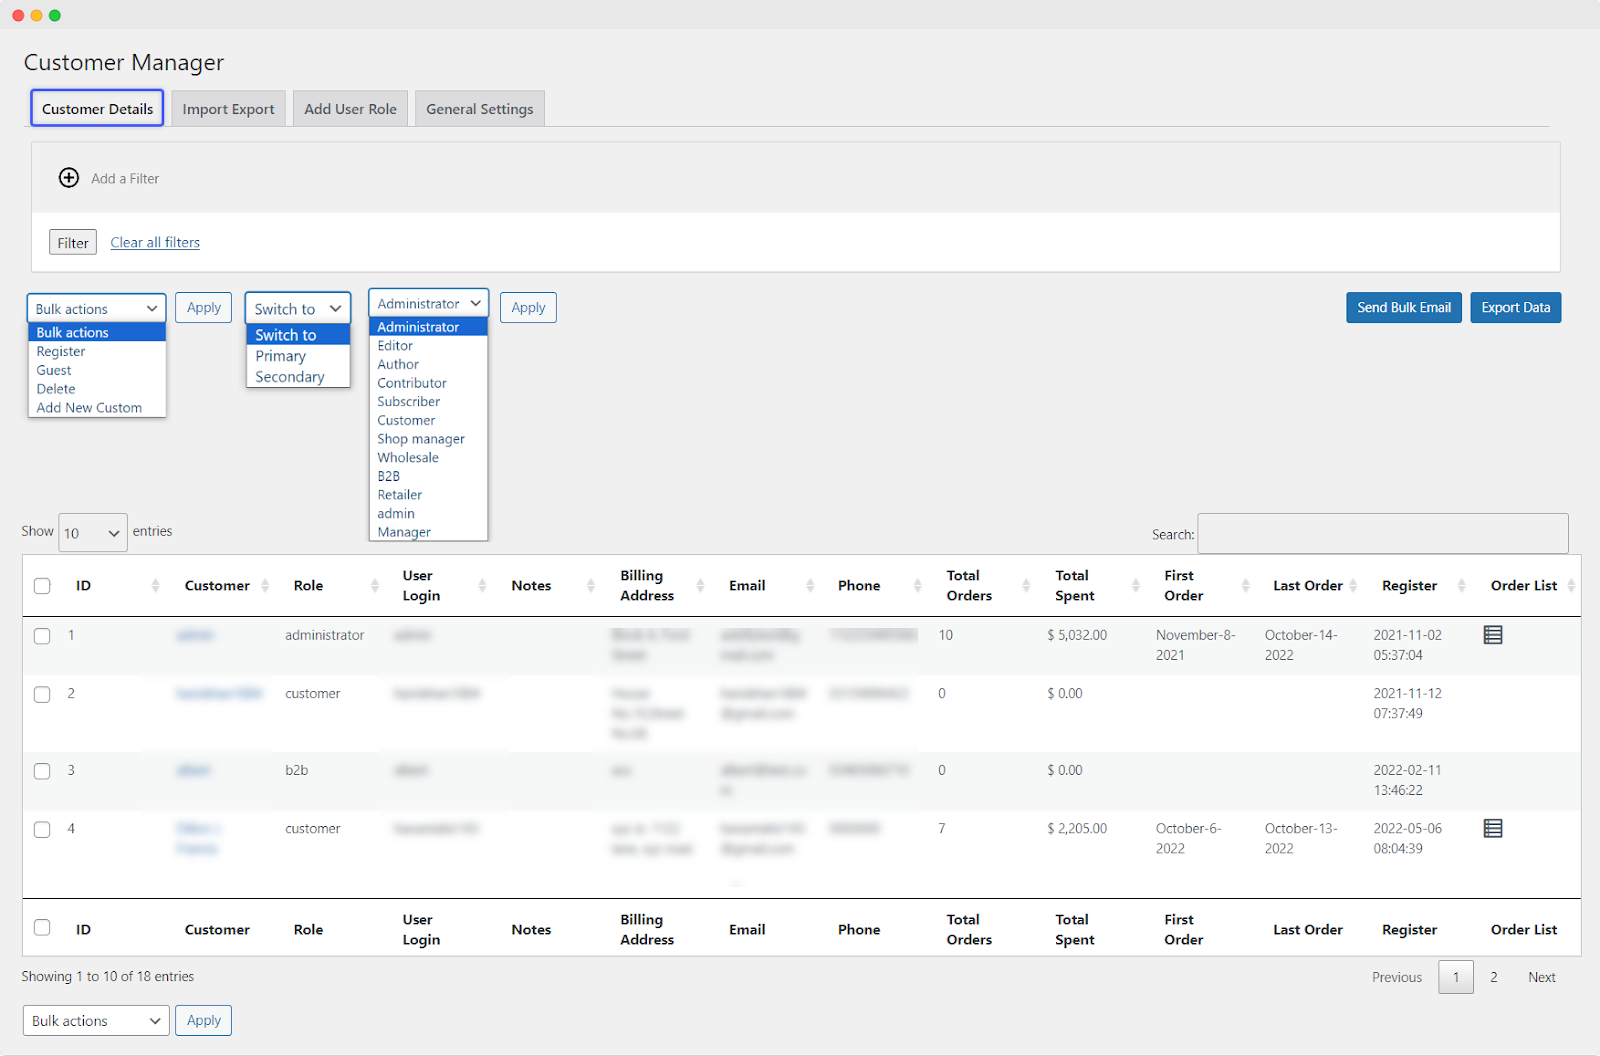
Switching User Roles:
- Easily switch user roles of desired customers.
- View all customers in one place and manually convert user roles either in bulk or one by one.
- Choose the roles you wish to switch and select from a dropdown of user role options to switch roles with a single click.
Sending Bulk Emails to Customers
Go to WooCommerce > Customer Manager > Customer Details.
Within the Customer Details interface, locate the option labeled “Send Bulk Email”.
Click on “Send Bulk Email” to initiate the email sending process.
- A popup window will appear, prompting you to provide the following details:
- Subject of the Email: Enter a concise and descriptive subject line for your email.
- Text: Compose the body of your email. You can utilize available placeholders to personalize your message. Placeholders may include customer-specific information like name, order details, or any other relevant data.
Once you have entered the subject and text for your email, click on the “Send” button to dispatch the email to all selected customers.

Importing/Exporting Customer Data in Bulk
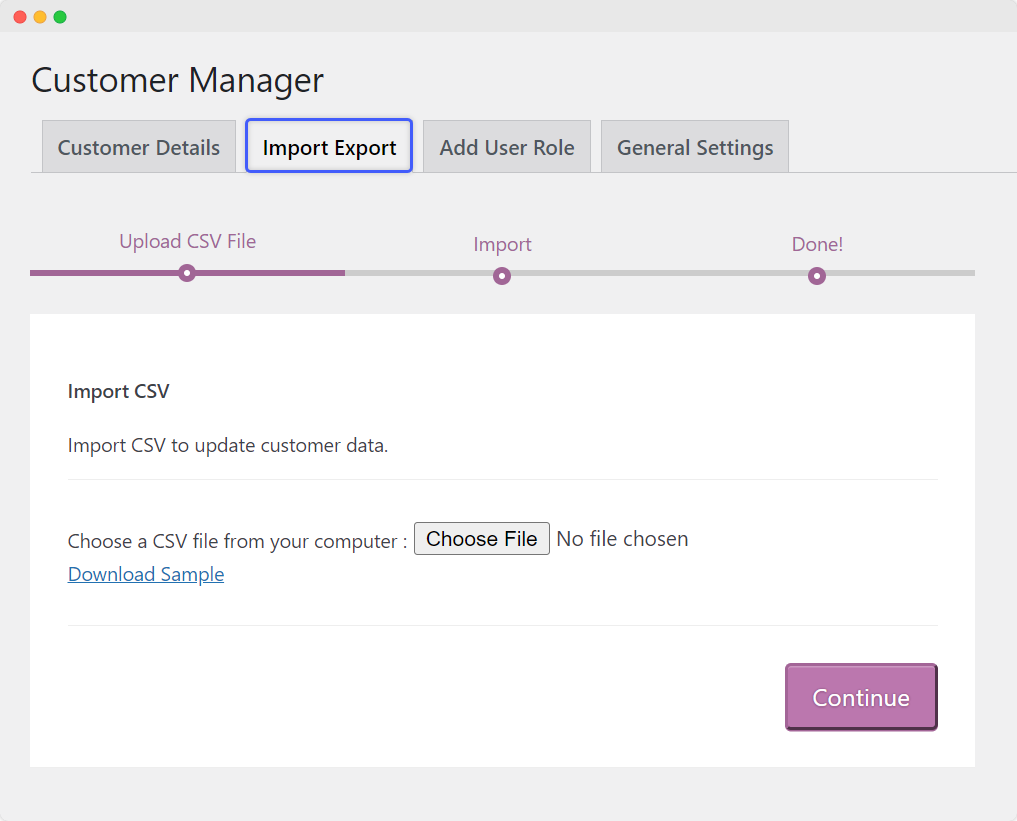
Go to WooCommerce > Customer Manager > Import Export.
Within the Import Export section, you’ll find options to import or export customer data.
Importing Customer Data:
- If you choose to import, you’ll typically be prompted to upload a CSV file containing the customer data you wish to import.
- Ensure that the CSV file follows the required format for importing customer data. This format may include specific columns for customer information such as name, email, address, etc.
- Once you’ve selected the CSV file, proceed with the import process. The plugin will process the file and import the customer data into your WooCommerce store.
Exporting Customer Data:
- To export the customer data in bulk, go to customer details section and click on “Export Data” button.
Adding New User Roles
Go to WooCommerce > Customer Manager > Add User Role.
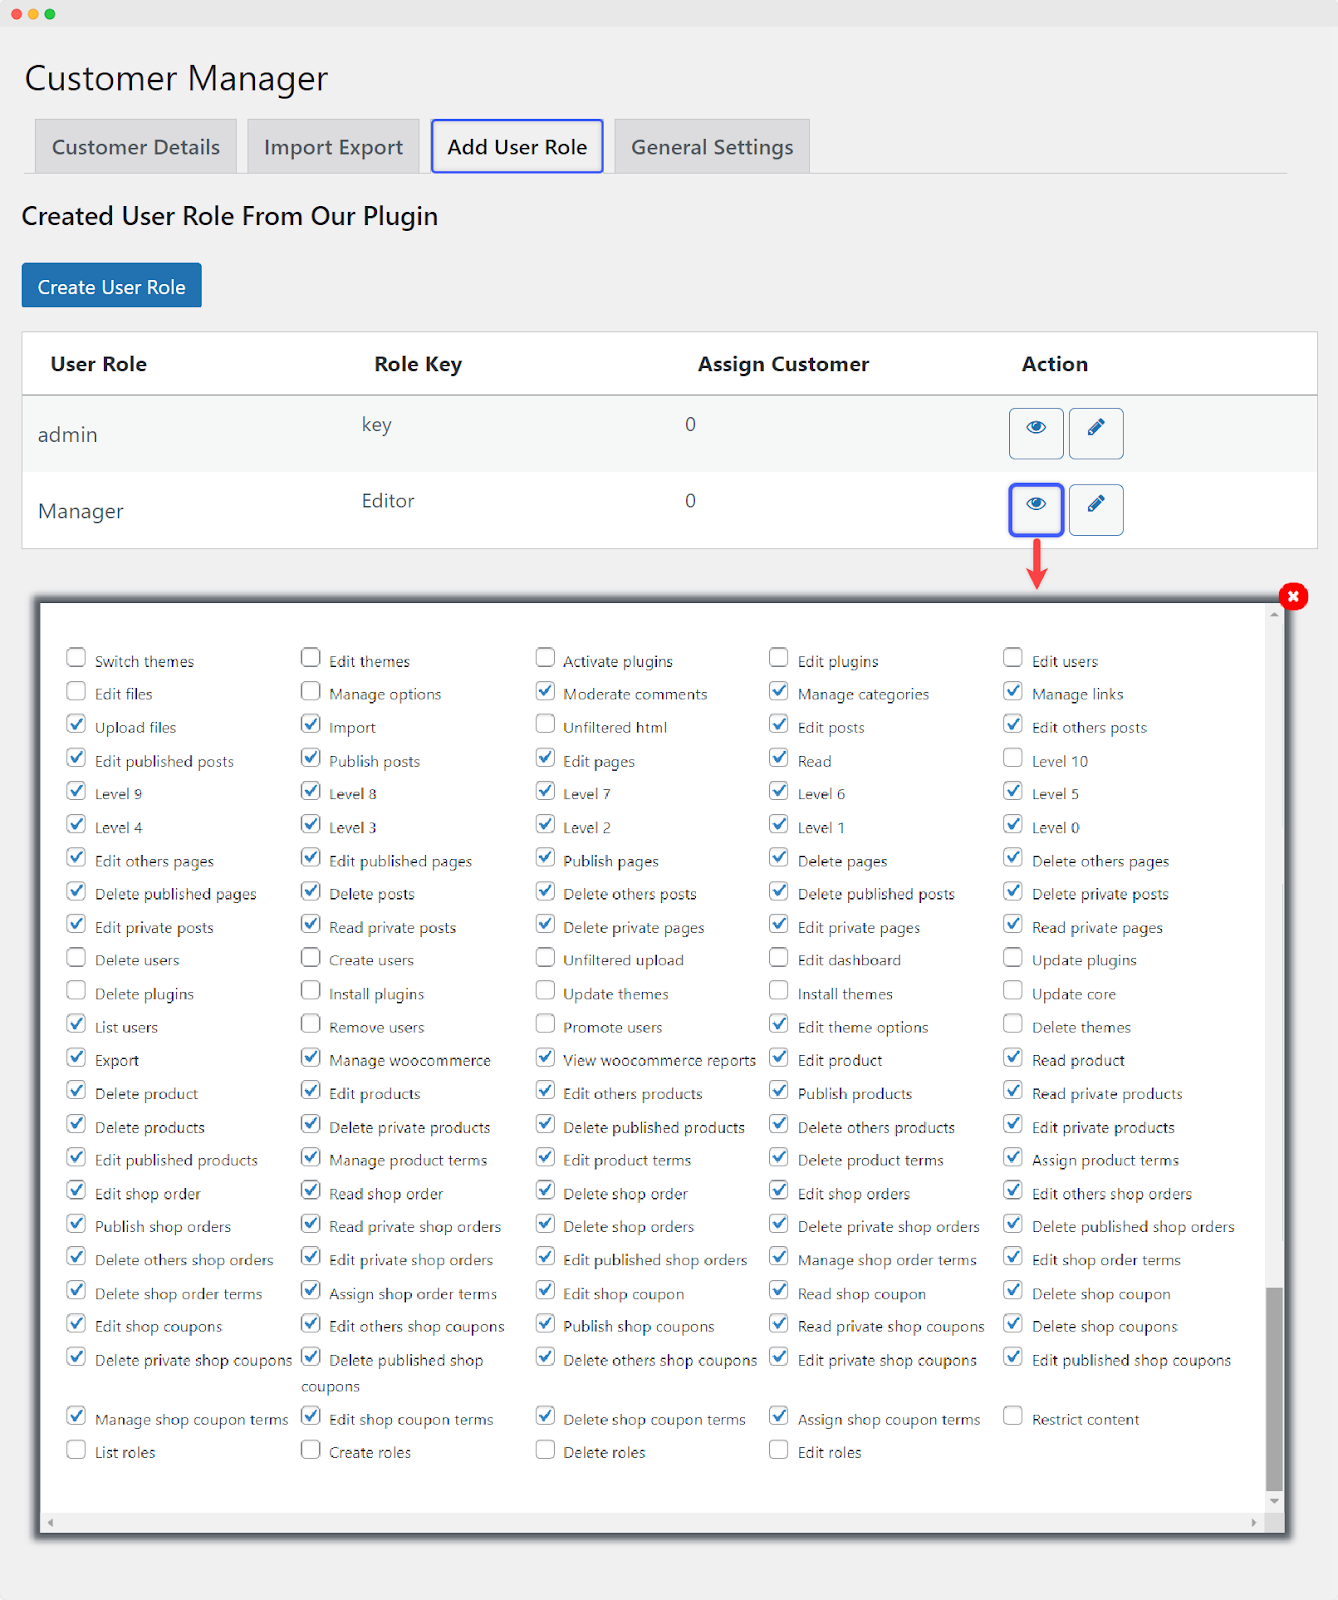
Upon accessing the Add User Role section, you’ll typically see a log displaying all existing user roles.
Creating a New User Role:
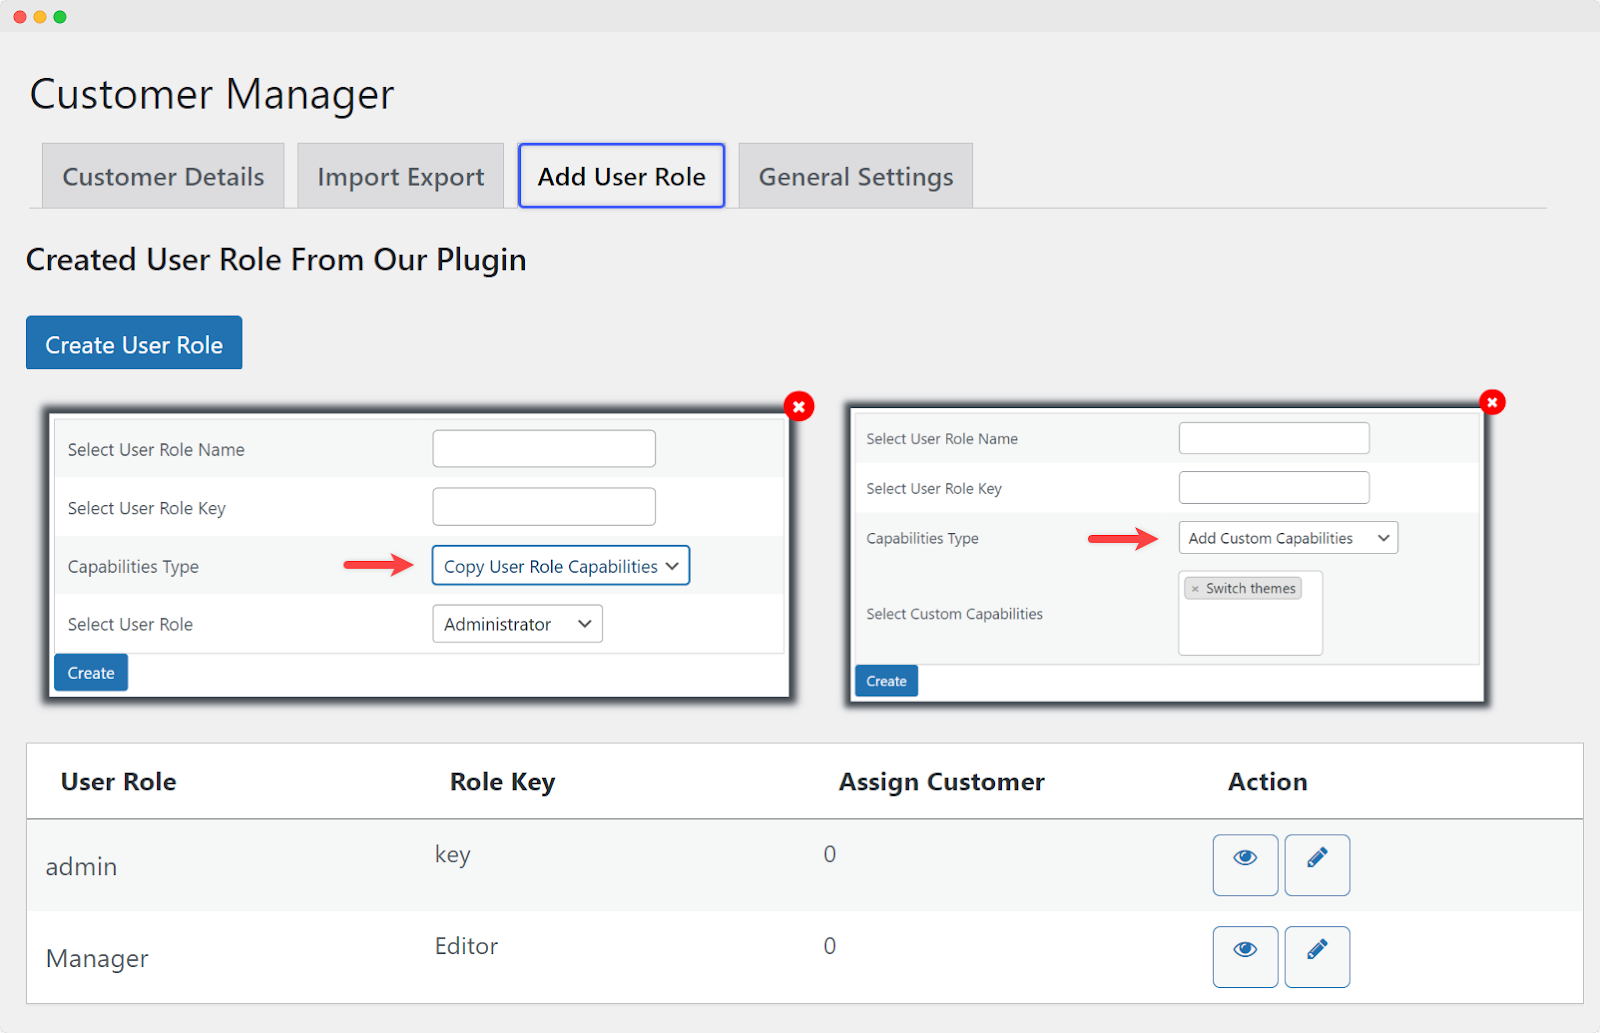
To create a new user role, click on the “Create User Role” button.
A new popup window will appear, prompting you to provide the following details:
- Select User Role Name: Enter a name for the new user role. This name should be descriptive and indicative of the role’s purpose.
- Select User Role Key: Enter a unique key for the user role. This key is used internally by WordPress to identify the user role.
- Capabilities Type Dropdown: Choose the type of capabilities for the user role. You’ll typically have two options:
- Copy User Role Capabilities: Select an existing user role from the dropdown to copy its capabilities. This option is useful if you want the new role to have similar permissions to an existing role.
- Add Custom Capabilities: If you prefer to define custom capabilities for the new role, choose this option.
- Select Custom Capabilities: Specify the custom capabilities you want to assign to the new user role. This allows you to tailor the permissions of the role according to your specific requirements.
Configuring the Customer Table As Per Choice
Go to WooCommerce > Customer Manager > General Settings.
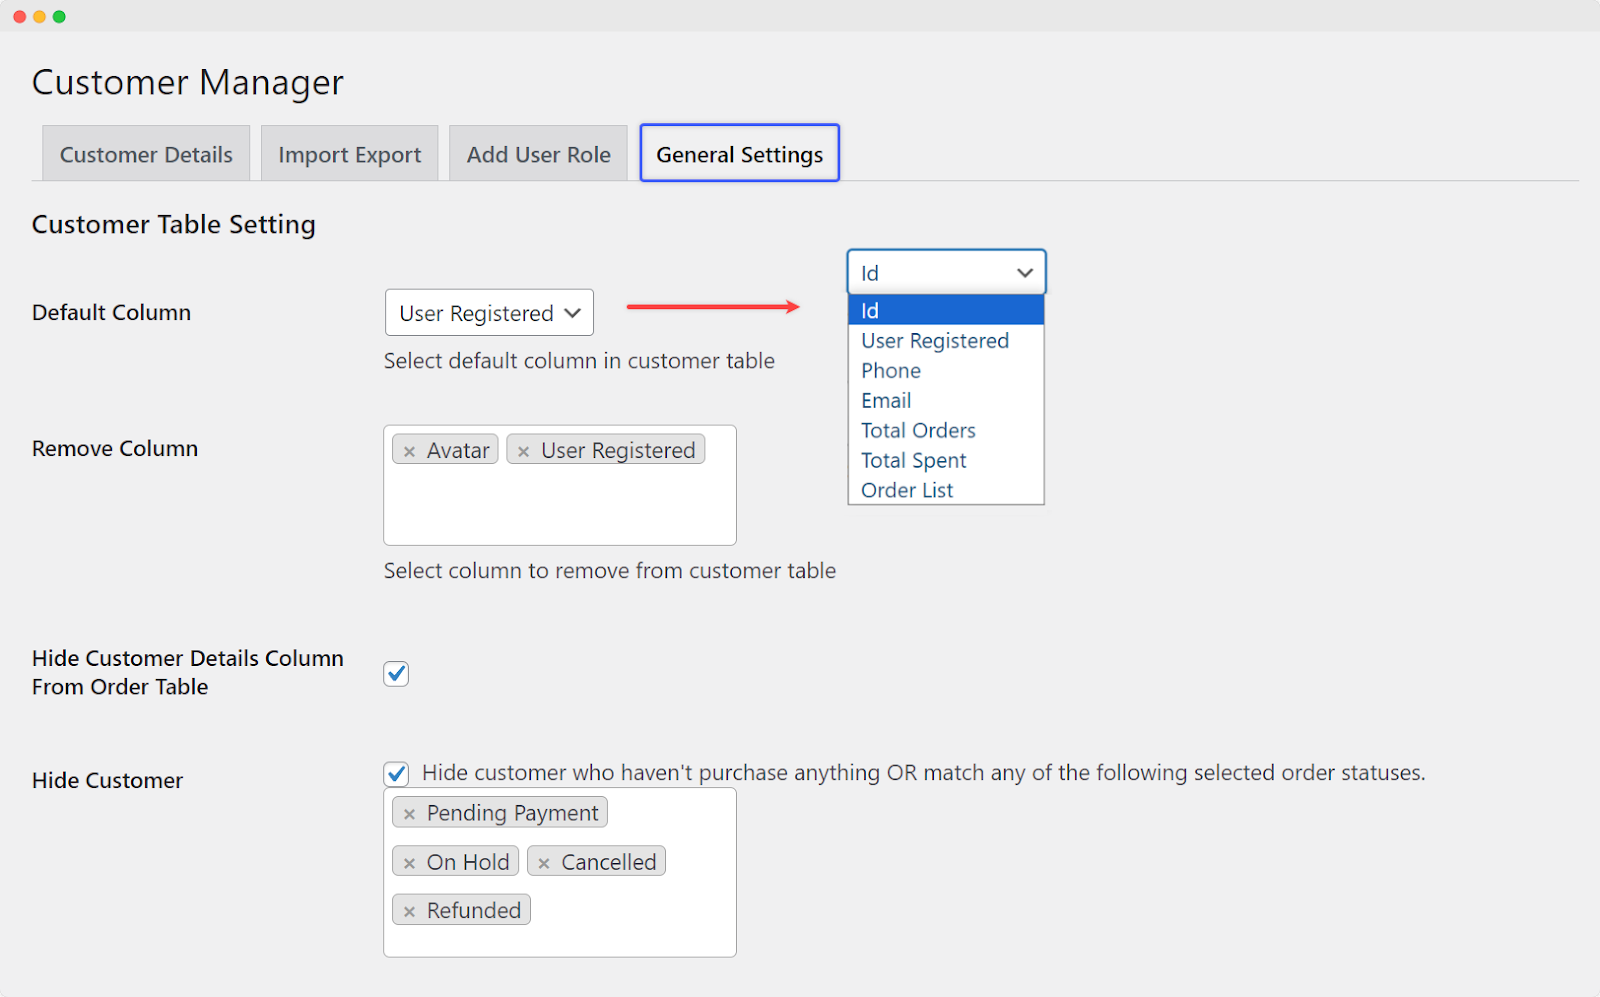
Customer Table Setting:
Default Column: Select the default column to be displayed in the customer table. Options typically include:
- Id
- User Registered
- Phone
- Total Orders
- Total Spent
- Order List
Remove Column: Choose columns to remove from the customer table.
Hide Customer Details Column From Order Table: Checkmark this option to hide customer details from the order table.
Hide Customer: Checkmark this option to hide customers who haven’t made any purchases or match specific order statuses. You can select from order statuses such as:
- Pending Payment
- Processing
- On Hold
- Completed
- Cancelled
- Refunded
- Failed
- Draft
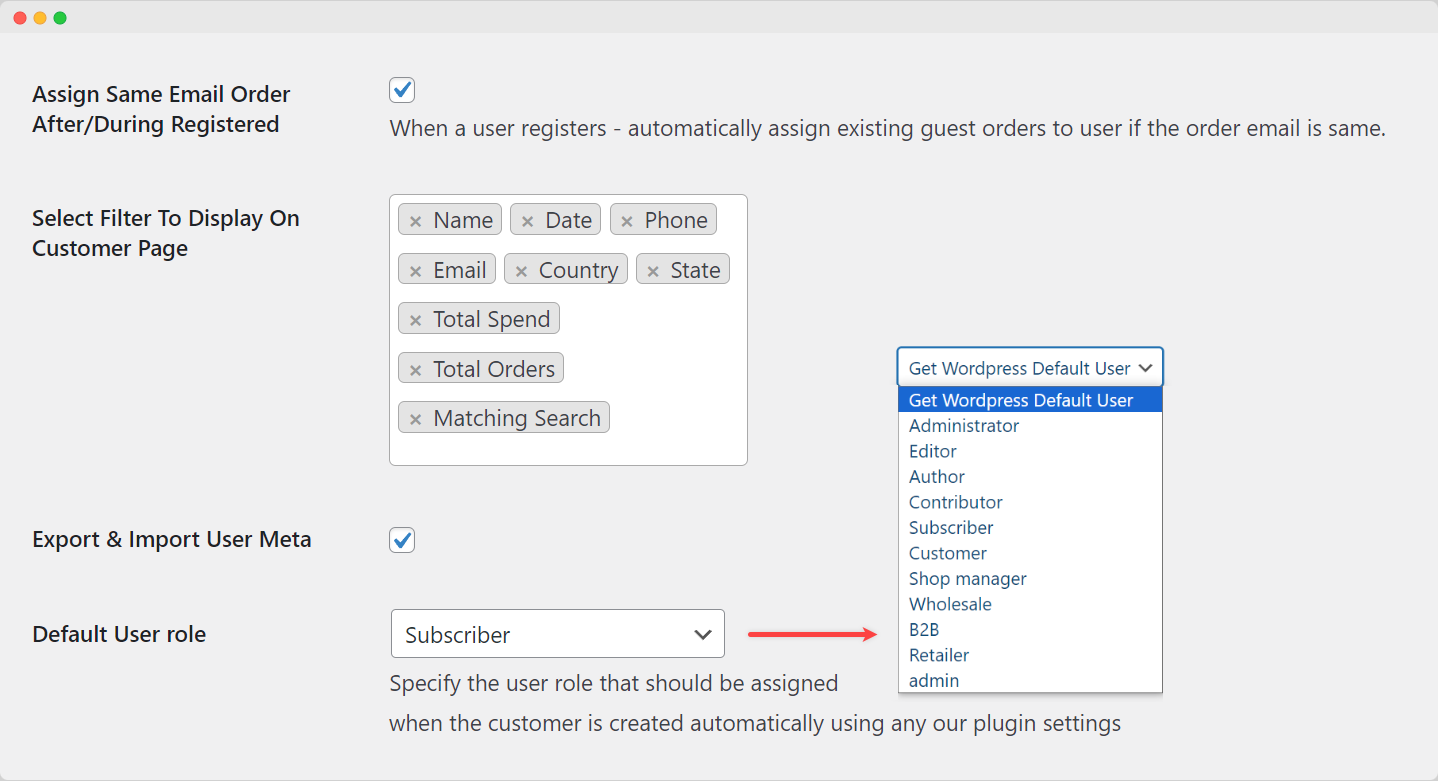
Assign Same Email Order After/During Registered: Enable this option to automatically assign existing guest orders to a user if the order email matches the registered user’s email.
Select Filter To Display On Customer Page: Choose the filter criteria that you want to display on the customer page.
Export & Import User Meta: Check this box to enable the export and import of user meta data.
Default User Role: Specify the default user role that should be assigned when a customer is created automatically using any of the plugin’s settings. Options typically include:
- WordPress Default User
- Administrator
- Editor
- Author
- Contributor
- Subscriber
- Customer
- Shop Manager
- Wholesale
- B2B
- Retailer
- Manager
Converting Guest Users to Customers Automatically
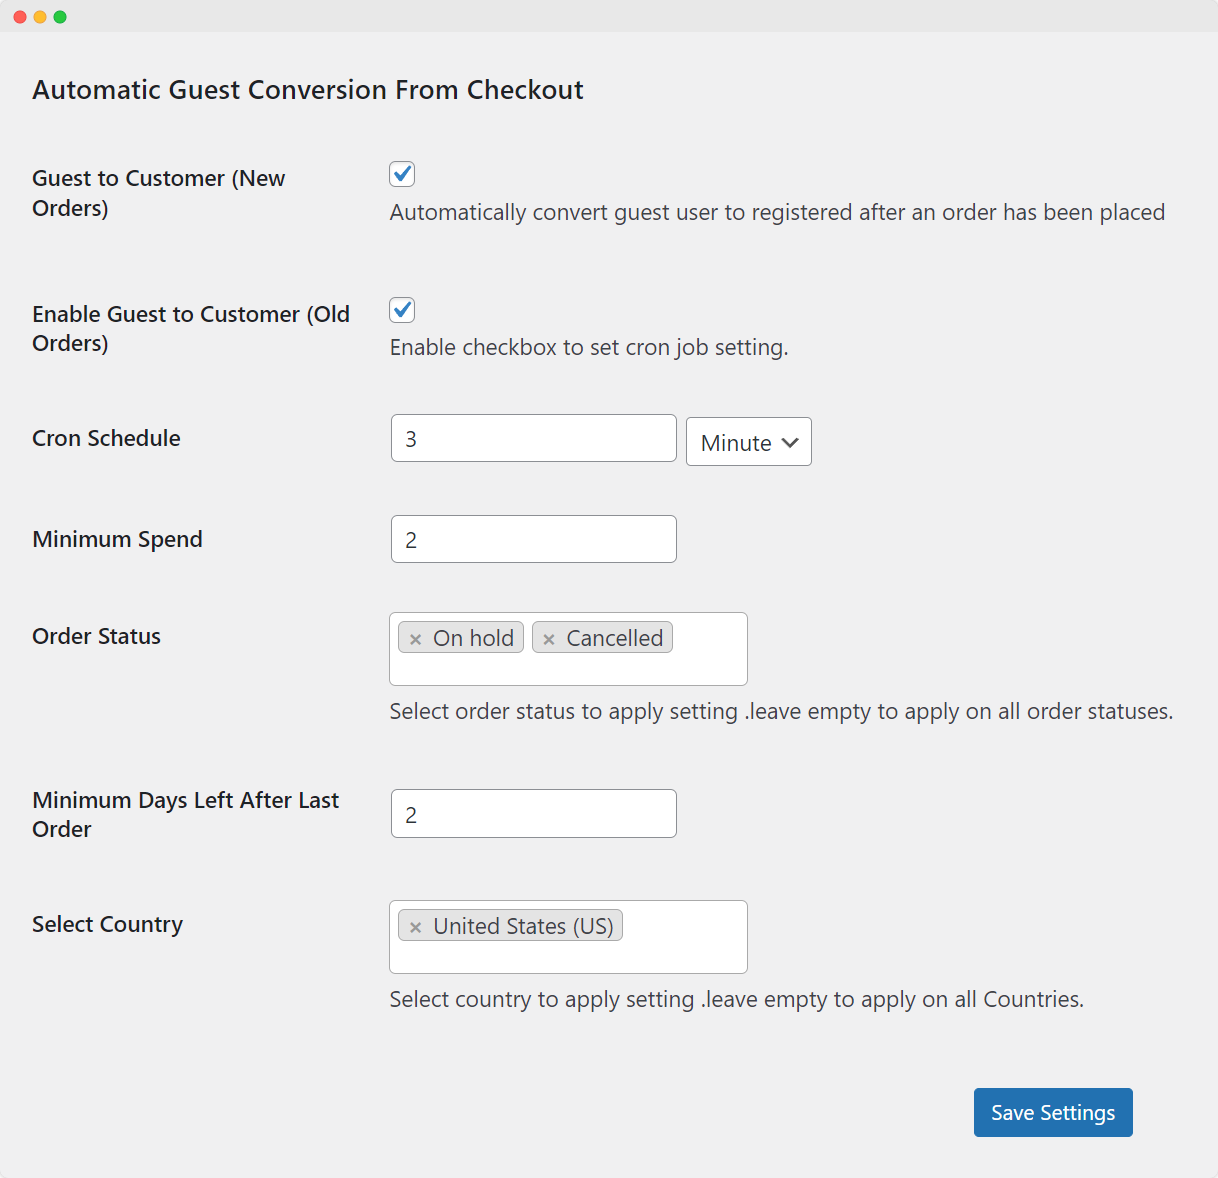
Automatic Guest Conversion From Checkout:
Guest to Customer (New Orders): Checkmark this option to ensure that guest users are automatically converted to registered customers when they complete a new order.
Enable Guest to Customer (Old Orders): Check this box to activate the cron job setting for converting old guest orders to registered customers.
Cron Schedule: Specify the schedule for the cron job to run. You can set the frequency in terms of:
- Minute
- Hours
- Days
- Week
- Month
Minimum Spend: Specify the minimum amount that a guest user must spend in order to be automatically converted to a registered customer.
Order Status: Select the order status(es) to which the automatic guest conversion should be applied. You can choose from options such as:
- Pending payment
- Processing
- On hold
- Completed
- Cancelled
- Refunded
- Failed
- Draft
Minimum Days Left After Last Order: Specify the minimum number of days that must elapse after a guest user’s last order before they are automatically converted to a registered customer.
Select Country: select specific countries for which the automatic guest conversion should apply. Leave this field empty to apply the setting to all countries.