
Create and Manage Multiple Notices
Viewing Dynamic Cart & Checkout Notices in a Grid
Go to WP Admin Panel > Cart Notices > Addify Cart Notices.
Here, you can:
- Get a record of all the notices you create in a grid
- Edit and delete all notices individually or in bulk
- Filter the notices by date
Creating a New Dynamic Cart & Checkout Notice
Go to WP Admin Panel > Cart Notices > Add New Notice. Click on “Add New Message”.
Add New Message:
- Add Title: Enter a title for your notice
Using Cart Notice Elements to Compose a Message
Cart Notice Elements: You can customize your notice using various cart notice elements, including:
- Cart Quantity
- Product Quantity
- Remaining Cart Quantity
- Remaining Cart Amount
- Remaining Product Quantity
- Products in Cart
- Products not in Cart
- Categories in Cart
- Categories not in Cart
- Remaining Time

Choosing & Customizing Cart Notice
Cart Notice:
- Message Type: Choose the type of message for your notice, such as:
- Simple Message
- Product in Cart
- Category in Cart
- Cart Quantity and Amount
- Deadline
- Button Text: Specify the text for the button to display in the message
- Button URL: Enter the URL to redirect when the button is pressed

Displaying Custom Cart Notice
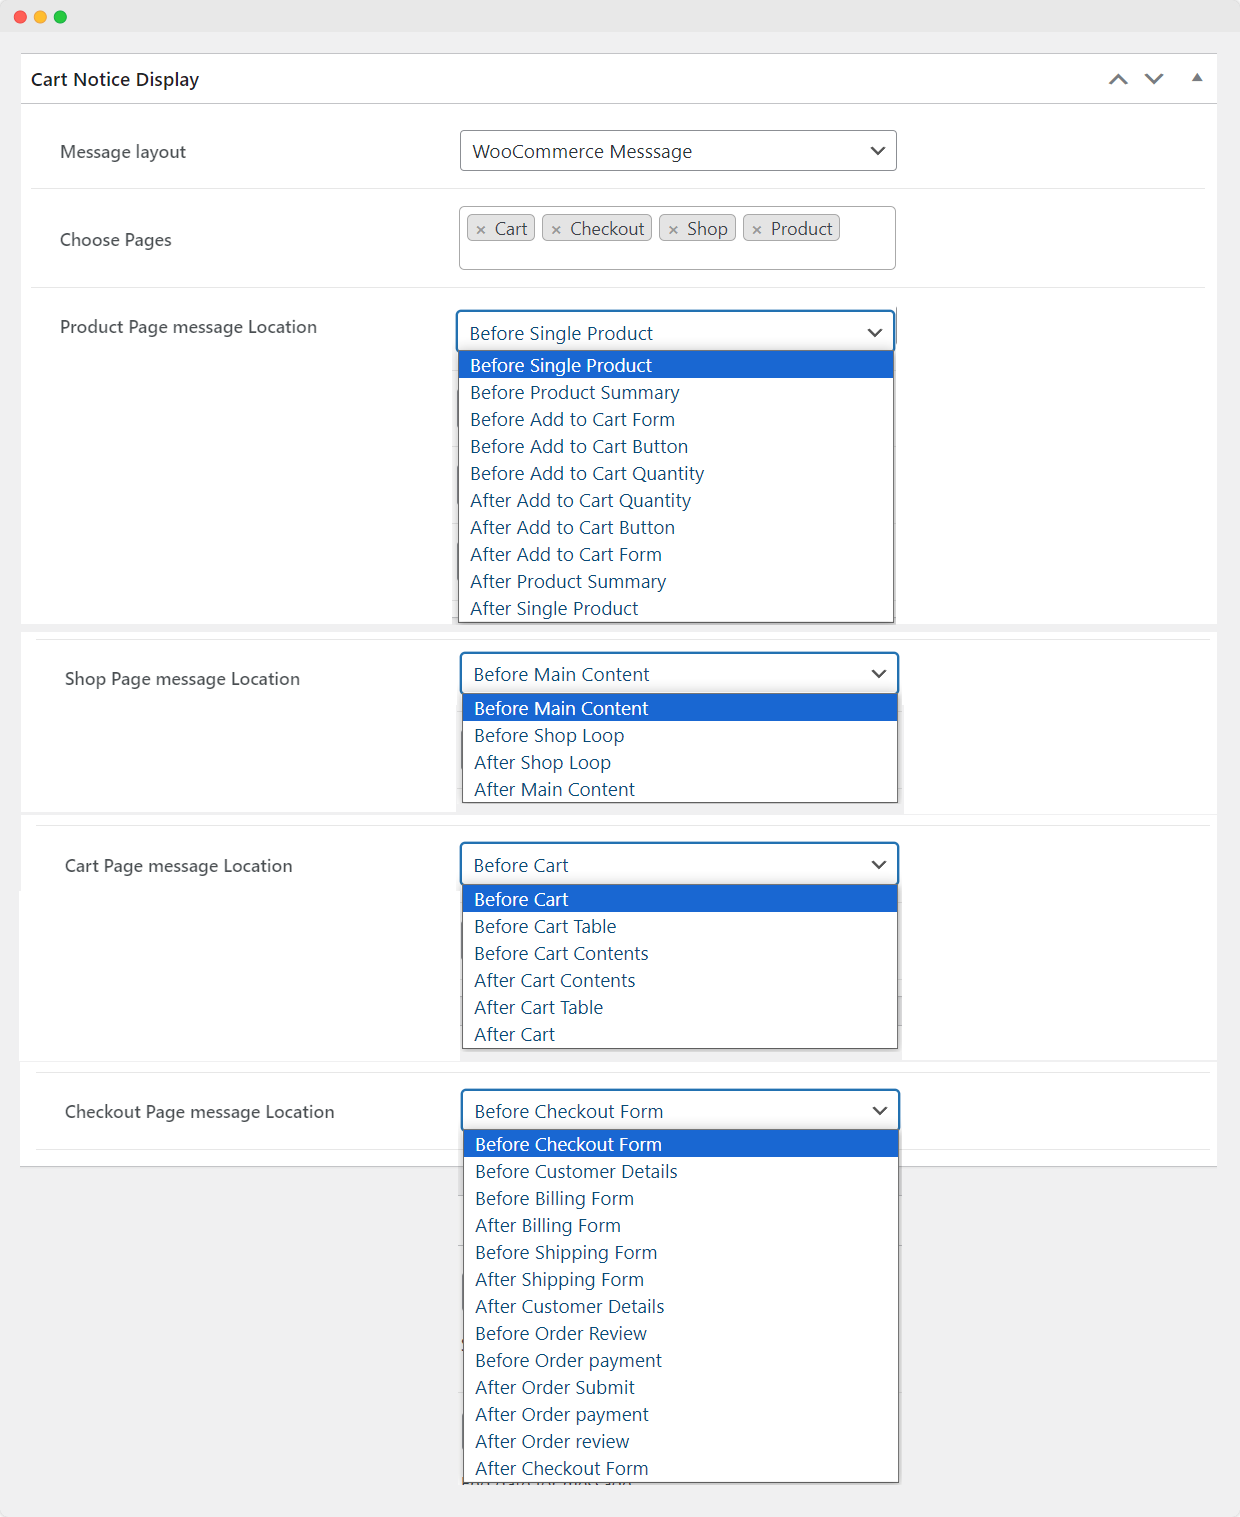
Cart Notice Display:
- Message Layout: Choose the layout for your cart notice, such as:
- WooCommerce Info
- WooCommerce Message
- WooCommerce Error
- Paragraph
- Heading
- Heading: If you select “Heading” as the display, specify the heading type
- Choose Pages: Select the pages where the notice will be displayed, including:
- Cart
- Checkout
- Shop
- Product
- Product Page Message Location: For the Product pages, you can specify the message location:
- Before Single Product
- Before Product Summary
- Before Add to Cart Form
- Before Add to Cart Button
- Before Add to Cart Quantity
- After Add to Cart Quantity
- After Add to Cart Button
- After Add to Cart Form
- After Product Summary
- After Single Product
- Shop Page Message Location: For the Shop pages, you can specify the message location:
- Before Main Content
- Before Shop Loop
- After Shop Loop
- After Main Content
- Cart Page Message Location: For the Cart pages, you can specify the message location:
- Before Cart
- Before Cart Table
- Before Cart Contents
- After Cart Contents
- After Cart Table
- After Cart
- Checkout Page Message Location: For the Checkout pages, you can specify the message location:
- Before Checkout Form
- Before Customer Details
- Before Billing Form
- After Billing Form
- Before Shipping Form
- After Shipping Form
- After Customer Details
- Before Order Review
- Before Order Payment
- After Order Submit
- After Order Payment
- After Order Review
- After Checkout Form
Enabling Conditions to Trigger Notices
Cart Notice Conditions:
If you select the message type as “Product in Cart”, then complete the following fields:
- Product Quantity: Choose from the two options:
- Required
- Maximum
- Products in Cart: Choose specific products. You can set conditions for:
- All Selected Products Must be in Cart
- Any Selected Product in Cart
- Products Not in Cart: Choose specific products. You can set conditions for:
- All Selected Products Must be in Cart
- Any Selected Product in Cart
If you select the message type as “Categories in Cart”, then complete the following fields:
- Categories in Cart: Choose specific categories. You can set conditions for:
- All Selected Categories Must be in Cart
- Any Selected Category in Cart
- Categories Not in Cart: Choose specific categories. You can set conditions for:
- All Selected Categories Must be in Cart
- Any Selected Category in Cart
If you select the message type as “Cart Quantity and Amount”, then complete the following fields:
- Cart Quantity: Choose from the two options:
- Required
- Maximum
- Cart Amount: Choose from the two options:
- Required
- Maximum
- Start Date: Set the start date for the message
- Expiry Date: Set the end date for the message
- Expiry Time: Set the message expiry time according to Coordinated Universal Time (UTC). The default time is 12:00 PM
- Choose Users Roles: Specify user roles. Leave empty for all user roles
- Choose Countries: Geo-location must be enabled in WooCommerce settings. Leave this field empty for all countries

Defining Cart Notice Priority
Post Attributes:
- Order: You can define the priority of your cart notice based on order


