Creating and Managing Cart Discount Rules
Product Pricing Rule
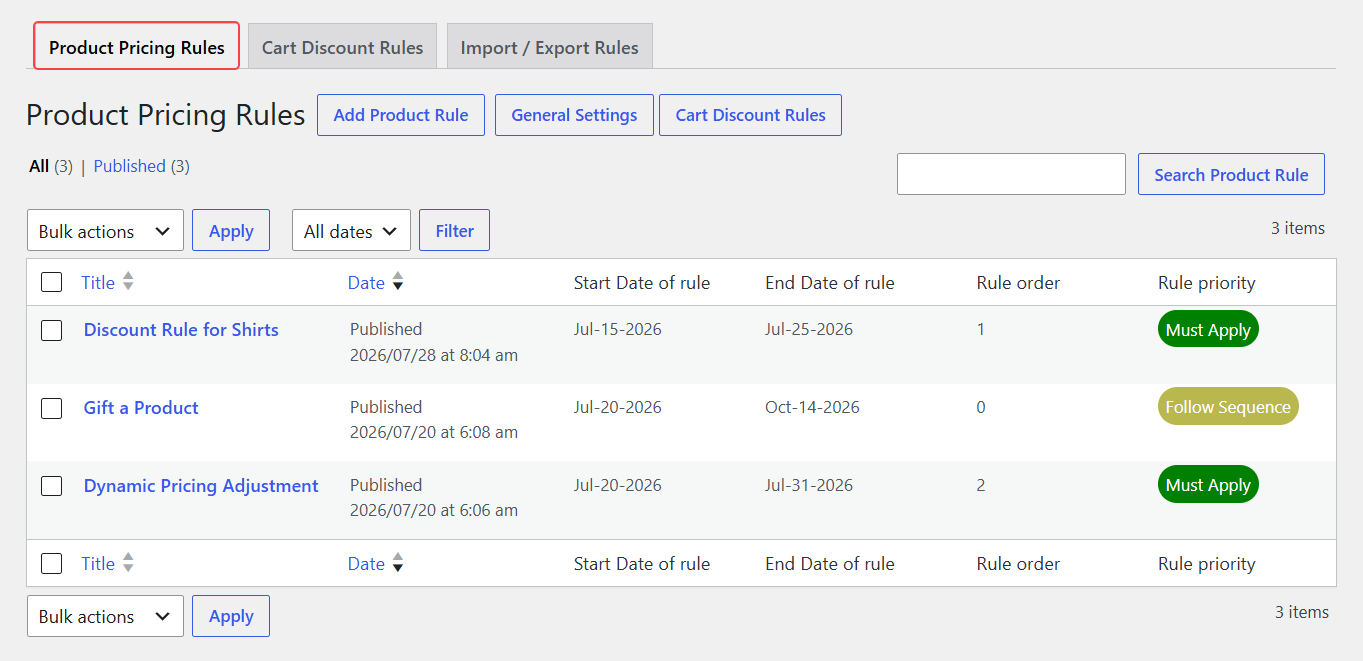
Click on “Product Pricing Rule.” By default, the previously created cart rules are displayed in the grid view.
Grid Details
- Title: Displays the title of the rule.
- Date: Displays the date when the rule is created.
- Start Date of Rule: Shows the start date of the rule.
- End Date of Rule: Shows the end date of the rule.
- Rule Order: Shows the order of the rule.
- Rule Priority: Shows the rule priority.
You can also create a new product pricing rule by clicking the “Add product pricing Rule” button.
Add Product Rule
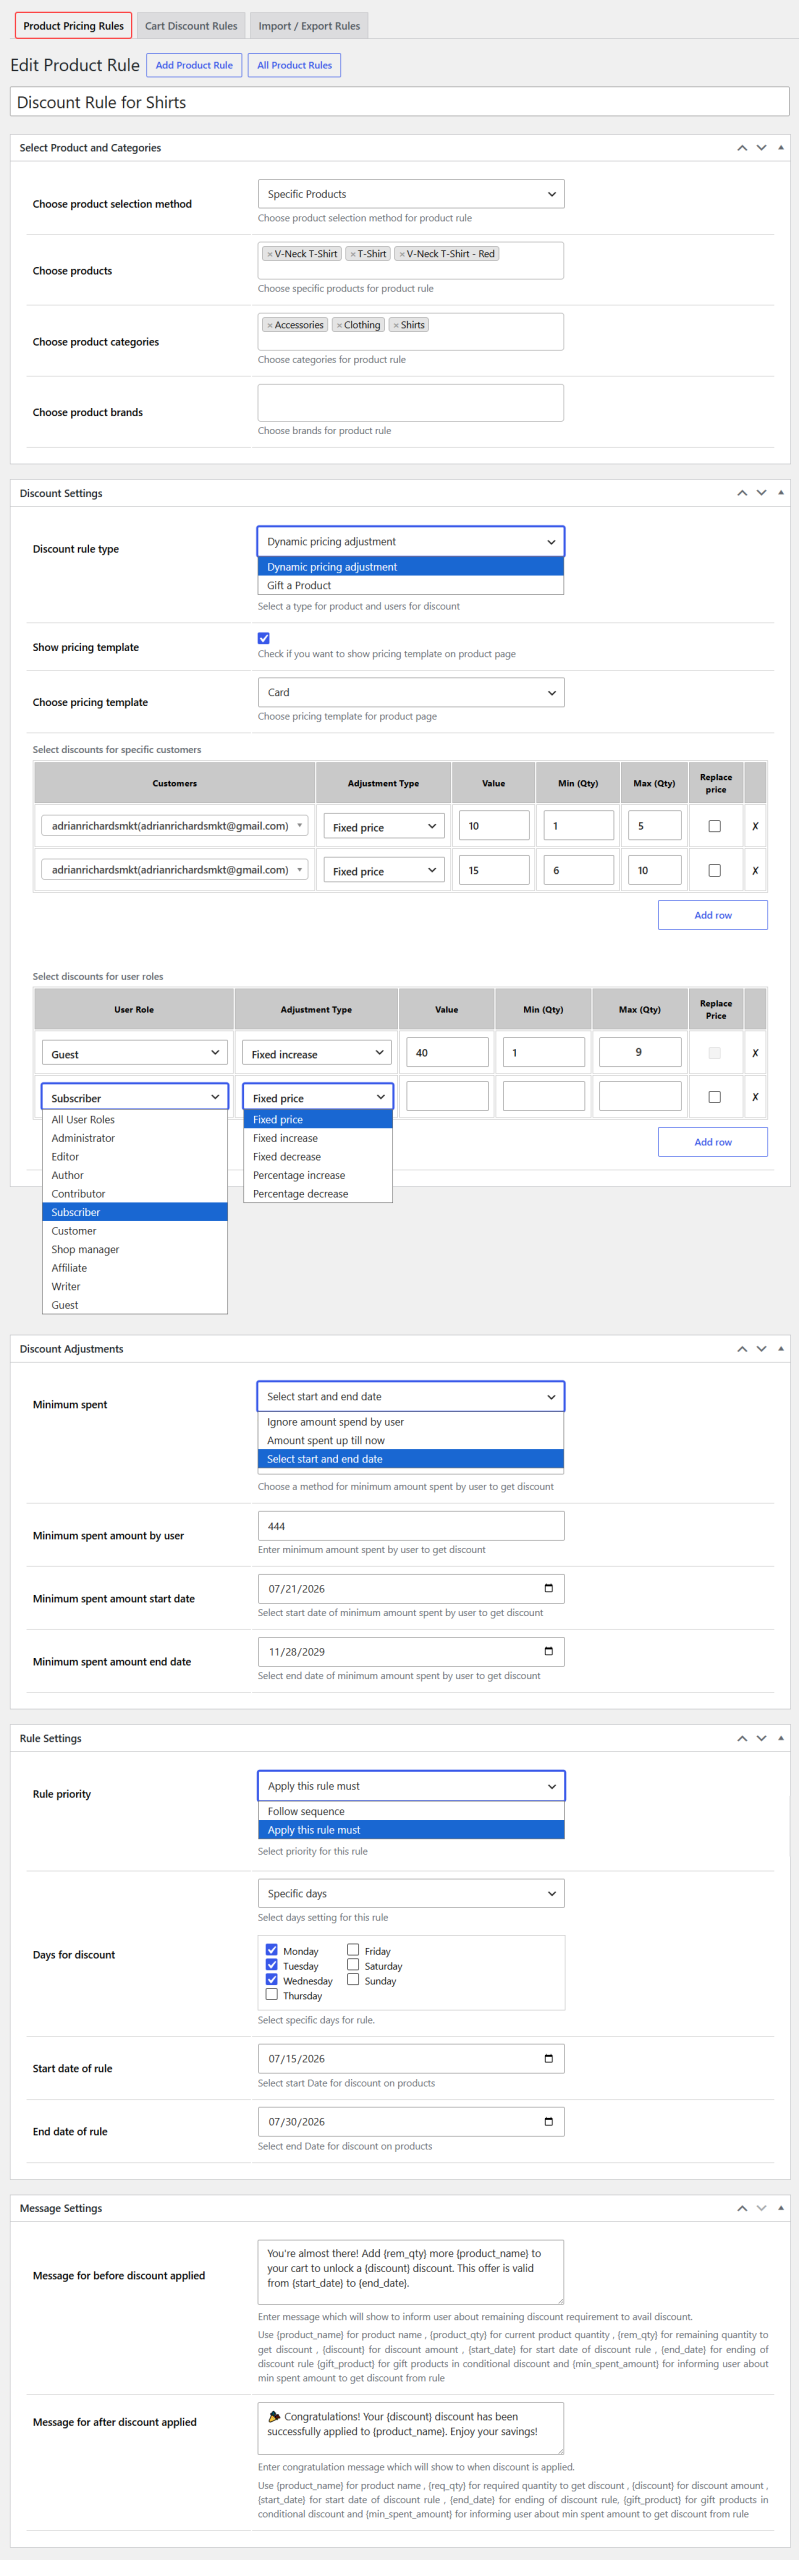
To add the product rule, you can configure the following settings:
- Add Title: Add a custom title for the product rule.
Select Product & Categories
- Choose product selection method: You can choose the product selection method, such as
- All products: Select this if you want to apply the rule to all products.
- Specific Products: Select this if you want to apply the rule to specific products. Once you select this, you can:
- Choose Products: You can select specific products where the rule will be applied.
- Choose Product Categories: Choose specific product categories where the rule will be applied.
- Choose Product Brand: Choose a specific product brand where the rule will be applied.
Discount settings
In a discount setting, you can:
Discount Rule type: Select your desired rule type, such as
- Dynamic Pricing Adjustment: Choose this when you want to apply the discount or markup price. Once you select this, you can:
- Show pricing template: Enable this to choose your desired template, such as
- Choose Pricing Template: You can choose the list, table, or card option to display the pricing template.
- Pricing table: For dynamic price adjustment rule types, you have the option to display a tiered pricing table on your product pages. Select the Show Pricing Option to enable and let customers know the discounts and prices they can get for different quantity ranges.
- Customer-specific pricing: To apply a pricing rule to specific customers, click Add Row, select the customer(s), and define the pricing rule by setting the adjustment type, value, minimum/maximum quantity, etc.
- Role-based pricing: To apply a rule based on user roles, click Add Row, select the applicable user roles, and define the pricing rule by setting the adjustment type, value, minimum/maximum quantity, etc.
- Choose Pricing Template: You can choose the list, table, or card option to display the pricing template.
- Show pricing template: Enable this to choose your desired template, such as
- Gift a product: Select this to offer free gifts to customers instead of discounts (more details available in the Free Gifts section). You can apply this feature for specific customers or for specific user roles.
- Customer-specific gift products: To apply a gift product to specific customers, click Add Row, select the customer(s), and choose gift products by settings gift minimum/maximum quantity, etc.
- Role-based gift products: To apply a rule based on user roles, click Add Row, select the applicable user roles, and choose gift products by setting the minimum/maximum gift quantity, etc.
Discount Adjustment
Use the following settings to configure discount adjustments based on the customer’s total spending.
- Minimum Spent: Select how the customer’s total spending should be calculated to qualify for the discount.
- Ignore Amount Spent by User: Apply the discount without considering the customer’s previous spending.
- Amount Spent Up Till Now: Calculate the customer’s total spending from all previous orders.
- Minimum Spent Amount by User: Enter the minimum amount the customer must have spent to qualify for the discount.
- Select Start and End Date: Calculate the customer’s spending only within the selected date range.
- Minimum Spent Amount by User: Enter the minimum amount the customer must have spent to qualify for the discount.
- Minimum Spent Amount Start Date: Select the start date for calculating the customer’s total spending. This option is available only when Select Start and End Date is chosen.
- Minimum Spent Amount End Date: Select the end date for calculating the customer’s total spending. This option is available only when Select Start and End Date is chosen.
Rule Settings
In rule settings, you can configure the following:
- Rule Priority: Set the Rule priority to handle the multiple rules simultaneously.
- Days of Discount: Select the days of discount, such as offering a discount on all days or offering a discount on specific days. If you select the specific days option, the list of weekdays will be open, which allows you to select the specific days from the list.
- Start Date of Rule: Set the start date of the rule.
- End Date of Rule: Set the end date of the rule.
Message Settings
Add the custom messages that are displayed to the customer to inform them about the discount. You can:
- Message for before discount applied: Add a custom message to inform the customer before the discount is applied.
- Message for after discount applied: Add a custom message that shows the customer after applying the discount.
Once the rule is created, the created rules will be displayed in a Grid view. In a grid view, you can view the following details:
Grid Details:
- Title: Displays the title of the rule.
- Date: Displays the date when the rule is created.
- Start Date of Rule: Shows the start date of the rule.
- End Date of Rule: Shows the end date of the rule.
- Rule Order: Shows the order of the rule.
- Rule Priority: Shows the rule priority.
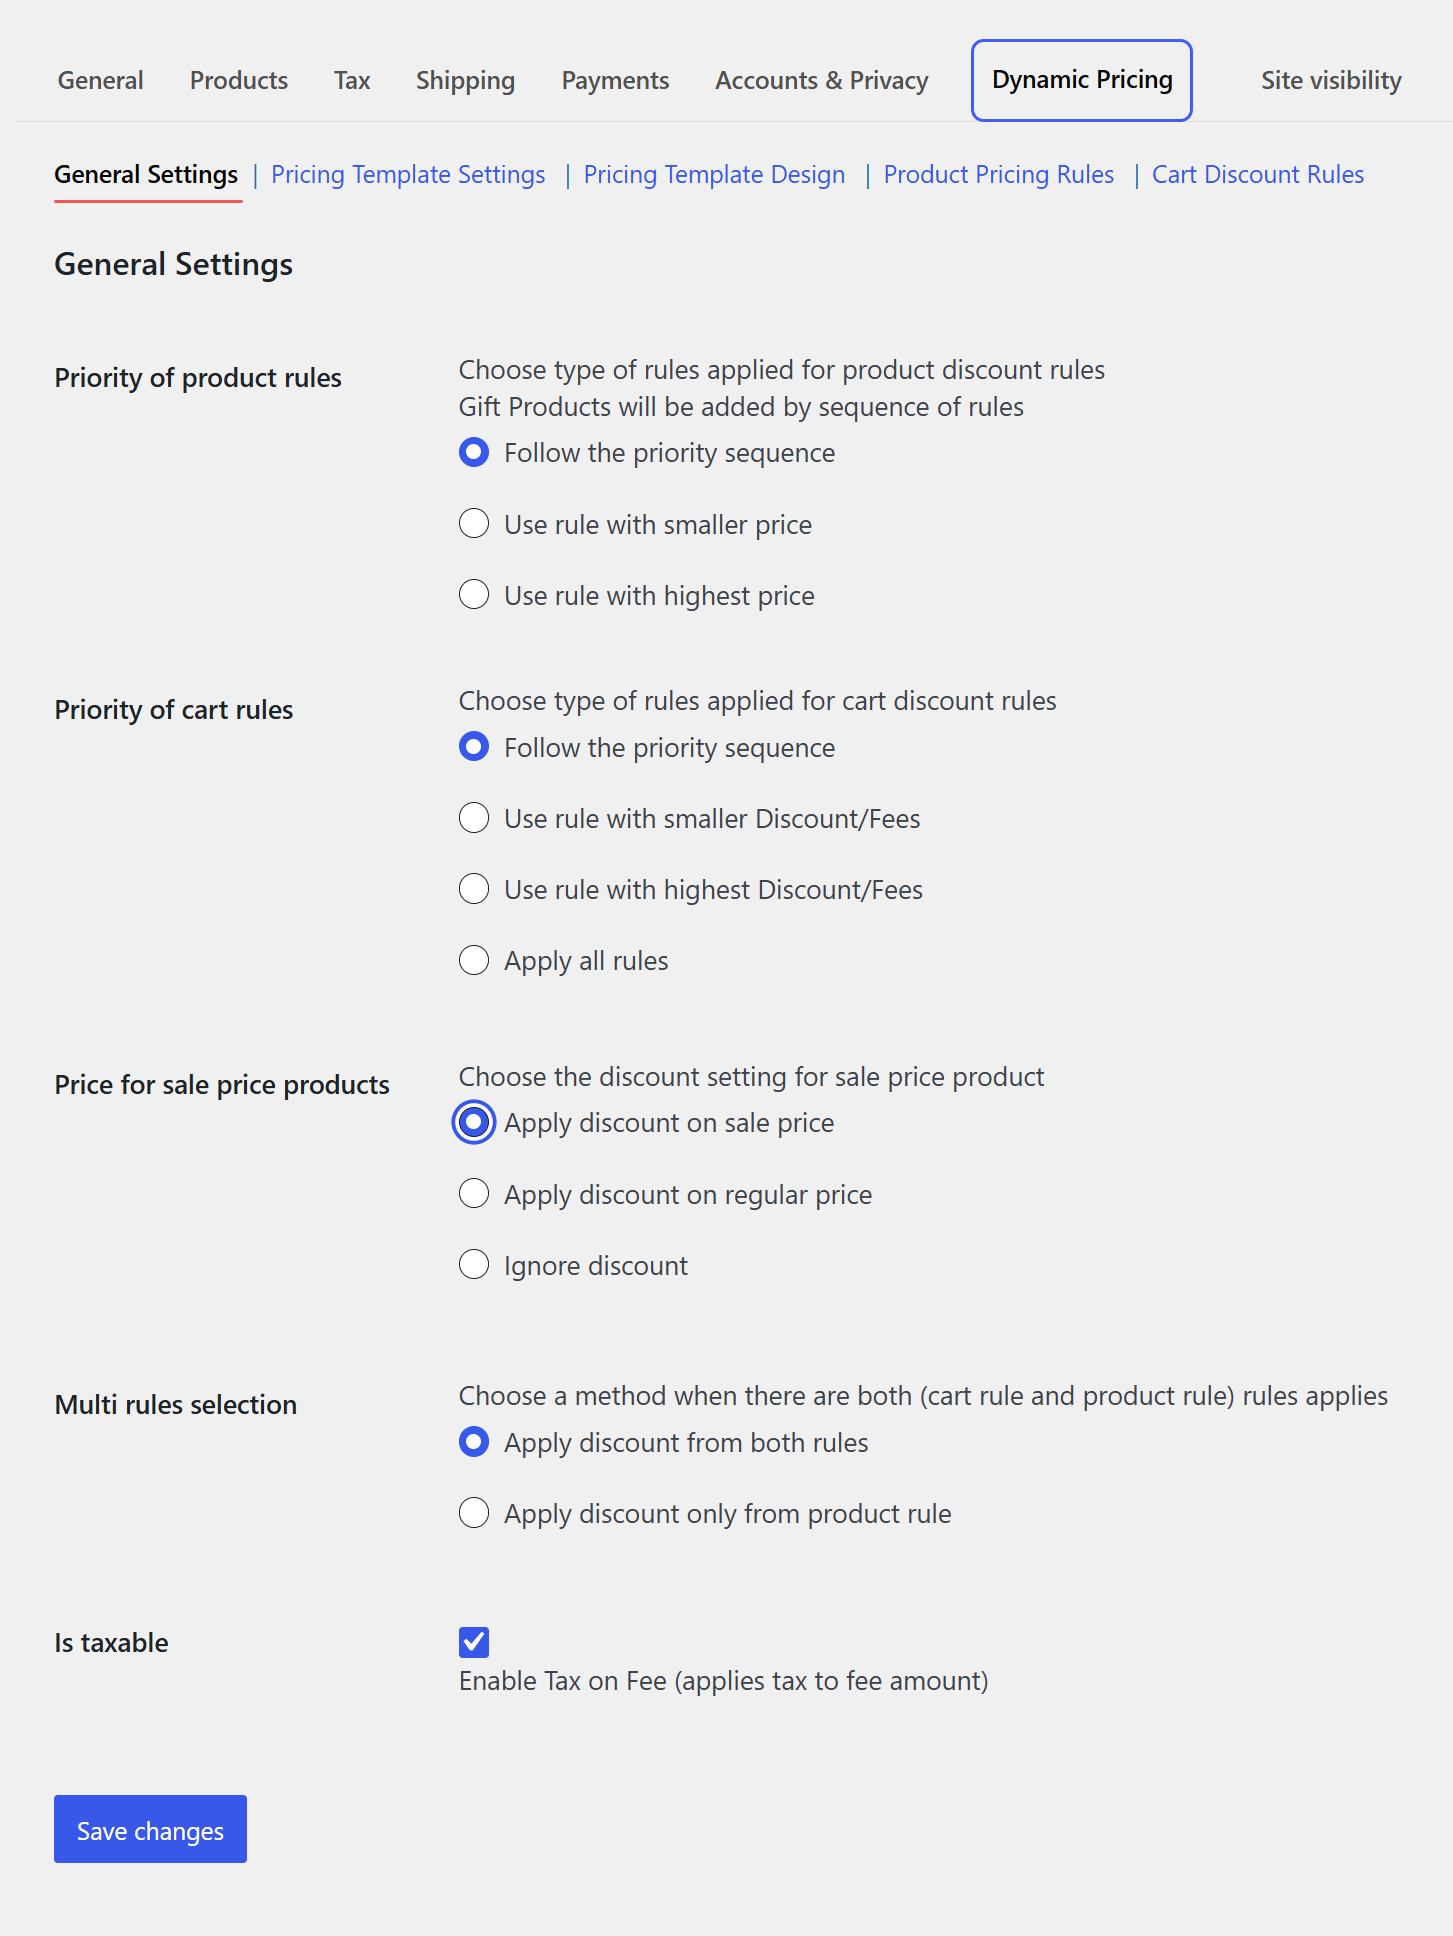
General settings
To configure the general settings, you can:
- Priority of product rule: Choose the specific rule type that you want to apply for the product discount rule and the gift products; also add a sequence of the rule.
- Follow the priority sequence: choose this to follow the priority order as set within rules.
- Use rule with smaller price: Choose this to ignore the rule priority order and apply the rule with the smaller price.
- Use rule with highest price: Choose this to ignore the rule priority order and apply the rule with the higher price.
- Priority of Cart rule: Choose the following option to set the priority of the cart rule.
- Follow the priority sequence: Select this to follow the priority order as set within rules.
- Use rule with smaller discount/markup: Select this to ignore the rule priority order and apply the rule with the smaller discount/markup.
- Use rule with highest discount/markup: Select this to ignore the rule priority order and apply the rule with higher discount/markup.
- Apply all rules: Use this to ignore the rule priority order and apply the rule discount/markup coming from all rules.
- Price of sale price products: Choose the discount setting for sale price products. You can:
- Apply discount on sale price: Select this to apply the discount on the sale price.
- Apply discount on Regular: Select this to apply the discount on the regular price.
- Ignore discount: Select this if you want to ignore/remove the discount.
- Multi-rule selection: You can choose both methods when both the product and the cart will apply.
- Apply discounts from both rules: Choose this if you want to apply the discount on both the cart and the product rule.
- Apply discount only from product rules: Choose this if you want to apply the discount only on the product rule.
- Is Textable: Enable this if you want to charge the tax fee.
- Save Changes: Click on the save button to implement these changes.
Pricing Template Settings
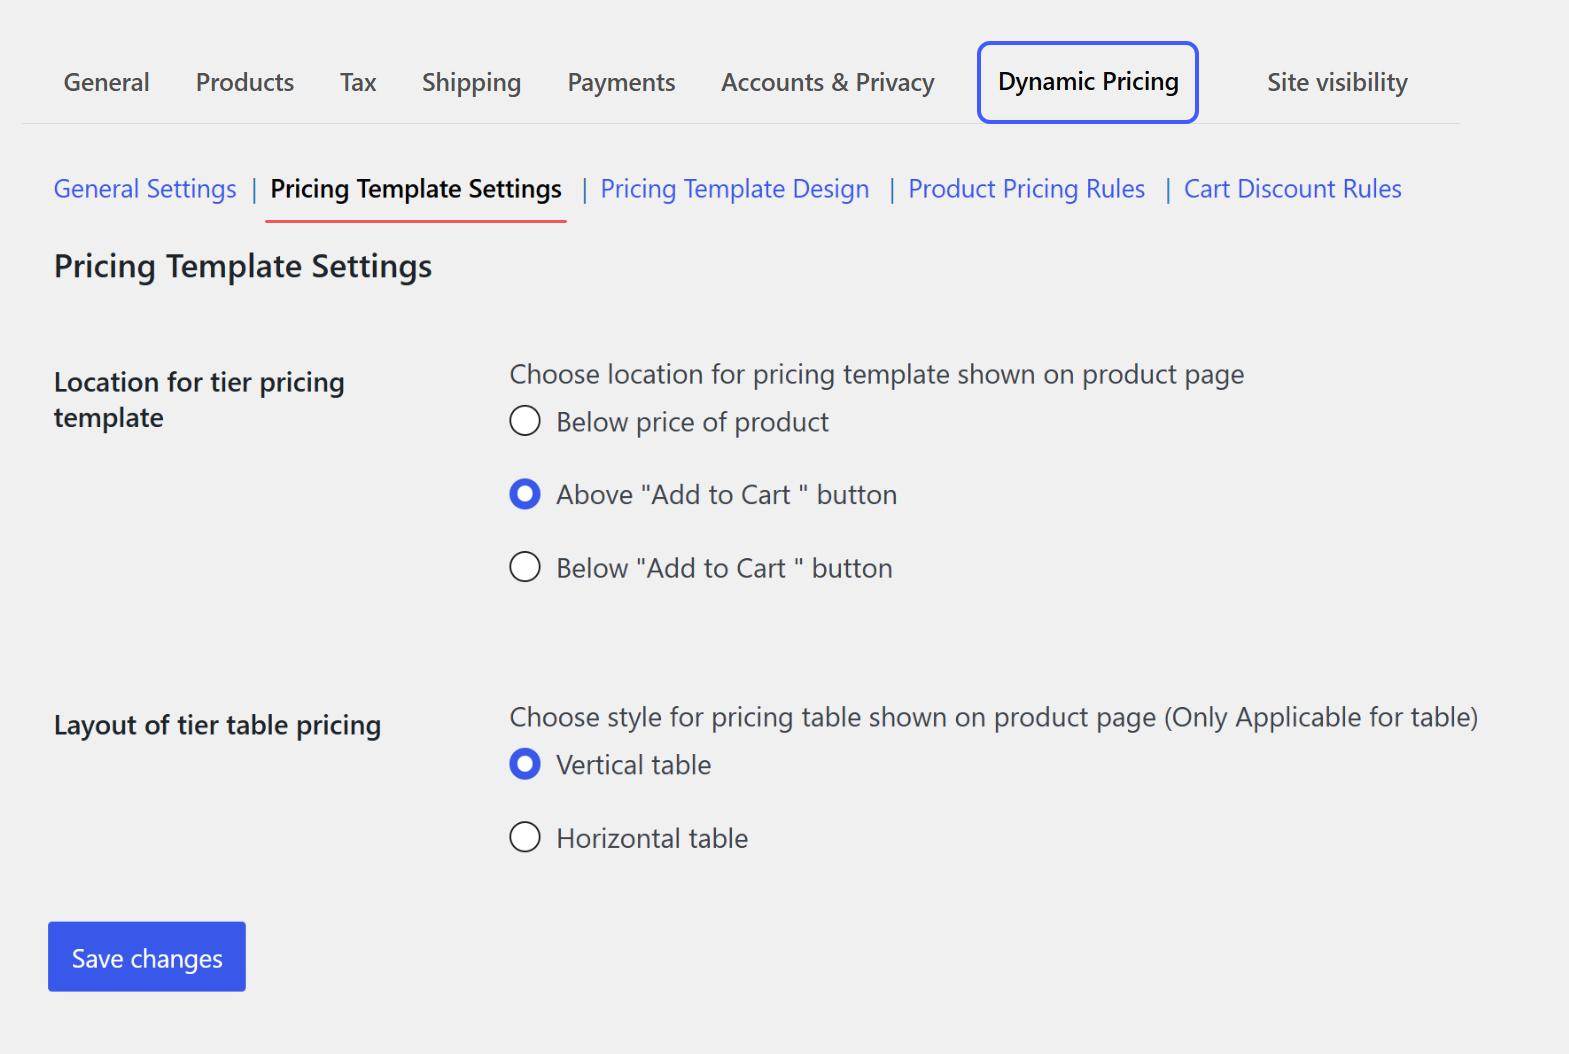
You can configure the following settings:
- Location for tier pricing template: Select the display location of the price template on a product page, such as:
- Below price of products: Choose this if you want to display the price below the products.
- Above the “Add to cart” button: Choose this to display the price above the “Add to Cart” button.
- Below the “Add to cart” button: Choose this to display the price below the “Add to cart” button.
- Layout of tier table pricing: Choose the style of price table shown on the product table.
- Vertical Table: Choose this if you want to show the table in vertical form.
- Horizontal Table: Choose this if you want to display the table in a Horizontal form.
Price Template Design
You can configure the following settings:
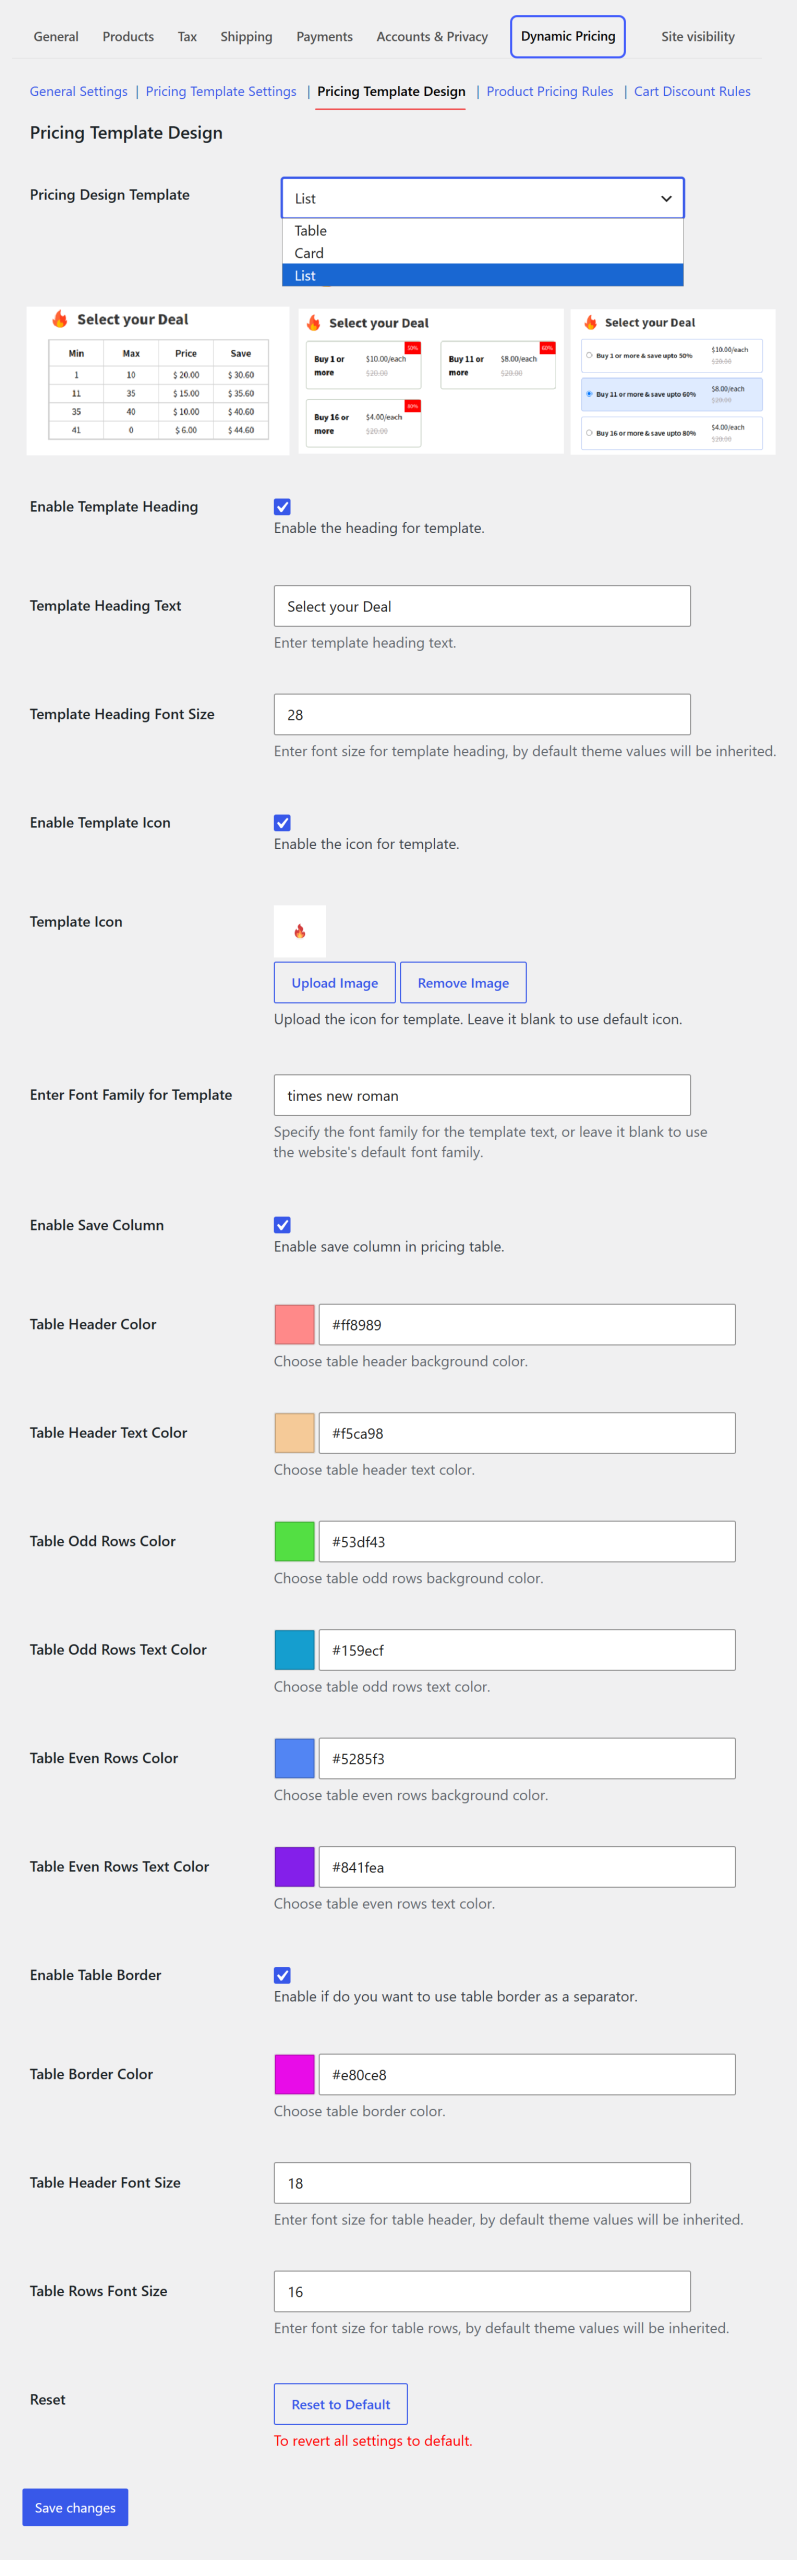
- Pricing Design Template: You can select the design template from the dropdown, such as:
- Table: If you want to show the table form, you can configure the following settings:
- Enable Template Heading: Enable the heading of the template. If enabled, you can:
- Template Heading Text: Add custom text for the template heading.
- Enter Font Family for Template: Add a custom font family for the template.
- Enable Template Icon: You can enable/disable the template icon. If enabled:
- Template icon: Upload or remove the template icon.
- Enter the Font Family for Template: Add the font family for the template.
- Enable Save Column: Enable this to save the column in the pricing table.
- Table Header Text Color: Add the custom color for table header text.
- Table Odd Row Color: Add a custom color for the table’s odd row.
- Table Odd Row Text Color: Add a custom color for the table odd row text.
- Table Even Row Color: Add a custom color for the table even rows.
- Table Even Row Text Color: Add a custom color for even row text.
- Enable Table Border: Enable or disable the table border as needed. If enabled:
- Table Border color: Add a custom color for the table border.
- Table Header Font Size: Add font size for table header.
- Table Row Font Size: Add the font size for the table row.
- Reset: Click on this to revert all changes.
- Enable Template Heading: Enable the heading of the template. If enabled, you can:
- Card: Choose this option to configure the following settings:
- Enable Template Heading: Enable the heading of the template. If enabled, you can:
- Template Heading Text: Add custom text for the template heading.
- Enter Font Family for Template: Add a custom font family for the template.
- Enable Template Icon: You can enable/disable the template icon. If enabled:
- Template icon: Upload or remove the template icon.
- Enter the Font Family for Template: Add the font family for the template.
- Card Border Color: Add the border color of the card.
- Card Background Color: Add the background color of the card.
- Card Text Color: Add the custom color for the card text.
- Select Border Color: Add the custom color for the card border.
- Enable Sale Tag: Enable or disable the card tag as needed. Once you enable this, you can
- Sale Tag Background Color: Add the custom background color for the sale tag background.
- Reset: Click on this to revert all changes.
- Enable Template Heading: Enable the heading of the template. If enabled, you can:
- List: Select this option if you want to display the prices in the form of a list. After selecting this, you can configure the following settings:
- Enable Template Heading: Enable the heading of the template. If enabled, you can:
- Template Heading Text: Add custom text for the template heading.
- Enter Font Family for Template: Add a custom font family for the template.
- Enable Template Icon: You can enable/disable the template icon. If enabled:
- Template icon: Upload or remove the template icon.
- Enter the Font Family for Template: Add the font family for the template.
- List Border Color: Add the custom border color for the list.
- List Background Color: Add a custom background color that matches your store theme.
- List Text Color: Add the custom text color for the list.
- Select List Text Color: Select a custom text color for the selected list.
- Reset: Choose this to revert all changes.
- Save Changes: Click on Save Changes to apply all changes.
- Enable Template Heading: Enable the heading of the template. If enabled, you can:
- Table: If you want to show the table form, you can configure the following settings:
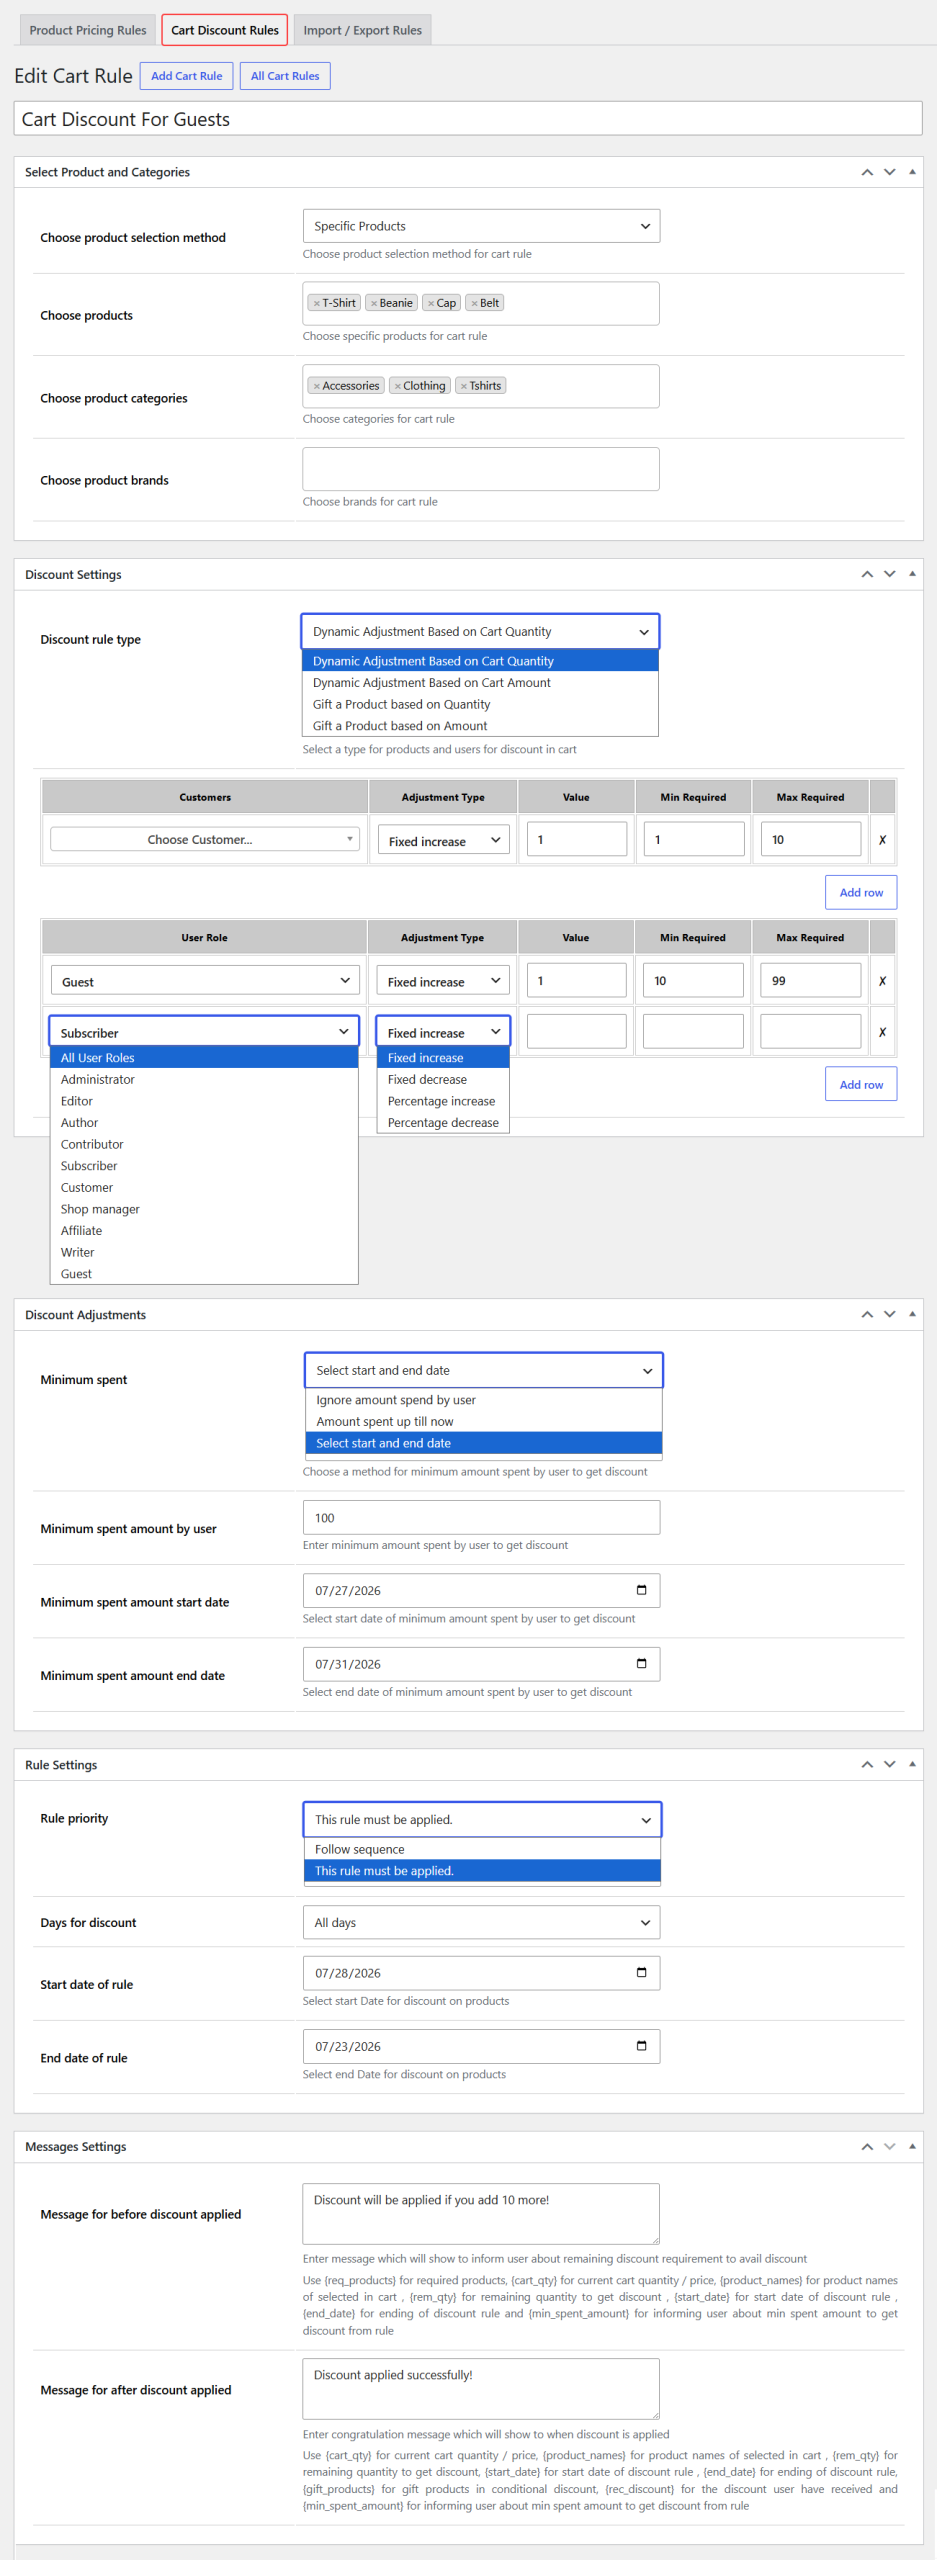
Cart Discount Rule
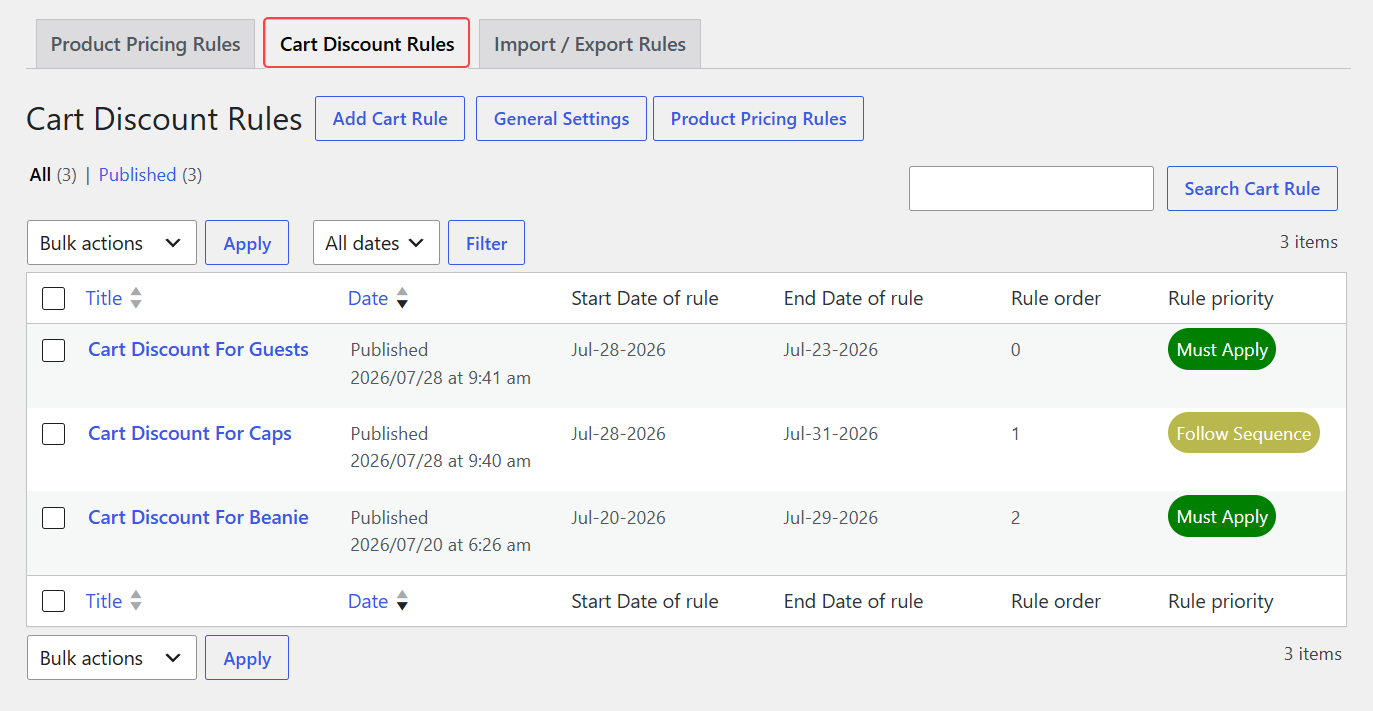
Click on “Cart Discount Rule”. By default, the previously created cart rules are displayed in the grid view.
Grid Details
- Title: Displays the title of the rule.
- Date: Displays the date when the rule is created.
- Start Date of Rule: Shows the start date of the rule.
- End Date of Rule: Shows the end date of the rule.
- Rule Order: Shows the order of the rule.
- Rule Priority: Shows the rule priority.
You can also create a new cart rule by clicking the “Add Cart Rule” button.
Add Cart Rule
Click on Cart rule
To add the product rule, you can configure the following settings:
- Add Title: Add a custom title for the cart rule.
Select Product & Categories
- Choose product selection method: You can choose the product selection method, such as
- All products: Select this if you want to apply the rule to all products.
- Specific Products: Select this if you want to apply the rule to specific products. Once you select this, you can:
- Choose Products: You can select specific products where the rule will be applied.
- Choose Product Categories: Choose specific product categories where the rule will be applied.
- Choose Product Brand: Choose a specific product brand where the rule will be applied.
Discount Rule type: Select your desired rule type, such as
- Dynamic Pricing Adjustment based on Cart Quantity: Choose this option to apply a price adjustment based on the total quantity of products in the customer’s cart. When you select this, a table will be displayed along with the following columns:
- Customers / User Roles: Select the specific customers or user roles to whom this pricing rule will apply.
- Adjustment Type: Choose the type of price adjustment:
- Fixed increase
- Fixed decrease
- Percentage increase
- Percentage decrease
- Value: Enter the adjustment value to increase or decrease the product price.
- Minimum Required Quantity: Enter the minimum cart quantity required for this rule to apply.
- Maximum Required Quantity: Enter the maximum cart quantity up to which this rule will apply.
- Dynamic Pricing Adjustment based on Cart Amount: Choose this option to apply a price adjustment based on the customer’s total cart amount. When this option is selected, the corresponding table will appear with the following columns:
- Customers / User Roles: Select the specific customers or user roles to whom this pricing rule will apply.
- Adjustment Type: Choose the type of price adjustment:
- Fixed Increase
- Fixed Decrease
- Percentage Increase
- Percentage Decrease
- Value: Enter the adjustment value to increase or decrease the product price.
- Minimum Required Amount: Enter the minimum cart amount required for this rule to apply.
- Maximum Required Amount: Enter the maximum cart amount up to which this rule will apply.
- Gift a Product based on Quantity: Choose this option to offer free gift products when the customer purchases a specified quantity. Once you select this option, the corresponding table will appear with the following columns:
- Customers / User Roles: Select the specific customers or user roles to whom this gift rule will apply.
- Gift Product: Select the product that will be offered as a free gift.
- Gift Quantity: Enter the quantity of the gift product to be added.
- Minimum Required Quantity: Enter the minimum cart quantity required to qualify for the free gift.
- Maximum Required Quantity: Enter the maximum cart quantity up to which the free gift will be offered.
- Gift a Product based on Amount: Choose this option to offer free gift products when the customer’s cart reaches a specified amount. Once you select this option, the corresponding table will appear with the following columns:
- Customers / User Roles: Select the specific customers or user roles to whom this gift rule will apply.
- Gift Product: Select the product that will be offered as a free gift.
- Gift Quantity: Enter the quantity of the gift product to be added.
- Minimum Required Amount: Enter the minimum cart amount required to qualify for the free gift.
- Maximum Required Amount: Enter the maximum cart amount up to which the free gift will be offered.
- Minimum Spent: Select how the customer’s total spending should be calculated to qualify for the discount.
- Ignore Amount Spent by User: Apply the discount without considering the customer’s previous spending.
- Amount Spent Up Till Now: Calculate the customer’s total spending from all previous orders.
- Minimum Spent Amount by User: Enter the minimum amount the customer must have spent to qualify for the discount.
- Select Start and End Date: Calculate the customer’s spending only within the selected date range.
- Minimum Spent Amount by User: Enter the minimum amount the customer must have spent to qualify for the discount.
- Minimum Spent Amount Start Date: Select the start date for calculating the customer’s total spending. This option is available only when Select Start and End Date is chosen.
- Minimum Spent Amount End Date: Select the end date for calculating the customer’s total spending. This option is available only when Select Start and End Date is chosen.
Rule Settings
In rule settings, you can configure the following:
- Rule Priority: Set the Rule priority to handle the multiple rules simultaneously.
- Days of Discount: Select the days of discount, such as offering a discount on all days or offering a discount on specific days. If you select the specific days option, the list of weekdays will be open, which allows you to select the specific days from the list.
- Start Date of Rule: Set the start date of the rule.
- End Date of Rule: Set the end date of the rule.
Message Settings
Add the custom messages that are displayed to the customer to inform them about the discount. In these settings, you can:
- Message for before discount applied: Add a custom message to inform the customer before the discount is applied.
- Message for after discount applied: Add a custom message that shows the customer after applying the discount.
Once the rule is created, the created rules will be displayed in a Grid view.
Import/Export Pricing Rule
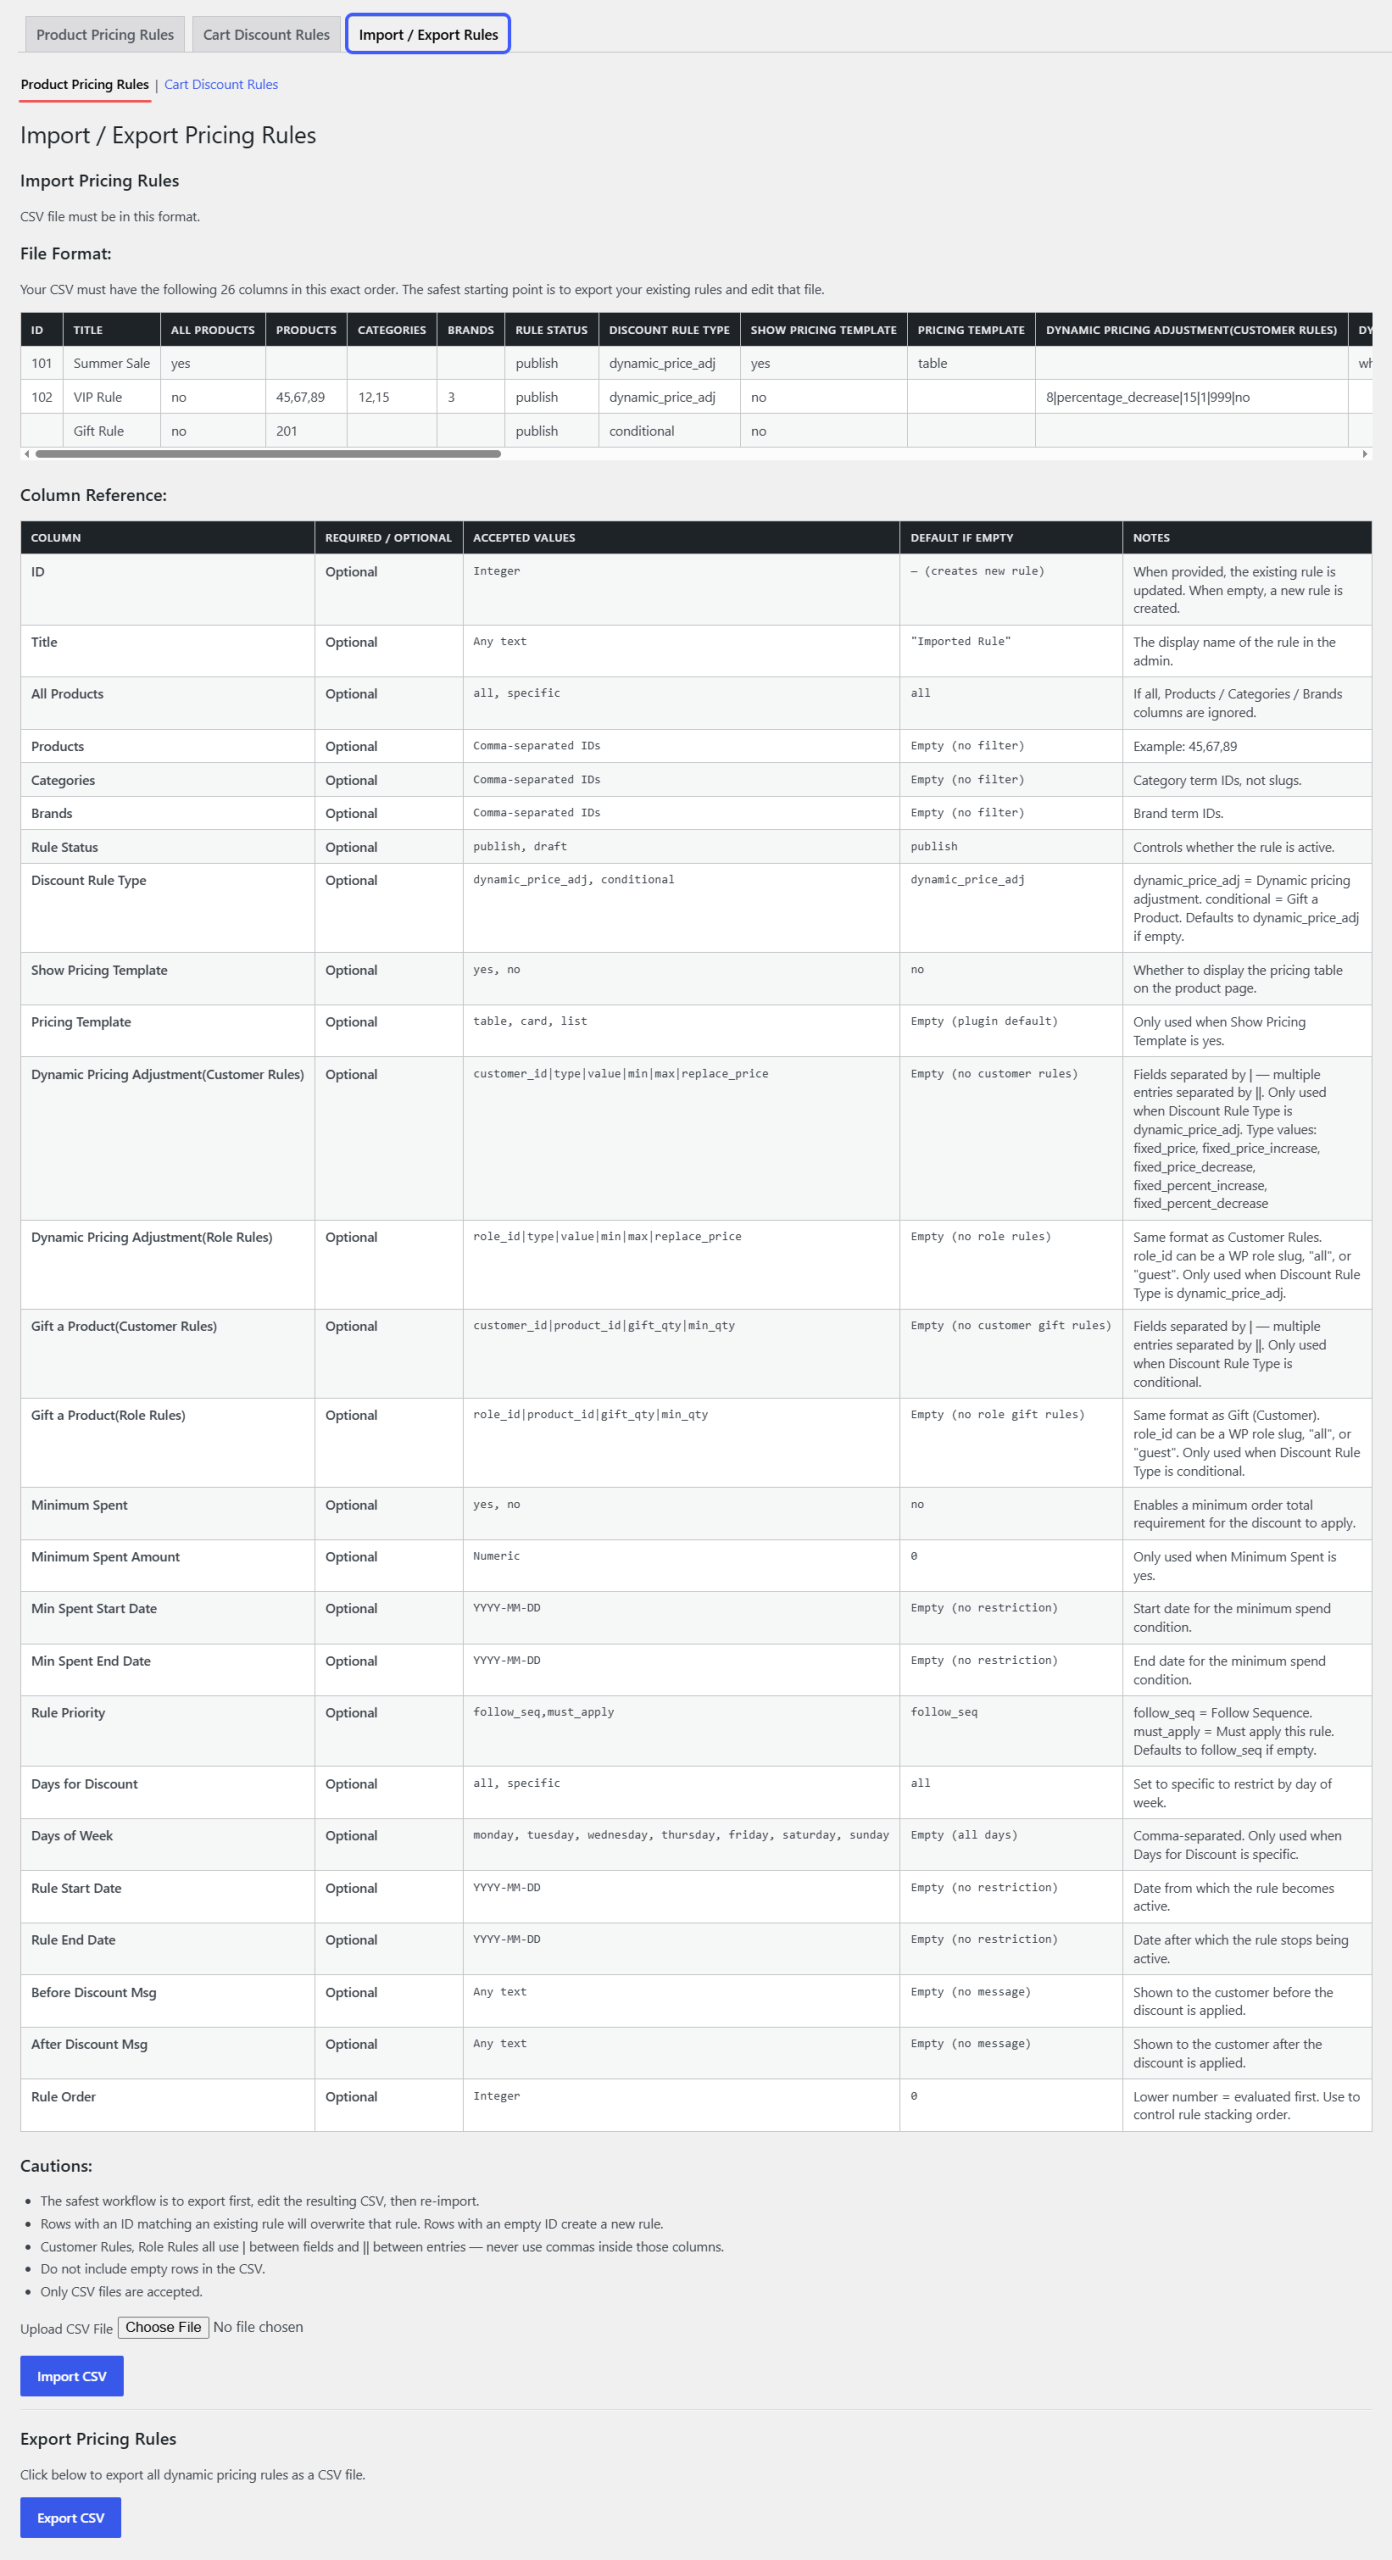
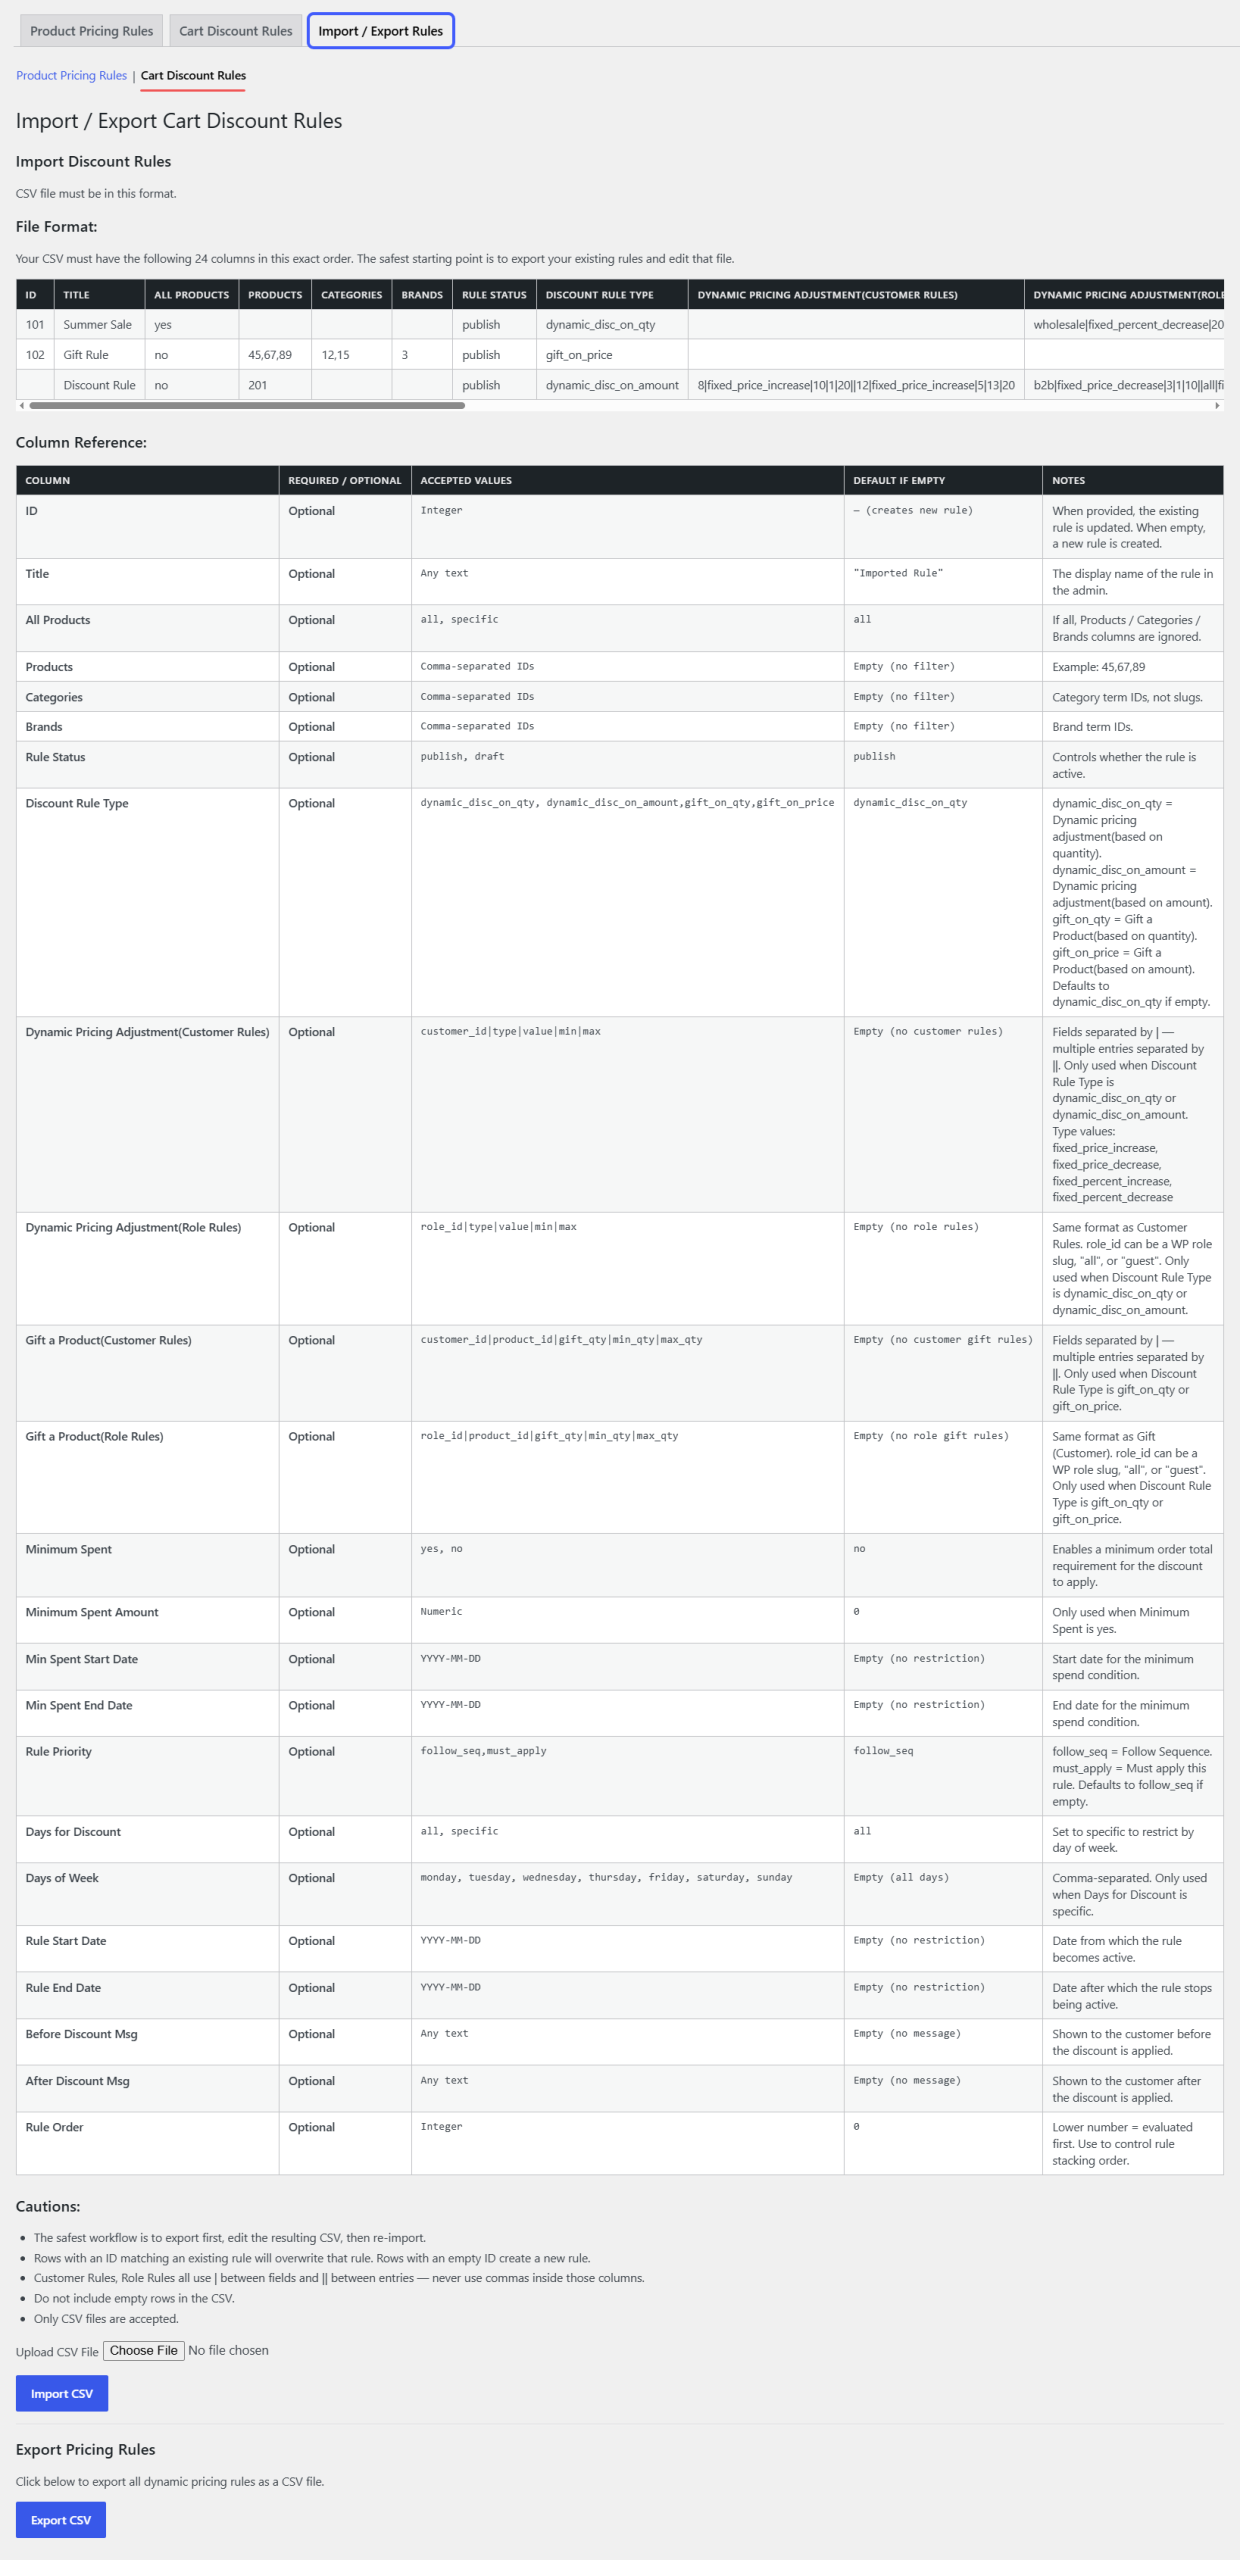
Click on “Import/Export Pricing Rules” to import or export pricing rules in bulk. The plugin uses a CSV file format, allowing you to easily download the sample file, update the data, and upload it using the same format.
The CSV file contains the following fields:
- ID
- Title
- All Products
- Products
- Categories
- Brands
- Rule Status
- Discount Rule Type
- Show Pricing Template
- Pricing Template
- Dynamic Pricing Adjustment (Customer Rules)
- Dynamic Pricing Adjustment (Role Rules)
- Gift a Product (Customer Rules)
- Gift a Product (Role Rules)
- Minimum Spent
- Minimum Spent Amount
- Minimum Spent Start Date
- Minimum Spent End Date
- Rule Priority
- Discount Days
- Days of the Week
- Rule Start Date
- Rule End Date
- Before Discount Message
- After Discount Message
- Rule Order