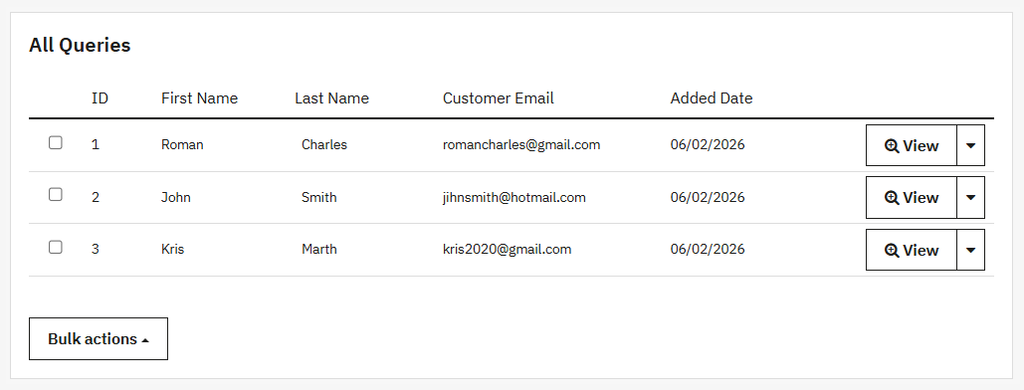
General Settings
When you open this module, by default, the General Settings module will open, where you can
- Module: Enable or disable the module.
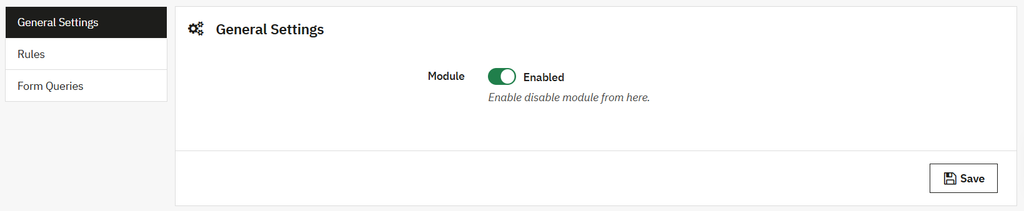
Rules
Click the Rules option to open the rule settings. By default, the rule General Settings tab will be displayed. Here, you can create a new rule, configure the general settings, and define the rule criteria. To configure a rule, use the following settings:
General Settings:
- Rule Name: Add the custom name for the rule.
- Rule Priority: Set the rule priority to handle multiple rules simultaneously.
- Active Rule: Activate or deactivate the hide price rule at any time.
- Hide Price: Enable or disable the hide price option. When enabled, the following settings become available:
- Custom Message: Enable this option to display a custom message instead of the product price.
- Add Custom message: Add your custom text or message, and optionally attach an image or video to provide additional information to customers.
- Custom Message: Enable this option to display a custom message instead of the product price.
- Hide Add-to-Cart Button: Enable or disable the Add to Cart button at any time. When enabled, the Add to Cart button will be hidden, and the following settings will become available:
- Custom button: Enable this option to replace the Add to Cart button with a custom button.
- Custom button title: Enter the title for the custom button.
- Custom button linked field: Add the URL where the custom button will redirect customers.
- Custom button text color: Choose a custom text color for the button.
- Custom button background color: Choose a custom background color for the button.
- Custom button: Enable this option to replace the Add to Cart button with a custom button.
- Login to View Price: Enable or disable this button at any time. Once enabled, the Login to View Price button is displayed on the frontend. Customers who click the button are redirected to the login page to sign in and view product prices.
- Show Ask for Price form: Enable this option to display the “Ask for Price” button on your store. When a customer clicks this button, the Ask for Price form appears. After enabling this option, you can choose which form fields to display by:
- First Name Field: Enable or disable this field as needed.
- Last Name Field: Enable or disable this field as needed.
- Email Address Field: Enable or disable this field as needed.
- Additional Query Field: Enable or disable this field as needed.
- Show WhatsApp Contact button: Enable this option to display a WhatsApp Contact button on your store, allowing customers to start a WhatsApp chat with you directly. Once enabled, the following setting becomes available:
- WhatsApp number: Enter the WhatsApp number that customers will use to contact you.
- Save: Click on the save button to save and apply these changes.
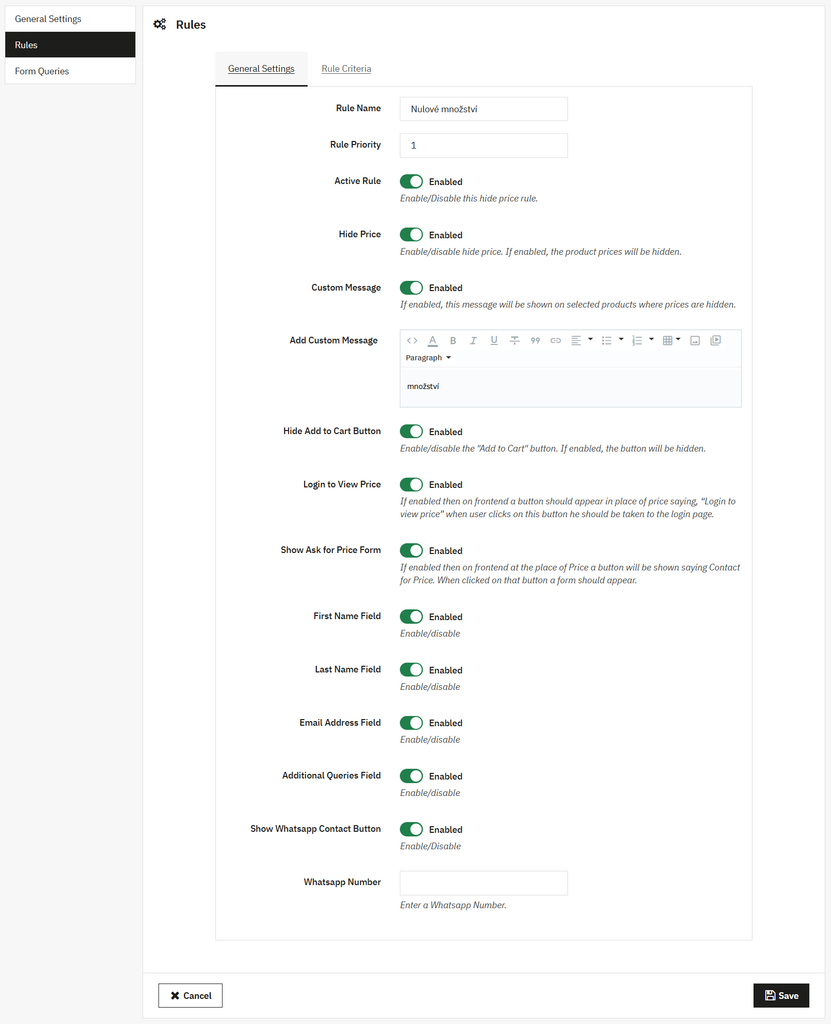
Rule Criteria
Configure the rule criteria using the following options:
- Customer Group: Enable this option to apply the rule to specific customer groups. Once enabled:
- Group: Select the customer groups in a list, such as Visitor, Guest, Customer, etc.
- All Products: Enable this option to apply the rule to all products in your store.
- Product Selection: Enable this option to apply the rule to specific products. Once you enable this:
- Products: Select the specific products to which the rule will apply.
- Category Selection: Enable this option to apply the rule to specific categories. Enable this to:
- Categories: Select the specific categories from the list to which the rule will apply.
- Supplier Selection: Enable this option to apply the rule to specific suppliers. Once enabled:
- Supplier: Select the specific suppliers.
- Manufacturer Selection: Enable this option to apply the rule to the specific manufacturers. Once enabled:
- Manufacturer: Select the name of a specific manufacturer.
- Price-Based Selection: Enable this option to apply the rule based on a product’s price. If you enable this, you can:
- Minimum Price: Enter the minimum product price.
- Maximum Price: Enter the maximum product price.
- Stock-Based Selection: Enable this option to apply the rule based on specific product stock. If enabled:
- Products with Zero Stock: Enable this to apply the rule only to out-of-stock products.
- Custom Stock Value: Enable this option to add a custom stock value where the rule will be applied.
- Stock Value: Enter the stock quantity. The rule will be applied when a product’s stock is lower than the specified value, hiding the product price and the Add to Cart button.
- Rule Scheduling: Enable this option to schedule the rule during a specific date range. If you enable this:
- Rule Start Date: Select the date when the rule should become active.
- Rule Expiry Date: Select the date when the rule should expire
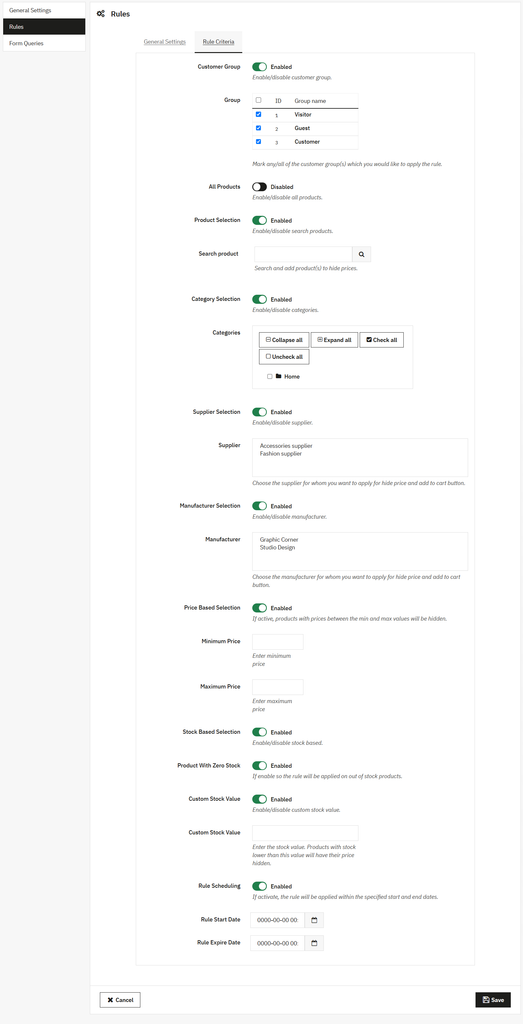
Form Queries
Click this option to view the details of all the forms submitted by customers. The submitted information is shown in a simple grid.
Grid Details:
- ID: Display the form ID.
- First Name: Display the customer’s first name.
- Last Name: Display the customer’s last name.
- Customer Email: Display customer email address.
- Added Date: Display the form submission date.