
Configuration of Multi Locations Inventory Management for WooCommerce
Viewing Inventory Stats in a Dashboard
Go to WooCommerce > Multi Locations > Dashboard. This is where you’ll find an overview of your inventory across all locations.
Viewing Inventory Stats:
From the dashboard, you can access various inventory statistics to get insights into your stock levels.
Key statistics include:
- Current Stock Value: The total value of your current stock across all locations.
- Total Stock: The total quantity of products available across all locations.
- Number of Out-of-stock Products: The count of products that are currently out of stock.
These statistics give you a quick overview of your inventory health.
Filtering and Time Periods:
You can view stock changes over time by applying filters for different warehouses and time periods.
This feature enables you to track how your inventory levels fluctuate over time, helping with inventory forecasting and management.
Exploring Stock Lists:
The dashboard also provides lists of various stock statuses:
- Low-stock Products: Products that are running low in inventory.
- Overstock Products: Products that have excess inventory.
- Out-of-stock Products: Products that are currently out of stock.
These lists help you identify which products need attention, whether it’s restocking, discounting, or adjusting inventory levels.

Managing Multiple Warehouse Locations
Go to WooCommerce > Multi Locations > Locations. Here, you can manage all locations in one place in a log.
Editing and Managing Locations:
You can edit any warehouse location details directly from the location log.
Perform bulk actions such as deleting or updating multiple locations simultaneously if needed.
Adding Multiple Locations
To add a new warehouse location, click on “Add New Location”.
Provide the following details for each location:
Add New Location:
- Name: The name of the warehouse as it will appear on your site.
- Slug: This is the URL-friendly version of the name, usually in lowercase and containing only letters, numbers, and hyphens.
- Parent Location: If applicable, you can assign a parent term to create a hierarchical structure.
- Description: An optional description of the location.
- Email: Contact email for the warehouse.
- Location Shop Manager Name: Name of the shop manager for this location.
- Phone: Contact phone number for the warehouse.
- Address, Route, City, State, Zip Code, Country: Physical address details of the warehouse.
- Latitude, Longitude: Geographical coordinates of the warehouse location.
- Accept Order in Specific Time: Specify if orders are accepted during specific times.
- Location Time: Opening and closing times for the warehouse.
- Shipping Zones: Define shipping zones applicable to this location.
- Shipping Methods: Select shipping methods available for this location.
- Payment Methods: Specify payment methods accepted for orders from this location, such as direct bank transfer, cash payments, or cash on delivery.
Saving New Location:
Once you’ve provided all necessary data for the new location, click on “Add New Location” to save it.


Managing Stock in a Dashboard
Go to WooCommerce > Multi Locations > Manage Stock to view comprehensive stock information presented in a table format.
Customizing Table Columns:
The stock management table allows you to tailor the displayed information according to your preferences. Choose from the following categories to populate the table:
- SKU
- Name
- Thumbnail
- Tax
- Status
- Tax Class
- Shipping Class
- Price
- Sale Price
- Weight
- Inventory Name
- Manage Stock
- Stock Quantity
- Low Stock Threshold
- Backorder
- Stock Status
- Sold Individually
- Location
- History
Applying Filters:
To streamline your stock viewing experience, you can apply filters based on various parameters:
- SKU: Search by SKU to locate specific products.
- Product Name: Search by the product name for quick access.
- Stock Quantity: Set minimum and maximum stock quantity thresholds.
- Categories: Filter by product categories to focus on specific groups of products.
- Product Type: Select from different product types like:
- All Products
- Simple Product
- Grouped Product
- External/Affiliate Product
- Stock Type: Choose from:
- All Stock
- In Stock
- Out of Stock
- On Backorder
- Product Management: Filter between Managed and Unmanaged products.
- Locations: Specify locations to view stock levels at specific warehouses.
Editing Stock Parameters:
From the table, you can directly edit various parameters of the stocks for quick updates:
- Price: Adjust the product price.
- Sale Price: Set or modify the sale price.
- Manage Stock: Enable or disable stock management for individual products.
- Stock Quantity: Specify the quantity of stock available.
- Low Stock Threshold: Set the threshold for low stock alerts.
- Allow Back Orders: Choose the backorder option, including:
- Do Not Allow
- Allow, But Notify Customer
- Allow
- Sold Individually: Toggle the option to sell the product individually.
- Location: Assign or change the location for the product’s stock.

Editing Products to Create Multiple Inventories
Click on any “Product ID” in the stock management table, or navigate to Products from the WordPress Admin Panel and select the product you want to edit.
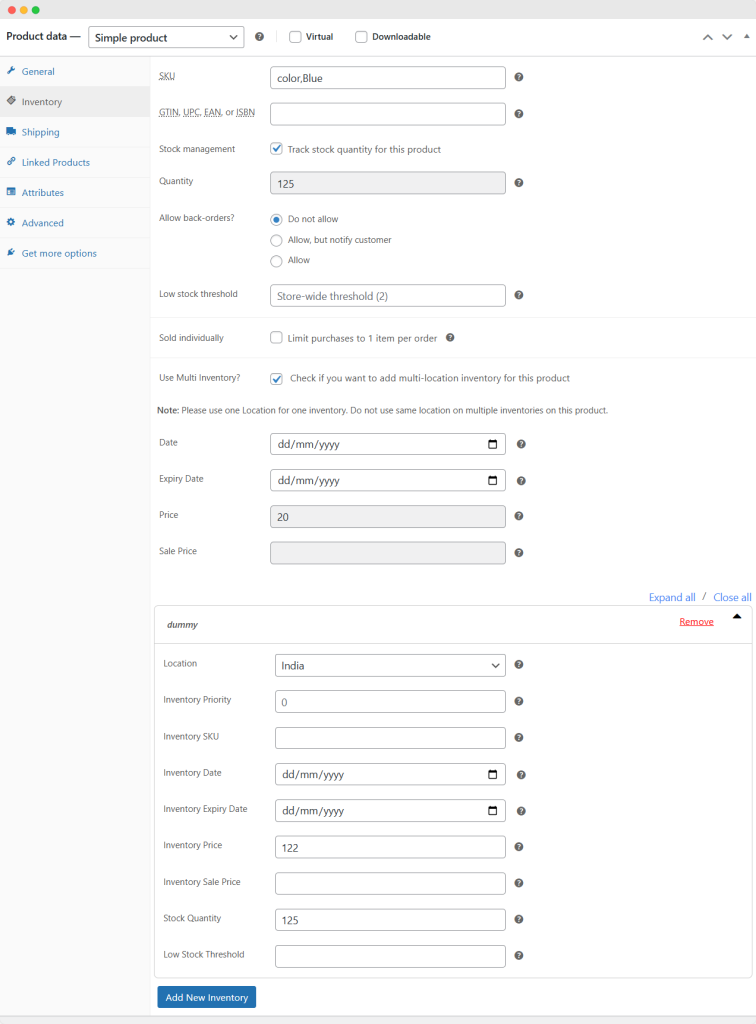
Adjusting Inventory Settings:
Once you’re in the product editing interface, you can customize inventories for both simple and variable products by adjusting the following settings:
- SKU: Enter the SKU (Stock Keeping Unit) for the inventory.
- Manage Stock: Toggle to manage the stock level (quantity) for the inventory.
- Stock Quantity: Specify the quantity of stock available for this inventory.
- Allow Backorders: Choose whether to allow backorders, and if so, how they’re handled (Do Not Allow, Allow But Notify Customer, Allow).
- Low Stock Threshold: Set the threshold for low stock alerts.
- Sold Individually: Optionally limit purchases to 1 item per order for this inventory.
- Total Stock: This field displays the total stock of the product including all inventories created.
- Date: Set the date of this inventory.
- Expiry Date: Optionally set an expiry date for this inventory.
- Price: Set the price for this inventory.
- Sale Price: Optionally set a sale price for this inventory.
- Location: Specify the location for this inventory.
Adding Multiple Inventories:
To add multiple inventories for a product, click on “Add New Inventory”.
Adjust the following settings for each new inventory:
- Location: Specify the location for this inventory.
- Inventory Priority: Set the priority of this inventory (if applicable).
- Inventory SKU: Enter the SKU for this inventory.
- Inventory Date: Set the date of this inventory.
- Inventory Expiry Date: Optionally set an expiry date for this inventory.
- Add Inventory Price?: Toggle to add a separate price for this inventory.
- Inventory Price: Set the price for this inventory (if applicable).
- Inventory Sale Price: Optionally set a sale price for this inventory.
- Stock Quantity: Specify the quantity of stock available for this inventory.
- Low Stock Threshold: Set the threshold for low stock alerts for this inventory.
Ensure that each location is used for only one inventory to avoid conflicts.
Showing Product Locations on Single Product Page
Go to WooCommerce > Settings > Multi Location Inventory Settings > General.
Front End:
- Show Locations: Check this option if you want to display locations to users on the Single Product Page.
- Show Locations In: Choose the form in which you want to display locations, either as a radio button or a dropdown menu.
- Restrict Users to Specific Locations: Enable this option to restrict users to select from the specified locations only.
- Locations: Select the locations you want to make available for users to choose from.
- Heading Display: Check this option if you want to display a heading.
- Heading: Enter the heading text.
- Heading Color: Select the color for the heading text.
- Title Display: Check this option if you want to display a title.
- Title: Enter the title text.
- Title Color: Select the color for the title text.
- Field Border: Enable this option to set a border for the location selection field.
- Field Border Color: Select the color for the field border.
- Field Border Radius: Enter the border radius.
- Field Padding: Enter the padding for the field.
- Field Background Color: Select the background color for the field.
- Dropdown Option/Radio Button Color: Set the color for dropdown options or radio buttons.
- Dropdown Option/Radio Button Font Size: Specify the font size for dropdown options or radio buttons.
- Hide Locations If They Are Out Of Stock: Enable this option if you want to hide locations that have out-of-stock status on the front end.

Assigning Orders Based on Priority or Maximum Stock
- Backend Mode Only: If enabled, this will disable front-end location selection functionality, allowing you to modify orders from the backend.
- Allow to Work plugin from Backend Only: Select this option if you want the plugin to work only from the backend.
- Location with Most Inventory in Stock: Automatically choose the location with the most available stock.
- Location as Per Priority in Stock: Assign locations based on priority and availability of stock.
Click on “Save Changes” to apply the configured settings.

Displaying Store Locations on the Shop Page
Go to WooCommerce > Settings > Multi Location Inventory Settings > Shop Page to display locations where each product is available, along with the stock and prices.
Shop Page Settings:
Inventory Name and Stock: Enable this option to show the names of locations where each product is available, along with the available stock at each selected location.
Inventory Price: Enable this option to display the price specific to each location on the shop page.
Hide Out of Stock Products: Enable this option to hide products that are currently out of stock. This ensures that only available products are displayed on the shop page.
Location Filter Widget: Enable this option to display a location filter widget on the shop page, alongside the default WooCommerce filters.
Click on “Save Changes” to apply the configured settings.

Configuring Shipping & Payment Methods
Go to WooCommerce > Settings > Multi Location Inventory Settings > Shipping & Payment Method to configure shipping and payment methods for each location.
Shipping and Payment Method Settings:
- Shipping Zones to Each Location: Enable this option to assign shipping zones to each location. You can set shipping zones from the location edit screen after enabling this feature.
- Shipping Methods to Each Location: Enable this option to assign shipping methods to each location. You can set shipping methods from the location edit screen after enabling this feature. Note that “Shipping Zone Setting” must be enabled for this option to work properly.
- Payment Methods to Location: Enable this option to assign payment methods to each location. You can set payment methods from the location edit screen after enabling this. On the checkout page, the common payment methods available from the selected product locations will be shown to the customer.
Click on “Save Changes” to apply the configured settings.

Customizing Stock Display
Go to WooCommerce > Settings > Multi Location Inventory Settings > Manage Stock Configuration to customize the stock display.
Configuration:
- InStock Color: Define the color to represent products that are in stock.
- Out of Stock Color: Define the color to represent products that are out of stock.
- On Backorder: Specify how products on backorder are indicated.
- Low Stock: Define the threshold for what is considered low stock.
- Over Stock: Specify how overstocked products are handled.
- Over Stock Threshold: Define the threshold for what is considered overstocked.
Click on “Save Changes” to apply the configured settings.

Importing/Exporting Inventory Stock Info
Go to WooCommerce > Multi Locations > CSV Import/Export to efficiently manage inventory stock information in bulk.
Importing Inventory Data:
To import inventory data from a CSV file, prepare your CSV file with detailed product and inventory information.
Ensure your CSV file includes the following fields:
- Product ID
- Product Name
- ID
- Name
- Priority
- SKU
- Date
- Expiry Date
- Manage Stock
- Stock Quantity
- Low Stock Threshold
- Allow Back Orders
- Sold Individually
- Locations
Use the “Upload CSV” button to load this inventory data into your WooCommerce store.
Exporting Inventory Data:
To export inventory data to a CSV file, click on the “Download CSV” to obtain data.


