
Create and Add Product Labels and Stickers
Adding New Labels and Stickers
In your WordPress admin dashboard, navigate to WooCommerce, and you will now see a Product Labels option in the menu.
Here, you will get a comprehensive log of product labels and stickers. To create a new label, click on “Add New Label.”
Add Title: Enter a unique title for the label. This title will help you identify the label in the future
Choosing from 4 Badge Types
Badge Type: Select the type of badge you want to create. You can choose from the following options:
- Text
- Text/Giff Over Image
- SVG with Text
- Image/Giff Only

Customizing Position & Size of Labels
Badge Label: Add a custom label for the badge. You can use placeholders such as {sale_price}, {standard_price}, {stock_quantity}, {active_price}, and {save_amount} to display dynamic information.
Add Background: Enable this option if you want to add a background to the text
Bold Text: Enable this option to display the text in bold
Badge Text Color: Choose a color for the badge label
Badge Text Size: Specify the size of the badge label
Badge Label Font-Family: Select a font family for the badge label. Options include:
- Times New Roman
- Garamond
- Courier New
- Monaco
- Brush Script MT
- Lucida Handwriting
- Copperplate
- Papyrus
- None of the Above (Custom Font Set)
Custom Font Name: If you selected “Custom Font Set,” add the custom font family name
Badge Opacity: Set the opacity for the badge

Specifying Start & End Dates
Badge Start Date: Choose the start date for displaying the badge. Leave it empty to show the badge at all times
Badge End Date: Choose the end date for displaying the badge. Leave it empty to show the badge at all times

Applying Restrictions Based on User Roles
User Roles: Select specific user roles for which you want to display the badge. Leave it empty to show the badge to all users
- Administrator
- Editor
- Author
- Contributor
- Subscriber
- Customer
- Shop Manager
- Wholesale
- B2B
- Retailer
- Guest Users
Customers: Select specific customers for whom you want to show the badge. Leave it empty to show the badge to all customers

Setting Product-Based Restrictions
Products: Choose the products for which you want to display the badge. You can select specific products or leave them empty to show the badge on all products
- All products
- Specific Products
Filter Products By: If you select specific products, you can further filter them based on various criteria. Leave empty to show badge on all products:
- On Out of Stock Products
- On Back Order Products
- On Product Shipping Classes
- On Product Types
- On Sale Products
- On Regular price Products
- On Active price Products
- On Best Selling products
- On Featured Products
- On Non Sale Products
- On All in Stock Products
- On New Products
- On Sale Price Products
- On Total Sales Products
- On Stock Range
- On Products Age
Hide WooCommerce Default Badge: Enable this option to hide the default WooCommerce badge

Applying Country Restrictions
Show/Hide Badge on Countries: Choose whether to show or hide the badge in specific countries
- Show Badge
- Hide Badge
Select Country: Choose the countries where you want to show or hide the badge

Displaying Badge on Shop & Product Page
Badge on Shop Page:
Show Badge on Shop, Category, Tag Page: Choose whether to display the badge on the shop, category, and tag pages.
While displaying the badge on the shop page, you can customize the following settings:
Badge Size for Shop Page: Set badge size to 100x100px, except for Badge Type Text.
Badge Position: Choose the badge position for the shop page.
Position of Badge: Opt to adjust the badge’s position.
Space Before Badge: Define space before the badge on the shop page in pixels (1-100px).
Space After Badge: Specify space after the badge on the shop page in pixels (1-100px).
Space for Top of Badge: Set space above the badge on the shop page in pixels (1-100px).
Space for Bottom of Badge: Determine space below the badge on the shop page in pixels (1-100px).
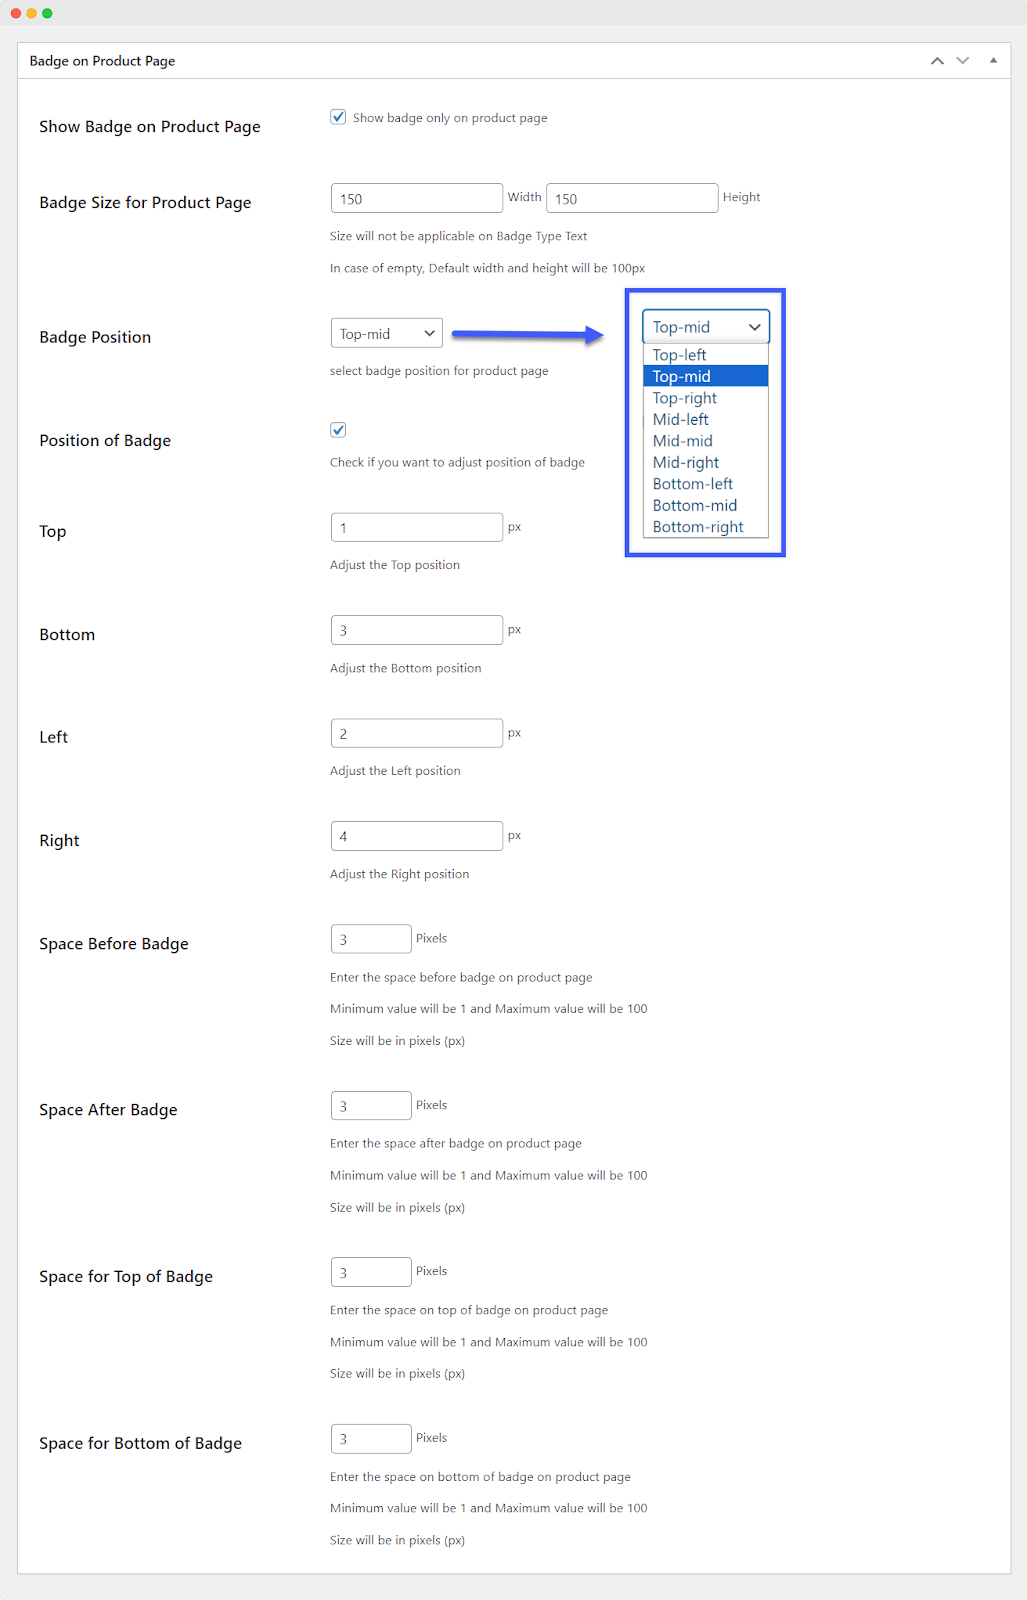
Badge on Product Page:
Show Badge on Product Page: Choose whether to display the badge only on the product page.

While displaying the badge on the product page, you can customize the following settings:
Badge Size for Product Page: Customize badge size (100x100px, default) for product pages, except for “Badge Type Text.”
Badge Position: Select badge position from the following nine options:
- Top left
- Top mid
- Top right
- Mid left
- Mid mid
- Mid right
- Bottom left
- Buttom mid
- Bottom right
Position of Badge: Enable this checkbox for customized position of the badge. This will allow you to configure the following options:
- Top
- Bottom
- Left
- Right
Space Before Badge: Set space before the badge (1-100 pixels) on the product page.
Space After Badge: Define space after the badge (1-100 pixels) on the product page.
Space for Top of Badge: Adjust space above the badge (1-100 pixels) on the product page.
Space for Bottom of Badge: Specify space below the badge (1-100 pixels) on the product page.
Setting Rule Priority
Order: Specify the order in which rules should be applied
Displaying Multiple Badges
If you want to show multiple badges on one product when multiple badges are available, go to WooCommerce > Settings > Product Labels and Stickers and check the Show Multiple Badges option.


