Donation Rule Settings of PrestaShop Donation Manager
Viewing a Complete Log of Donation Campaign
After configuring general settings, navigate to Donation Rules. Here, you can view a detailed list of rules that you will create, and by clicking on the “+” symbol, you can create multiple rules and advertise a donation campaign on your store.
The log displays useful information like Donation Rule ID, Title, Priority, Status, Date of Creation, and Last Modified Date. You can also perform bulk actions on these rules.

Creating A New Donation Campaign
By remaining on the “Donation Rules” settings, click on the “+” symbol and add a new rule for the campaign you want to feature in your store. Now follow the steps:

- Activate Donation Rule: Enable the option to activate the rule
- Add Donation Rule Title: Add a custom text defining the donation rule
- Enter Description: Write a description explaining the donation campaign
- Choose Donation Rule Priority: Add any number to set the rule priority for the donation campaign
- Select Specific Customer Group: From the table, you can choose the following customer group on which you want to apply donation:
- Visitor
- Guest
- Customer
- Add Fixed/Custom Price: You can select any one option for the donation:
- Fixed Price: On selecting a fixed price, you are allowing customers to donate that specific amount from your store.
- Donation Price: Enter a fixed price for the donation
- Custom Price: On selecting custom price you are allowing buyers to donate any desired amount from your store.
- Adjust Minimum Donation Price: Enter the minimum price for the donation
- Add Suggested Donation Price: Enter the price you want to suggest to users for donation
- Set Donation Expiry Date: Select dates until the donation campaign expires

Customizing General Advertisement For Donation Campaign
Once you configured the details for the donation rule, remain on the same page, and from the top section, click on “General Advertisement”. From this section, you can feature a donation campaign as a general advertisement campaign for your store. Now add the following details:
- Add General Advertisement Title: Enter the general advertisement title you want to feature
- Enter Description: Write a description of the general advertisement
- Upload Header/Footer Background Image: Click on Add file and add any custom image for the background
- Add Left/Right Column Background Image: If you want to feature the ad on the left side of the page, then Click on Add File and choose any custom image
- Enable Donate Button: By enabling the option you are featuring a Donate Button along with the image of the campaign.
- Enter Donate Button Text: Add custom text for the donate button
- Choose Button Text Color: Select any color for the campaign
- Select Button Text Background Color: Select the color for the donate button text’s background
- Show advertisement on Home Page: Enable the option to display a Donation Ad on Homepage of your store. Disable it if you wish to hide it from the homepage.
- Select General Advertisement Places: Choose the following places to feature donation Ads on that specific position of the homepage:
- Header
- Footer
- Select General Advertisement Places: Choose the following places to feature donation Ads on that specific position of the homepage:
- Show Advertisement on Product Page: Enable general donation Ads on product pages. Disable it if you do not want to feature it on the product page
- Add General Advertisement Places: Select from the following places:
- Header
- Footer
- Left
- Right
- Add General Advertisement Places: Select from the following places:
- Show advertisement on Category Page: Enable/Disable general advertisement on category pages
- Choose Places for Donation Banner: Select places to feature donation campaign on the following:
- Header
- Footer
- Left
- Right
- Choose Places for Donation Banner: Select places to feature donation campaign on the following:
- Show advertisement on the Cart Page: Enable/Disable general donation Ads onthe cart page
- Add Position to place Donation Campaign: Select from the following places:
- Header
- Footer
- Left
- Right
- Add Position to place Donation Campaign: Select from the following places:
- Show Advertisement on CMS Page: Enable the option to create general donation advertisements on the CMS pages of your store
- Choose a position to place a donation: Select from the following places:
- Header
- Footer
- Choose a position to place a donation: Select from the following places:


Customizing Donation Advertisement Campaign
To remain on the same page, click on “Donation Advertisement”. Here, you can create a donation campaign as a product to allow your customers to add the price to the cart directly.
- Add Donate Advertisement Title: Enter the advertisement title you want to feature
- Enter Description: Write a description of the donation campaign
- Upload Header/Footer Background Image: Choose a donation advertisement background image
- Add Left/Right Column Background Image: Add any custom image for donation advertisement for left/right positions.
- Enable Donate Button: Enable the option to add a new Donate Button
- Enter Donate Button Text: Add custom text for the donate button
- Choose Button Text Color: Select any color for the campaign
- Select Button Text Background Color: Select the color for the donate button text’s background
- Show Donations on Home Page: Enable the option to display a Donation as a product on Homepage of your store. Disable it if you wish to hide it from the homepage.
- Select Advertisement Places: Choose the following places to feature donation Ads on that specific position of the homepage:
- Header
- Footer
- Select Advertisement Places: Choose the following places to feature donation Ads on that specific position of the homepage:
- Show Donations on Product Page: Enable donations on product pages. Disable it if you do not want to feature it on the product page
- Add Donation Advertisement Places: Select from the following places:
- Header
- Footer
- Left
- Right
- Add Donation Advertisement Places: Select from the following places:
- Show Donations on Category Page: Enable/Disable donation as a product on category pages
- Choose Places for Donation: Select places to feature donation campaign on the following:
- Header
- Footer
- Left
- Right
- Choose Places for Donation: Select places to feature donation campaign on the following:
- Show Donations on Cart Page: Enable/Disable donation Ad on cart page
- Add Position to place Donation Campaign: Select from the following places:
- Header
- Footer
- Left
- Right
- Add Position to place Donation Campaign: Select from the following places:
- Show Donations on CMS Page: Enable the option to add donation as a product on CMS pages of your store
- Choose position to place donation: Select from the following places:
- Header
- Footer
- Choose position to place donation: Select from the following places:


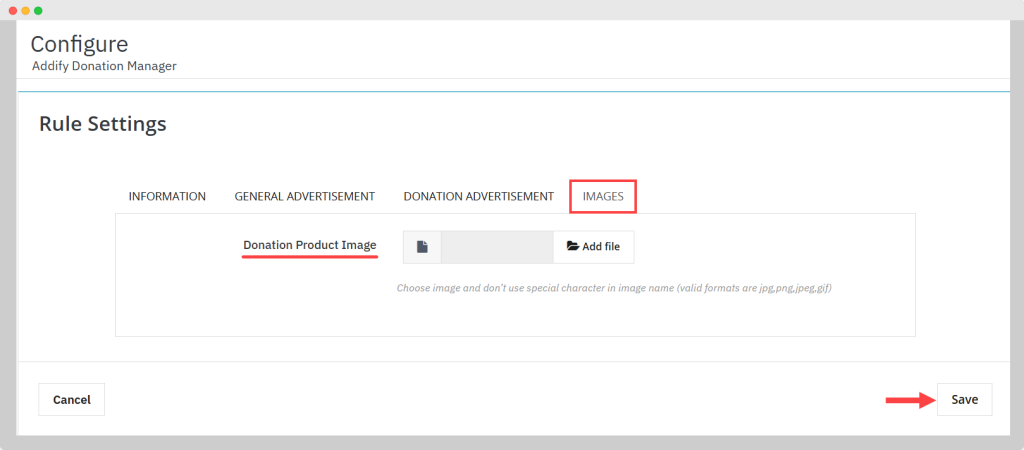
Adding Custom Product Images for Campaigns
Remain on the same page and click on “Images.” From this section, you can add any custom image for the Donation Product.
Donation Product Images: Click on Add file to upload any image from your device and make it display as the donation image used for the product.