
Configuring Order Statuses Settings
Managing Order Statuses in a Log
Go to WooCommerce > Order Statuses.
Here, you can view your order statuses in a grid format. Easily perform bulk actions, search for any specific order status in the search bar, and apply filters based on dates.
1. Importing Custom Statuses:
If you prefer not to add order statuses manually, click the “Import Custom Statuses” button.
Note: You can also download the “import file format” file for reference.
2. Exporting Custom Statuses:
To download a CSV file containing the flow of your order statuses, click the “Export Custom Statuses” button.

3. Adding A New Order Status:
Click the “Add Order Status” button. While creating and adding a new order status, you can customize the following settings:
Order Status Data
Name: Enter a unique descriptive name for your custom order status
Slug: Set the slug for the order status
Note: The slug should consist of only lowercase letters, with no spaces, and words separated by hyphens (“-“)
Description: Provide a brief description of your custom order status
Background Color: Choose a color that will be displayed behind the order status name
Text Color: Select the icon color or text color of the order status name
Graphic Style: Choose a graphic style for the order status. You can pick between:
- Text
- Icon
User Can Cancel: Mark this to allow customers cancel their orders at this status
Paid: Select the payment status of users when their orders are in this status
- Orders are neither paid or nor require payment
- Orders with the status have been paid
- Orders with this status require payment (similar to pending payment)
Bulk Action: Check this option to add this order status to Order list table Bulk action list.
Display in Reports: Mark this to enable orders with this status to be included in sales and order reports
Hide from customer: Enabling this option will hide this order status from customers. (Note: when this is enabled, Cancel and Pay buttons associated with this status will also be hidden from customers)

Click “Publish” to save the new custom order status for your products.
Managing Status Email Rules in a Log
Navigate to WooCommerce > Order Statuses > Status Email. In this section, you can easily manage all your existing email notification rules.
View, edit, or delete any rule directly from the dashboard when needed.
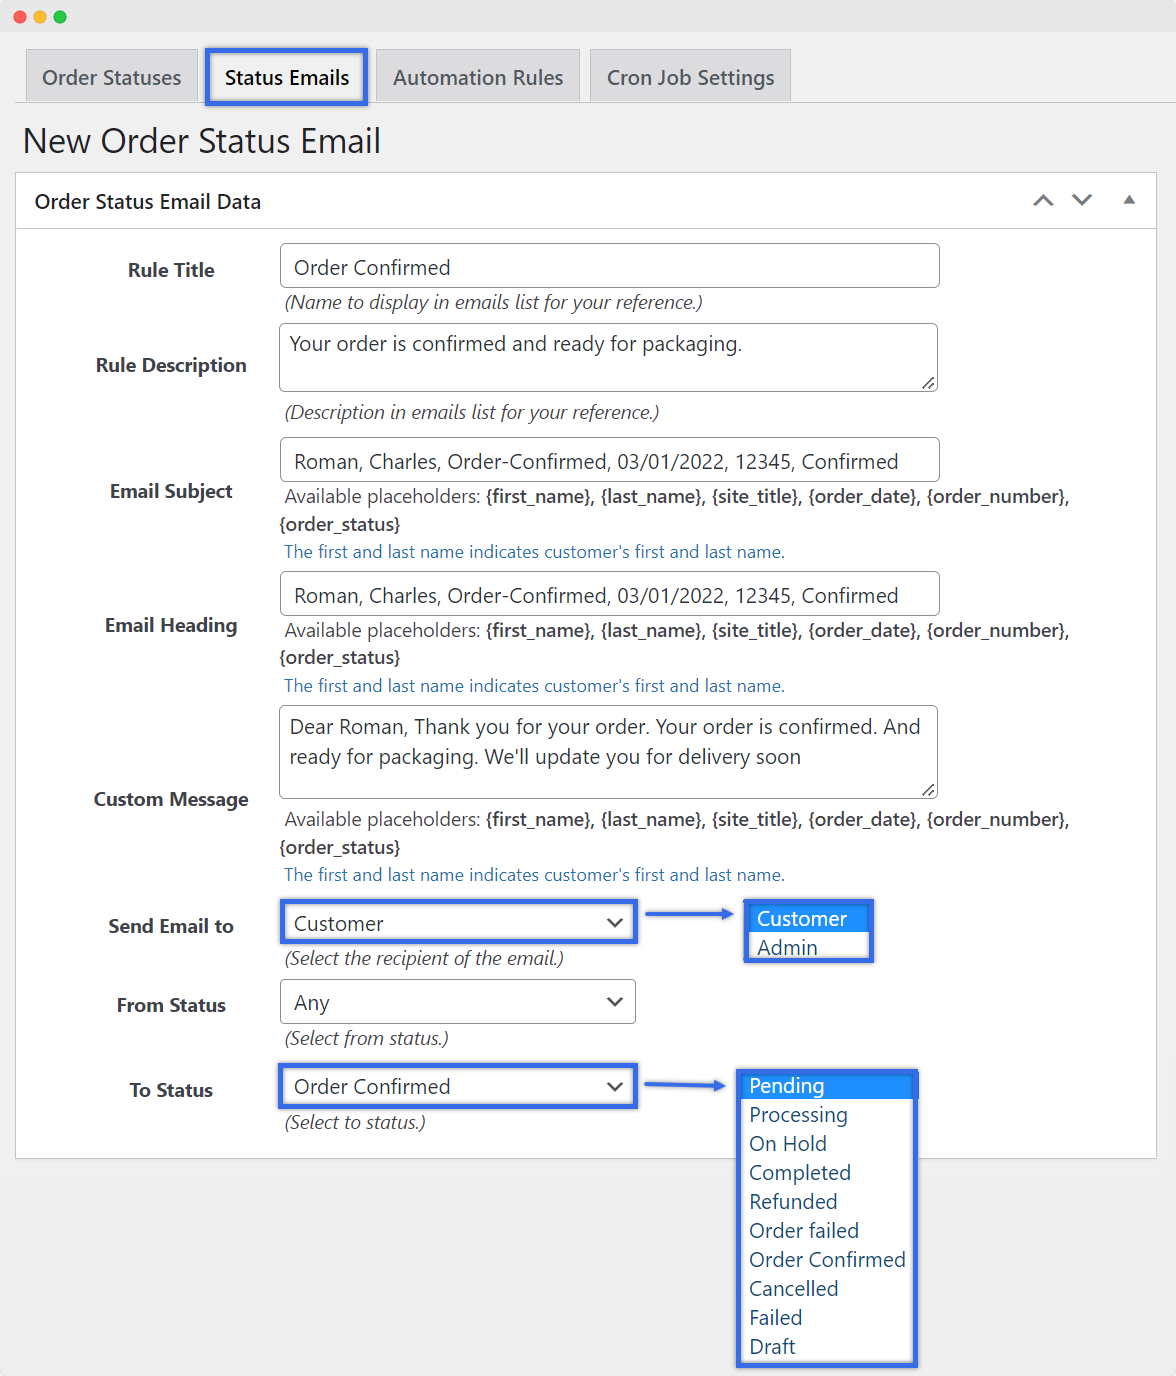
Adding a New Order Status Email Rule
Click the “Add Order Status Email” button to create a new email rule. While setting up a new rule, you can configure the following settings:
Rule Title: Assign the rule a unique title. This title will be displayed in the email list for your reference.
Rule Description: Customize the rule description
Email Subject: Set the subject line for the email. You can use placeholders such as {site_title}, {order_date}, and {order_status})
Email Heading: Personalize the email main heading. Available placeholders include {first_name}, {last_name}, {site_title}, {order_date}, {order_number}, {order_status}
Note: The first and last name indicates customer’s first and last name
Custom Message: Add a custom message that you want to include in the status email alert. (Note: Basic order details will be automatically included after this message)
Send Email To: Choose the recipient of the email. Options include:
- Customer
- Admin
From Status: Specify the starting order status that will trigger this email
To Status: Specify the ending order status that will trigger this email
Click “Publish” to save the new status email rule
Managing Automation Rules in a Log
Go to WooCommerce > Order Statuses > Automation Rules to see a complete list of all the existing rules. In this section, you can perform bulk actions, search for specific automation rules using the search bar, and apply filters based on dates.
Adding A New Automation Rule
Click the “Add Automatic Rule” button. While configuring a new rule, you can customize it with the following options:
Add Title: Provide a descriptive title for your automation rule
Order Status:
- From Status: Select the initial order status that will trigger the rule
- To Status: Choose the desired order status to which the order will transition automatically
Time Interval:
- Set Time Interval: Specify the time interval, in minutes, after which the order status will change from the ‘From Status’ to the ‘To Status’
Order Quantity:
- Maximum Quantity: Set the maximum order quantity. The rule will apply only to orders with a quantity less than or equal to the specified value
- Minimum Quantity: Set the minimum order quantity. The rule will apply only to orders with a quantity equal to or greater than the specified value
Order Amount:
- Maximum Amount: Define the maximum order subtotal. The rule will apply only to orders with a subtotal less than or equal to the specified value
- Minimum Amount: Set the minimum order subtotal. The rule will apply only to orders with a subtotal equal to or greater than the specified value
Products:
- Products: Select specific products for which the rule should apply. Leave this field empty to apply the rule to all products
- Product Categories: Choose product categories for targeted rule application. Empty fields mean the rule applies to all categories
Countries:
- Billing Countries: Specify billing countries to restrict the rule to orders from specific locations
- Shipping Countries: Choose shipping countries to limit the rule’s application to specific regions
User Roles:
- User Roles: Select user roles for which the rule will apply. Empty fields mean the rule is not role-specific.
Date Created:
- Date Created Before: If you want the rule to be applied only for orders created before some date, you can set it here. Ignored, if empty.
- Date Created After: If you want the rule to be applied only for orders created after some date, you can set it here. Ignored, if empty
Email Settings:
- Disable Customer Email Notification: Check this box if you don’t want customers to receive email notifications.
- Disable Admin Email Notification: Check this box if you don’t want admins to receive email notifications.
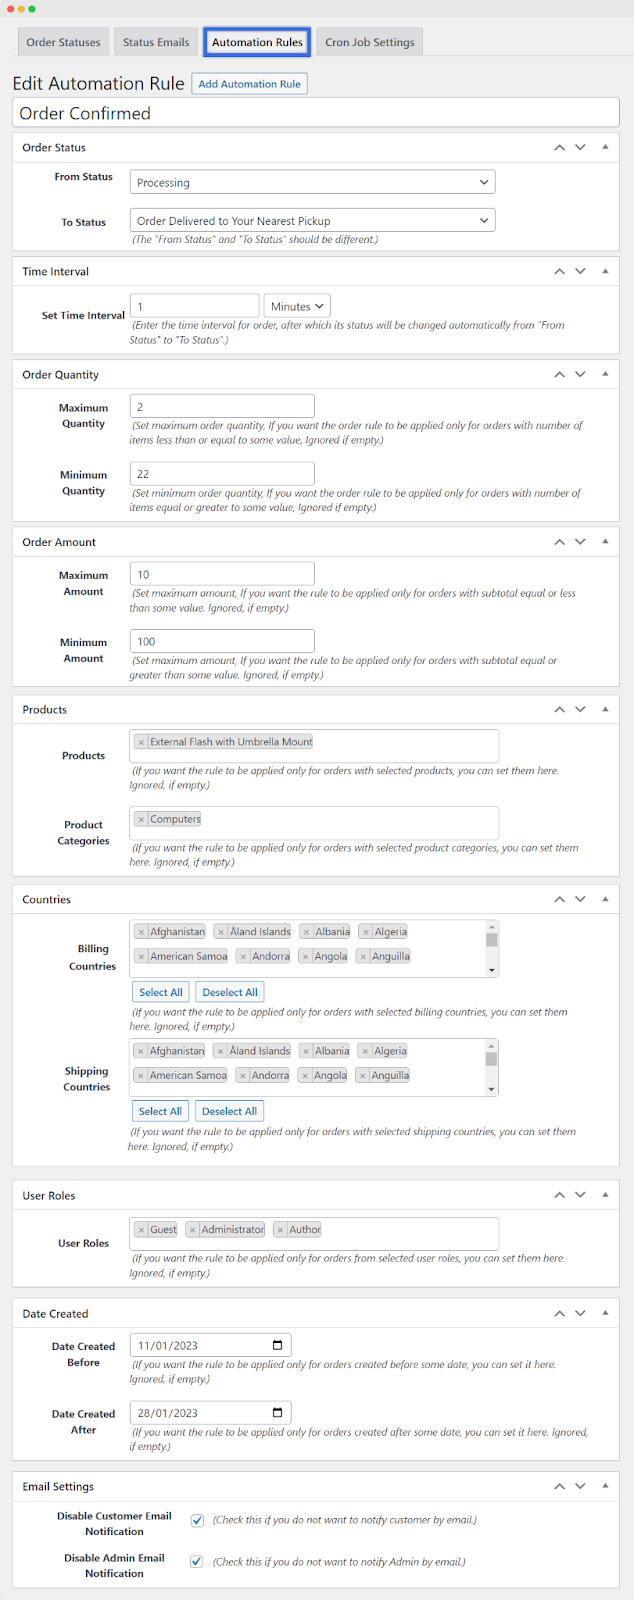
Rule Priority:
Order: Assign a priority value to the rule to determine its order of execution.
Once you’ve configured your rule, click ‘Publish‘ to save the settings.
Cron Job Settings
Go to WooCommerce > Order Statuses > Cron Job settings. Here, you can customize cronjob settings to trigger automatic emails and status change rules.
Cron Time Type: Select the time type for scheduling the cron job. You can choose from:
- Minutes
- Hours
- Days
Cron Job Time: Enter the desired time for the cron job to execute (default time interval =15
minutes)


