Enabling Tax Exemption For Customers in Your Store
Addify Tax Exemption Module Settings
1. General Settings
This section empowers you to tailor tax exemption preferences for your store. Configure the following options to streamline the tax exemption process:
- Remove Tax Automatically: Enable to automatically remove tax during checkout
- Enable Text Field:
- Enable: Enable to display a text field in the tax form
- Required: Enable to make the field mandatory for users to fill
- Text Field Label: Assign the field a unique label
- Enable Textarea Field:
- Enable: Add a text area field in the tax form
- Required: Enable to make the field mandatory for users to fill
- Textarea Field Label: Set a label for the text area field
- Enable File Upload Field:
- Enable: Add a file upload field in the tax form
- Required: Enable to make the field mandatory for users to fill
- File Upload Field Label: Set a label for the file upload field
- Allowed Upload File Types: Specify the acceptable file types that users can upload for tax exemption verification (Note: insert comma-separated values like doc, pdf, etc to allow multiple file types)
Click “Save Changes” to apply the new settings

2. Exempt Customers and Roles
Here, you can tailor tax exemptions to specific individuals or roles within your store, ensuring a seamless and customized shopping experience for everyone.
- Choose Customers: Choose individual customers to whom you want to give tax exemption
- Select User Roles: Choose user roles to whom you want to give tax exemption. You have eight options to choose from:
- Administrator
- Editor
- Author
- Contributor
- Subscriber
- Customer
- Shop Manager
- Whole Sale
- B2B
- Retailer
- Guest
Click “Save Changes” to apply the settings

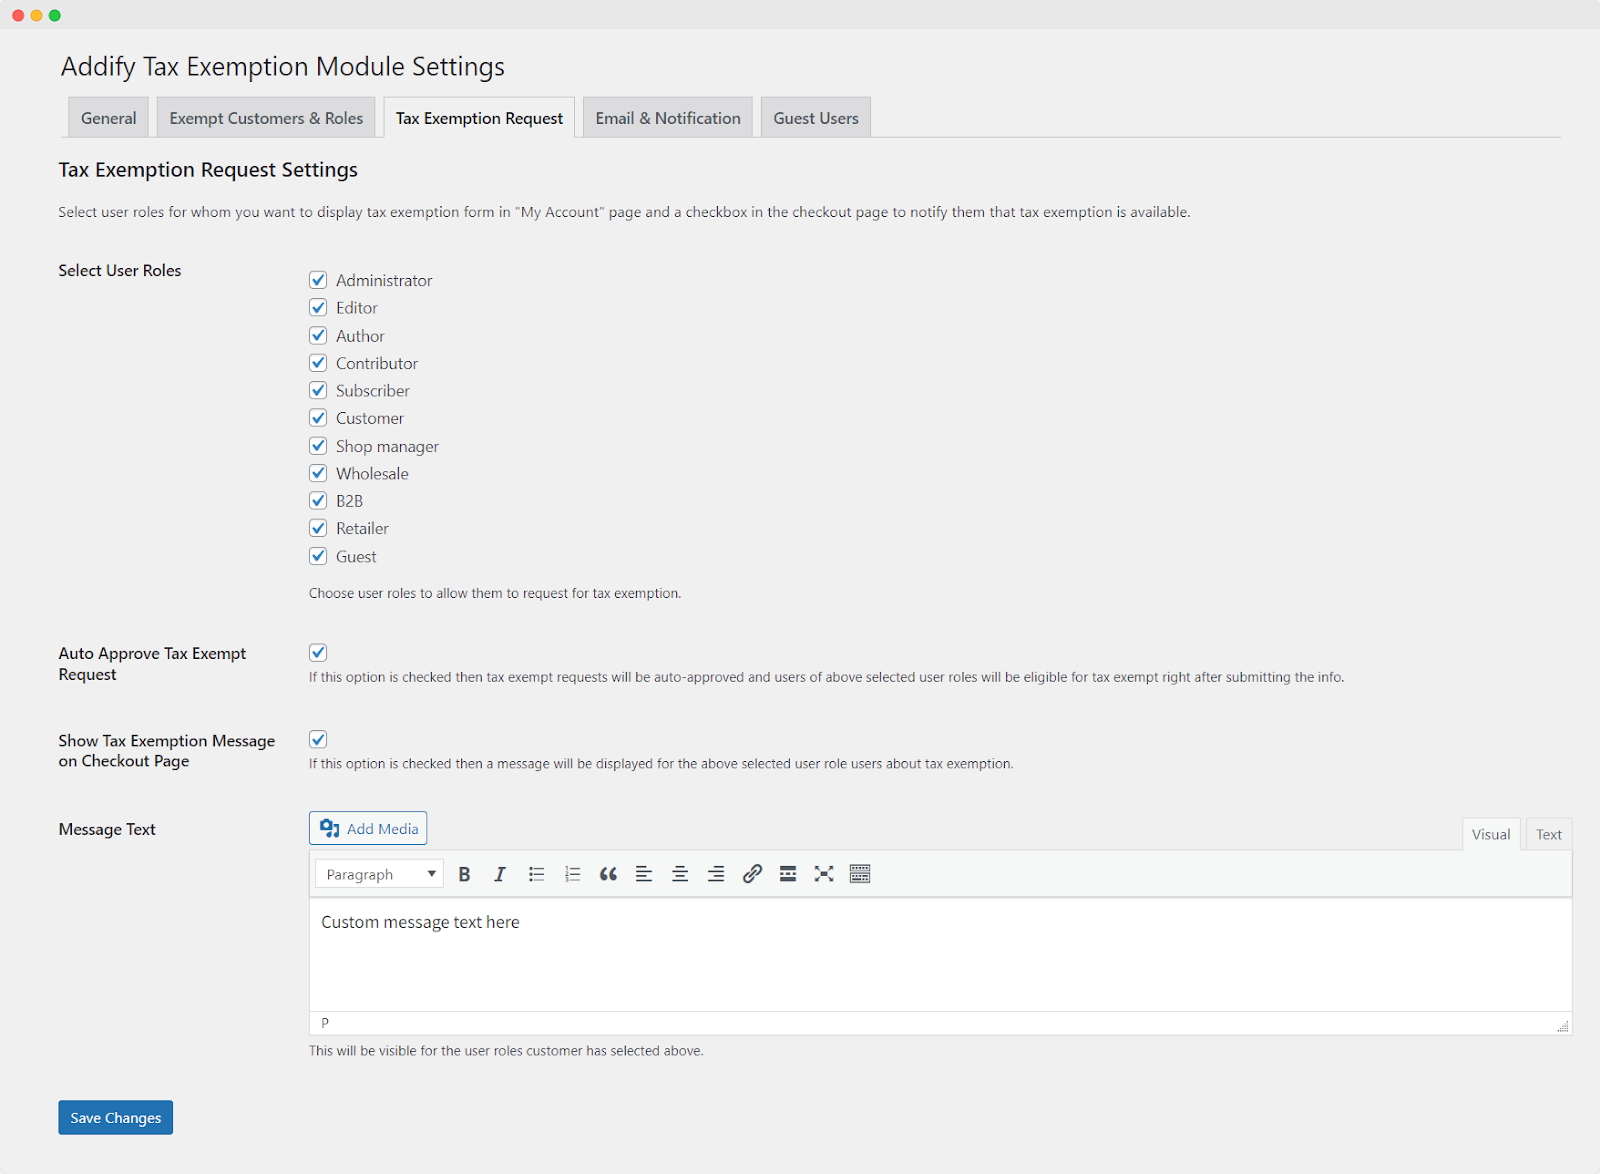
3. Tax Exemption Request
This section enables you to display tax exemption forms on the “My Account Page” for specific user roles:
- Select User Roles: Choose user roles eligible for tax exemption. Options include:
- Administrator
- Editor
- Contributor
- Subscriber
- Customer
- Shop Manager
- Wholesale
- B2B
- Retailer
- Guest
- Auto Approve Tax Exempt Request: Automatically approve tax-exempt requests from selected user roles
- Show Tax Exemption Message on Checkout Page: Display a personalized message to the selected user roles
- Message Text: A textbox to customize the message content
Click “Save Changes” to save the adjustments
4. Email & Notification
Manage email and notification settings for the WooCommerce Tax Exempt plugin in this section:
a. Email & Notification Settings
- Admin/Shop Manager Email: All administrative emails regarding tax exemption will be sent to this email address
- Add/Update Tax Info Message: This message will be displayed when users add or update tax information in their accounts
b. Add/Update Info Email Messages:
- Admin Email Message: This message will be used in admin email when a user adds or updates tax info from my account (You can use {user_name}, {customer_email}, {form_data}, {approve_link}, {disapprove_link} variables to add data in the message)
- Customer Email Message: This message will be used in customer email when a user adds or updates tax info from my account. (You can use {user_name}, {customer_email}, {form_data} variables to add data in the message)

c. Approve Tax Info Email Messages
- Approve Tax Info Email Message (Admin): This message will be used in the admin email when the admin approves submitted tax info. (You can use {user_name}, {customer_email}, {form_data} variables to add data in the message)
- Approve Tax Info Email Message (Customer): This message will be used in the customer email when the admin approves submitted tax info. (You can use {user_name}, {customer_email}, {form_data} variables to add data in the message)

d. Disapprove Tax info Email Messages
- Disapprove Tax Info Email Message (Customer): This message will be used in the customer’s email when the admin disapproves the submitted tax info. (You can use {user_name}, {customer_email}, {form_data} variables to add data in the message)

e. Expire Tax Info Email Messages
- Expire Tax Info Email Message (Admin): This message will be used in the admin email when submitted tax information is expired. (You can use {user_name}, {customer_email}, {form_data} variables to add data in the message)
- Expire Tax Info Email Message (Customer): This message will be used in the customer’s email when submitted tax information is expired. You can use {user_name}, {customer_email}, and {form_data} variables to add data to the message.
Click “Save Changes” to save the modifications

5. Guest Users
In this section, you can set up a personalized message for guest users about tax exemptions.
Guest User Settings
- Show Tax Exemption Message: Check this option to display a “claim tax exemption” message to guest users
- Message Text: Personalize the content of the message here
Click “Save Changes” when finished
Note: Unlike other users, you cannot manually approve tax exemption requests for guest users; enabling the “Show tax exemption message” option will automatically grant tax exemption to eligible guest users without requiring manual approval.

Managing Tax Exemption Requests
Approve or Disapprove Tax Exempt Request of Users Manually
To approve or disapprove the tax exemption requests from users, navigate to your WP Admin Panel and access the Users section. Select the user whose exemption request you wish to review, then click on the “edit” option. This will direct you to the user details page.
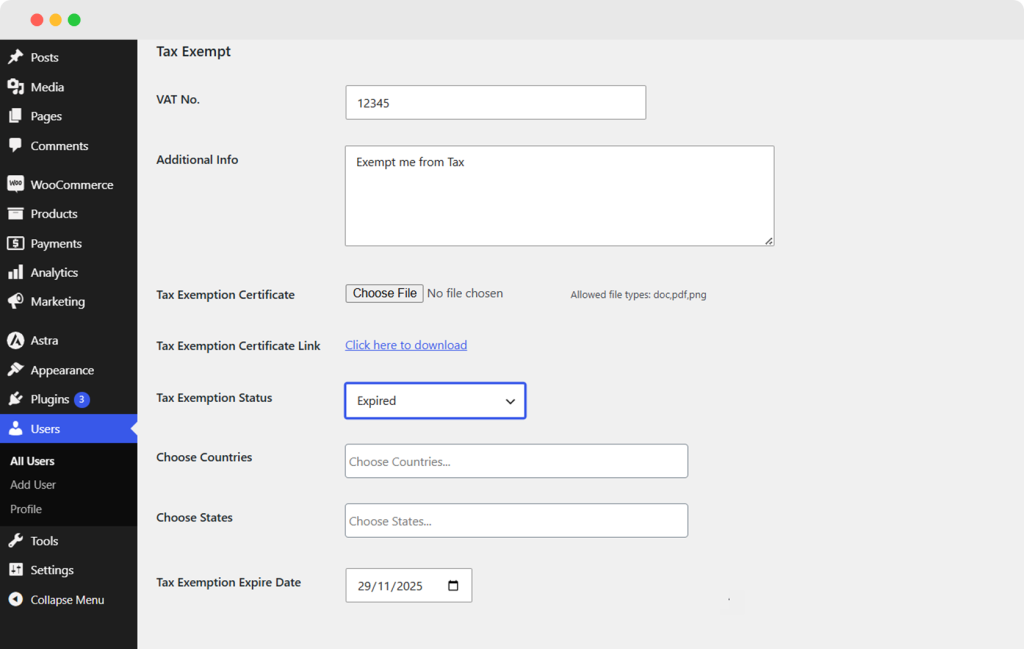
Scroll down to find the “Tax Exempt” section and precisely configure the following settings:
- Tax Number: Enter the applicable tax identification number, if required.
- Exemption Reason: Specify the reason for tax exemption.
- Tax Exemption Certificate: Upload the Tax Exemption Certificate
- Tax Exemption Certificate Link: Link to Download the Tax Exemption Certificate
- Tax Exemption Status: Choose the status of the tax exemption
- Approved
- Disapproved
- Expired
- Choose Countries or States: Choose the countries or states for tax exemption
- Tax Exemption Expiry Date: If applicable, input the date when the tax exemption status expires.