
Configuring the Plugin
1) Products Visibility (By User Roles)
To configure this feature, go to B2B > Settings and navigate to the Products Visibility tab.
Allowing Search Engines to Crawl
General Settings:
Allow Search Engines to Index: Permit search engines to index and rank products, categories, and other pages.

Showing/Hiding Products for All Customers
Global Visibility Settings:
Enable Global Visibility: Checkmark to enable products to all registered and non-registered users
Show/Hide: Select whether you want to show or hide products from users
Select Products: Select products on which you want to apply the global visibility settings
Select Categories: Select categories on which you want to apply the global visibility settings
Redirection Mode: Choose a redirection mode for restricted items from the two options:
- Custom URL
- Custom Message
Custom URL: Add a custom URL to redirect when a user tries to access the restricted catalog
Custom Message: Add a custom error message to display when a user tries to access the restricted catalog

Concealing Products by User Roles
Visibility By User Roles:
The available user roles are:
- Administrator
- Editor
- Author
- Contributor
- Subscriber
- Customer
- Shop manager
- Wholesale
- B2B
- Retailer
- Guest
When selecting a desired user role, you will see the following options:
Enable for this Role: Checkmark to enable products to this specific user
Show/Hide: Select whether you want to show or hide products from the user
Select Products: Select products on which you want to apply this functionality
Select Categories: Select categories on which you want to apply this functionality
Redirection Mode: Choose a redirection mode for restricted items from the two options:
- Custom URL
- Custom Message
Custom URL: Add a custom URL to redirect when the user tries to access the restricted catalog
Custom Message: Add a custom error message to display when the user tries to access the restricted catalog

2) Hide Price & Request a Quote
The WooCommerce B2B plugin enables users to establish various rules for concealing the prices of particular products and specific user roles. It offers the option to replace prices with customized text and replace the “Add to Cart” button with a new “Add to Quote” button.
Adding a New Quote Rule
Go to B2B > Quote Rules > Request for Quote Rules. Get a full list of quote rules in a grid. Click on any quote rule to view the details or even edit.
- Perform bulk actions on quote rules
- Apply a filter to sort them according to month and year
- Add a New Rule
- Search for an existing quote
To generate additional rules, click “Add New Rule” and set the rule as desired.
Add New Rule:
Add Title: Enter a unique quote rule title for future reference
Rule Settings:
Quote for User Roles: Select from the following user roles
- Administrator
- Editor
- Author
- Contributor
- Subscriber
- Customer
- Shop manager
- Wholesale
- B2B
- Retailer
- Guest
Apply on All Products: Check this box to apply this rule on all products
Apply on Out of Stock Products Only: Check this box to apply this rule for “out-of-stock products” only (Note: Select replace quote button with add to cart to activate it)
Quote Rule for Selected Products: Choose a product(s) to apply the quote rule
Quote Rule for Selected Categories: Choose a category(s) to apply the quote rule
Hide Price: Choose “Yes” or “No” from the dropdown to enable/disable Hide Price
Hide Add to Cart Button: Choose an option from the dropdown:
- Replace Add to Cart button with a Quote Button
- Keep Add to Cart button and add a new Quote Button
- Replace Add to Cart with custom button
- Keep Add to Cart and add a new custom button
Custom Button Link: Add a link for a custom button
Custom Button Label: Enter a custom label on the button, e.g., “Request a Quote”
Rule Priority:
Order: Set a desired order for the quote rule
REST API Guide
Requirements:
To use the latest version of the REST API you must be using:
- WooCommerce 3.5+.
- WordPress 4.4+.
- Role-based pricing 2.0.0+
- Pretty permalinks in Settings > Permalinks so that the custom endpoints are supported. Default permalinks will not work.
- You may access the API over either HTTP or HTTPS, but HTTPS is recommended where possible.
Authentication
We have extended the v3 version of WooCommerce REST API. Read more about the WooCommerce authentication here. https://woocommerce.github.io/woocommerce-rest-api-docs/#authentication
List all rules of RFQ
This API helps you to get all rules of Request a quote. HTTP Request: GET /wp-json/wc/v3/af_rfq/ CURL: curl https://example.com/wp-json/wc/v3/af_rfq \-u consumer_key:consumer_secret
Retrieve a rule of RFQ by ID
This API helps you to get all rules of Request a quote. HTTP Request: GET /wp-json/wc/v3/af_rfq/{rule ID} CURL: curl https://example.com/wp-json/wc/v3/af_rfq//{rule ID} \-u consumer_key:consumer_secret
List all user submitted quotes
HTTP Request: GET /wp-json/wc/v3/af_quotes/ CURL: curl https://example.com/wp-json/wc/v3/af_quotes \-u consumer_key:consumer_secret
List all user submitted quotes
HTTP Request: GET /wp-json/wc/v3/af_quotes/ CURL: curl https://example.com/wp-json/wc/v3/af_quotes \-u consumer_key:consumer_secret
Retrieve a Quote by ID
HTTP Request: GET /wp-json/wc/v3/af_quotes/{Quote ID} CURL: curl https://example.com/wp-json/wc/v3/af_quotes/{Quote ID} \-u consumer_key:consumer_secret
Create new quote
HTTP Request: POST /wp-json/wc/v3/af_quotes CURL: Curl -X POST https://example.com/wp-json/wc/v3/af_quotes/{Quote ID} \ -u consumer_key:consumer_secret -H “Content-Type: application/json” \ -d ‘{your-data}’
Delete a quote by ID
HTTP Request: DELETE /wp-json/wc/v3/af_quotes/{Quote ID} CURL: curl -X DELETE https://example.com/wp-json/wc/v3/af_quotes/{Quote ID}?force=true \-u consumer_key:consumer_secret
Update a quote by ID
HTTP Request: PUT /wp-json/wc/v3/af_quotes/{Quote ID} CURL: curl -X PUT /wp-json/wc/v3/af_quotes/{Quote ID} \ -u consumer_key:consumer_secret \ -H “Content-Type: application/json” \ -d ‘{Your Data}’

Adding Custom Fields to Quote Form
Go to B2B > Quote Fields > Fields for Request a Quote. This section displays all of your Quote Fields in a single grid.
- View, edit, or delete any field
- Perform bulk actions on form fields
- Search for an existing form field
- Filter the fields according to month and year
- Add new form fields
To create additional fields, click on “Add New Field”
.

Add New Field:
Title: Enter the name of the field that appears on your All Quotes pages
Field Attributes and Values:
Field Name: Add a unique name for each quote field. It is also used as a meta_key to store values in a database (field name can not be changed once published)
Field Type: Select an input format type for the field
- Text
- Number
- File
- Time
- Date
- DateTime
- Textarea
- Select (Dropdown)
- Multi Select
- Radio
- Checkbox
- Terms & Conditions
Field Label: Enter the field label that will be visible to customers at the frontend
Field Default Value: Select any default customer value against which that field’s data should be stored
- Set a default value
- Username
- First Name
- Last Name
- Nickname
- Display Name
- Billing First Name
- Billing Last Name
- Billing Company
- Billing Address 1
- Billing Address 2
- Billing City
- Billing Postcode
- Billing Phone
- Billing Email
- Shipping First Name
- Shipping Last Name
- Shipping Company
- Shipping Address 1
- Shipping Address 2
- Shipping City
- Shipping Postcode
- Shipping Phone
- Shipping Email
Field Placeholder: Enter a customized text to give your customer an additional description or hint of what you want from them in this field
Based on the input type you select in Field Type, additional fields will appear at the bottom of this section:
When you select “File” as a field type:
- Allowed File Types: Add Comma separated file extensions, e.g., pdf, txt, jpg
- Allowed File Size: File size in bytes 1KB = 1000 bytes and 1MB = 1000000 bytes
When you choose “Select,” “Multi Select,” and “Radio” as a field type:
- Field Options: Add field option(s) for fields types
Field Attributes:
Order: Set the order of fields in the form
Enable/Disable: Enable or disable the field through the dropdown
Required: Make any field mandatory or optional

Managing All Submitted Quotes
Go to B2B > All Quotes > Quotes. Get a list of quote requests submitted by customers and admins in a grid. Click on any quote to view the details or even edit.
- Perform bulk actions on quotes
- Apply a filter to sort them according to month and year
- Add a New Quote
- Search for an existing quote

To create a new quote, click on “New Quote” to continue.
New Quote:
Add Title: Add a unique title for future reference
Customer Information:
Quote #: Displays a unique rule number to distinguish from others
Quote user: Select a user for which you want to apply this rule for
Name: Enter the first name of the customer
Last Name: Enter the last name of the customer
Email: Enter the email address of the customer
Shipping Address Line 1: Add the shipping address of the customer
Shipping Address Line 2: Complete the shipping address of the customer
Additional Instructions: Add a custom message for your customers
I Agree to Terms & Conditions: An agreement section to display with the quote
Quote Details:
View the following quote details here. Add new products or delete an existing one.
- Thumbnail
- Item
- Cost
- Offered Price
- Quantity
- Subtotal (Standard)
- Offered Subtotal
- Shipping Cost
- Total (Standard)
Note: Tax/Vat will be calculated on quote conversion to order, but it is visible to customers.

Add Product(s):
Click on “Add Product(s)”, a pop-up will appear:
Product: Select a product to add to a quote
Quantity: Add product quantity
Click on “Add to Quote”
Once the desired products are added, click on “Convert to Order”.

Quote Attributes:
Current Status: Change the current status of the quote from the dropdown
- Pending
- In Process
- Accepted
- Converted to Order
- Declined
- Cancelled
Notify Customer: Choose “No” or “Yes” from the dropdown
Note: Choose “Yes” to notify customers via email

Personalizing Global Configurations for Request a Quote
To configure this feature, go to B2B > Settings and navigate to the Request a Quote tab.
General Settings:
Enable (Out-of-Stock): Enable/disable the request a quote button for out-of-stock products (Compatible with simple and variable products only)
Quote Basket Menu(s): Add a Mini Quote Basket: Select the menu where the mini quote basket should be added (Option to add on multiple menus). Use the shortcode [addify-mini-quote]
Disable quote basket for user roles: Select user roles to display the quote basket (By default, it is enabled for all)
Set Basket Style: Select the style to display the number of items in the customer’s basket
- Quote Basket with Dropdown
- Icon and Number of items
Enable Ajax Add to Quote (Product Page): Enable/disable Ajax Add-to-Quote on the product page
Enable Ajax Add to Quote (Shop Page): Enable/disable Ajax Add-to-Quote on the shop page
Redirect to Quote Page: Redirect customers to the Quote page once they have successfully added a product to the Quote
Redirect After Quote Submission: Redirect customers to any page once they have successfully submitted a Quote
URL to Redirect: Enter a URL to redirect after the quote is submitted successfully

Custom Messages Settings:
Enabled Ajax add to quote to customize the success messages for:
Quote Submitted Successfully Message: Enter a custom message when a user submits a quote (Message will appear on the quote submission page)
View Quote Basket Button Text: Enter a custom text to display for the view quote basket button

Emails Settings:
Enable and customize the following email notifications:
Admin/Shop Manager Email Address(es): Add comma-separated email addresses of the admin/shop manager
Request a Quote Emails: Set up emails for each quote status. Messages will be displayed before the quote table in emails. These quote statuses are:
- Admin (New Quote)
- Pending/New Quote
- In Process
- Accepted
- Converted to Order(Admin)
- Converted to Order(Customer)
- Declined/Products not available
- Canceled/Rejected
Below are the email settings for each quote status:
Enable/Disable Email: Checkmark to allow emails for this status
Subject of Email: Enter a custom subject of the email
Heading of Email: Enter a custom heading for the email
Additional Message: Customize email message to send for this quote status

Google Captcha Settings:
Enable Captcha: Enable/disable the Google reCaptcha field on the Request a Quote Form
Site Key: Enter a Google reCaptcha site key (available on Google). Without this key, Google reCaptcha will not work
Secret Key: This is Google reCaptcha secret key (available on Google). Without this key, Google reCaptcha will not work

Editors & Builders Settings:
Elementor Compatibility: Enable/disable this option
Divi Builder Compatibility: Enable/disable this option
Solution 2: Allow another solution if your add to cart is not replaced by the plugin Button

Quote Attributes Settings:
Enable Product Price: Activate to display product price, subtotal, and the total of the quote basket (the price will always display on the quote basket and emails)
Enable Offered Price: Activate offered price and subtotal (offered price) of the quote basket
Increase Offered Price: Enter a number in percent to increase the offered price from the standard price of the product (Leave empty for standard price)
Note: Offered price will be displayed according to the settings of a cart (including/excluding tax)
Enable Tax Display: Display tax calculation based on the standard price
Enable Convert to Order: Allow customers the convert to order option at the frontend
Enable Quote Converter Display: Activate to show quote converted (User/Admin) in My Account quote details

Place Quote Button Settings:
Place Quote Button Text: Add a custom place quote button text
Place Quote Button Background Color: Customize the background color of the place quote
Place Quote Button Color: Customize the text color of the place quote
Update Quote Button Settings:
Update Quote Button Text: Add a custom place quote button text
Update Quote Button Background Color: Customize the background color of the place quote
Update Quote Button Color: Customize the text color of the place quote

3) B2B Registrations
The WooCommerce B2B plugin offers a robust B2B registration feature, enabling you to include additional fields for user registration, showcase user roles on the registration form, and manually approve or disapprove new user registrations.
Adding New Registration Fields
To add additional registration fields, go to B2B > Registration Fields. Click on “Add New Field” to generate a customized registration field. During the process of adding a new field, you can:
Add New Field:
Add Title: Enter a unique title for future reference
Field Details:
Field Label: Enter the text in the “Add Title” section
Field Type: Choose from 19 fields as listed below:
- Text
- Text area
- Select box
- Multi-select box
- Checkbox
- Multi-checkbox
- Radio button
- Number
- Password (accept secret input)
- File upload (limit file types and size)
- Color picker
- Date picker (calendar)
- Time picker
- Google ReCaptcha
- Heading
- Message
- VAT field
- Privacy text

Field Formatting
Select from the following format settings:
Required Field: Enable this if the field is required
Show in WooCommerce Registration Form: Enable this to display the field in the Registration form
Show in WooCommerce My Account: Enable this to display the field in the My Account page
Read Only Field (Customer can not update this from My Account page): Enable this to mark the field as read-only
Show in admin order detail page and order email: Enable this to show in the admin order detail page and order email
Field Width: Choose from these two options: Full Width, Half-Width
Field Placeholder Text: Add Field Placeholder Text
Field Description: Add Field description
Field Custom Css Class: Add Field Custom CSS Class

Field Dependency
Is Dependable?: Checkmark to make the field dependable
Select User Roles: Select the user roles for which you want to display this field. Leave empty to display fields for all. User roles mentioned here are:
- Administrator
- Editor
- Author
- Contributor
- Subscriber
- Customer
- Shop manager
- Wholesale
- B2B
- Retailer
- Guest
Field Status
Select from the following field status settings:
Field Sort Order: Choose the field sort order
Field Status: Choose to keep it Active or Inactive

Configuring Registration Fields
To access the B2B registration settings, go to B2B > Settings and navigate to B2B Registration settings. In this section, you can configure various aspects related to B2B registration.
General Settings
You can easily manage registration field settings from here.
Additional Fields Section Title: This is the title for the section where additional fields are displayed on the front-end registration form
Google reCaptcha Settings: Add the following keys to enable Recaptcha:
- Site Key: Add site key to enable Google Recaptcha. You can get the key from Google. Without it, google reCaptcha will not work.
- Secret Key: Add a secret key to enable Google Recaptcha. This is Google reCaptcha secret key; you can get this from Google. Without it, Google reCaptcha will not work.

Enable Default Fields
Enable default WooCommerce registration fields on the registration page. When the user enters these fields, data will be populated on billing fields automatically.
There are ten default fields that you can customize and publish. Below are the settings for each field that you can adjust as per your requirement:
Label: Add a field label
Placeholder: Add placeholder text
Message: Add a message
Required: Mark field is required or not.
Sort Order: Add sort order for the field
Field Width: Add field width
- Full width
- Half width
Status: Choose the field status
- Publish
- Unpublish

User Role Settings
Manage the user role settings with the following options:
Enable User Role Selection: Enable/disable user role selection on the registration page to show the user role dropdown on the registration page.
User Role Field Label: Add a field label for the user role selection select box.
Select User Roles: Select which user roles you want to show in the dropdown on the registration page. You can choose from the following:
- Editor
- Author
- Contributor
- Subscriber
- Customer
- Shop manager
- Wholesale
- B2B
- Retailer
Note: The administrator role is not available for display in the dropdown.

Approve New User Settings
Manage and approve new users using the below settings:
Enable Approve New User: Enable this option to place all newly registered users to Pending until the admin approves.
Enable Approve New User at Checkout Page: Enable/disable the approval of a new user at the checkout page.
Exclude User Roles: Select user roles to exclude from manual approval. These user roles will be automatically approved.
Approve New User Messages Settings: Add messages for new users through the following options:
- Message for Users when Account is Created: Add a message to display to the user on completion of the registration process.
- Message for Users when the Account is Pending Approval: Add a message to display to the user when he attempts to log in after registration while the account is still pending approval.
- Message for Users when Account is Disapproved: Add a message to display to the users on the account disapproval.

Email Settings
Manage emails with the following options:
Admin Email Text (New User): Add text for email notifications regarding new user notifications
Admin Email Text (My Account Update): Add text for email notifications when updating user notification is sent to the admin
User Welcome Email Text: Add text for the email body when a new customer registers
Pending Email Body Text: Add text for the email body when the account is pending approval
Approved Email Text: Add text for approval email messages
Disapproved Email Text: Add text for disapproval email messages

All Registration Fields
View all registration fields created in a single grid or create new fields.
Search Custom fields: Search a field you want to view
Field Type: Know the field types of all fields
Status: View field status
Sort Order: View priority order
Bulk Actions: Apply bulk actions to all fields: Edit, Move to trash, Active, Inactive

4) Role-Based Pricing
Establish pricing specific to customers and user roles with role-based pricing for WooCommerce. You can set a fixed price or adjust prices by a fixed amount or percentage. This feature can be configured on the individual product edit page or through the rules management system, allowing you to modify prices for multiple products and categories in bulk.
Adjusting Role-based Pricing for User Roles
Go to WP Admin Panel > Products > Add New > Role Based Pricing (By User Roles). Enter the following details:
User Role: Select the user role to apply the pricing rule
Adjustment Type: Choose from the following options:
- Fixed Price
- Fixed Increase
- Fixed Decrease
- Percentage Increase
- Percentage Decrease
Value: Add value to the user role
Min Qty: Enter a minimum quantity for the user role
Max Qty: Enter a maximum quantity for the user role
Replace Original Price?: Checkmark to replace the original price with the adjustment type selected
Remove: Take action to remove the rule
Click on “Add Rule” to apply the rule.

Adjusting Role-based Pricing for Specific Customers
Go to WP Admin Panel > Products > Add New > Role Based Pricing (By Customers). Enter the following details to adjust pricing for specific customers:
Customer: Select the specific customer to apply the pricing rule
Adjustment Type: Choose from the following options:
- Fixed Price
- Fixed Increase
- Fixed Decrease
- Percentage Increase
- Percentage Decrease
Value: Add value to the rule
Min Qty: Enter a minimum quantity for the customer
Max Qty: Enter a maximum quantity for the customer
Replace Original Price?: Checkmark to replace the original price with the adjustment type selected
Remove: Take action to remove the rule
Click on “Add Rule” to apply the rule.

Setting Up Role Based Pricing in Bulk
Go to B2B > Role Based Pricing to adjust the rule-based pricing in bulk. You can create multiple rules to adjust the prices of multiple categories and products in bulk for specific customers and user roles.
Adding a New Rule:
Add Title: Add a unique title for future reference
Rule Details:
Rule Priority: Enter a number between 0 and 100 (1 is high, and 100 is low)
Apply on All Products: Check the box to apply the rule on all products
If left unchecked:
Select Products: Choose selected products to apply the rule
Select Categories: Choose selected categories to apply the rule
Role Based Pricing (By Customers):
Customer: Select the specific customer to apply the pricing rule
Adjustment Type: Choose from the following options:
- Fixed Price
- Fixed Increase
- Fixed Decrease
- Percentage Increase
- Percentage Decrease
Value: Add value to the rule
Min Qty: Enter a minimum quantity for the customer
Max Qty: Enter a maximum quantity for the customer
Replace Original Price?: Checkmark to replace the original price with the adjustment type selected
Remove: Take action to remove the rule
Role Based Pricing (By User Roles):
User Role: Select the user role to apply the pricing rule
Adjustment Type: Choose from the following options:
- Fixed Price
- Fixed Increase
- Fixed Decrease
- Percentage Increase
- Percentage Decrease
Value: Add value to the user role
Min Qty: Enter a minimum quantity for the user role
Max Qty: Enter a maximum quantity for the user role
Replace Original Price?: Checkmark to replace the original price with the adjustment type selected
Remove: Take action to remove the rule

Managing Role-Based Pricing
Go to B2B > Settings and navigate to the Role Based Pricing settings tab.
General Settings:
Enable Tiered Pricing Table: Choose to enable a tiered pricing table on the product page
Tiered Pricing Table: Add a custom message to display tiered prices with min and max quantities
Enforce Min & Max Quantity: Check the box to limit users to a minimum and maximum quantity to add to a cart
Min Qty Error Message: Add a custom message to display as an error message when a user adds a quantity less than a minimum quantity
Max Qty Error Message: Add a custom message to display as an error message when a user adds a quantity more than a maximum quantity
Update Cart Error Message: Add a custom error message to display when the user updates the product in the cart

Price for Discount:
Price for Discount by User Roles: Select a regular or sale price to apply a discount of role-based pricing
The user roles include:
- Administrator
- Editor
- Author
- Contributor
- Subscriber
- Customer
- Shop Manager
- Wholesale
- B2B
- Retailer
- Guest

Role Based Pricing Rules:
Add new pricing rules or edit an existing one.

Importing Product Prices Using CSV File
Navigate to WP Admin Panel > B2B > Import Role Base Prices.
Note: Starting from version 1.9.0, importing prices using a CSV file is now possible. However, it is essential to adhere to the specified format outlined below. Please carefully review the instructions and cautionary information provided on the respective page before proceeding with the import process.

5) Tax Exemption
The WooCommerce Tax Exemption plugin enables you to offer tax exemption to selected customers and user roles.
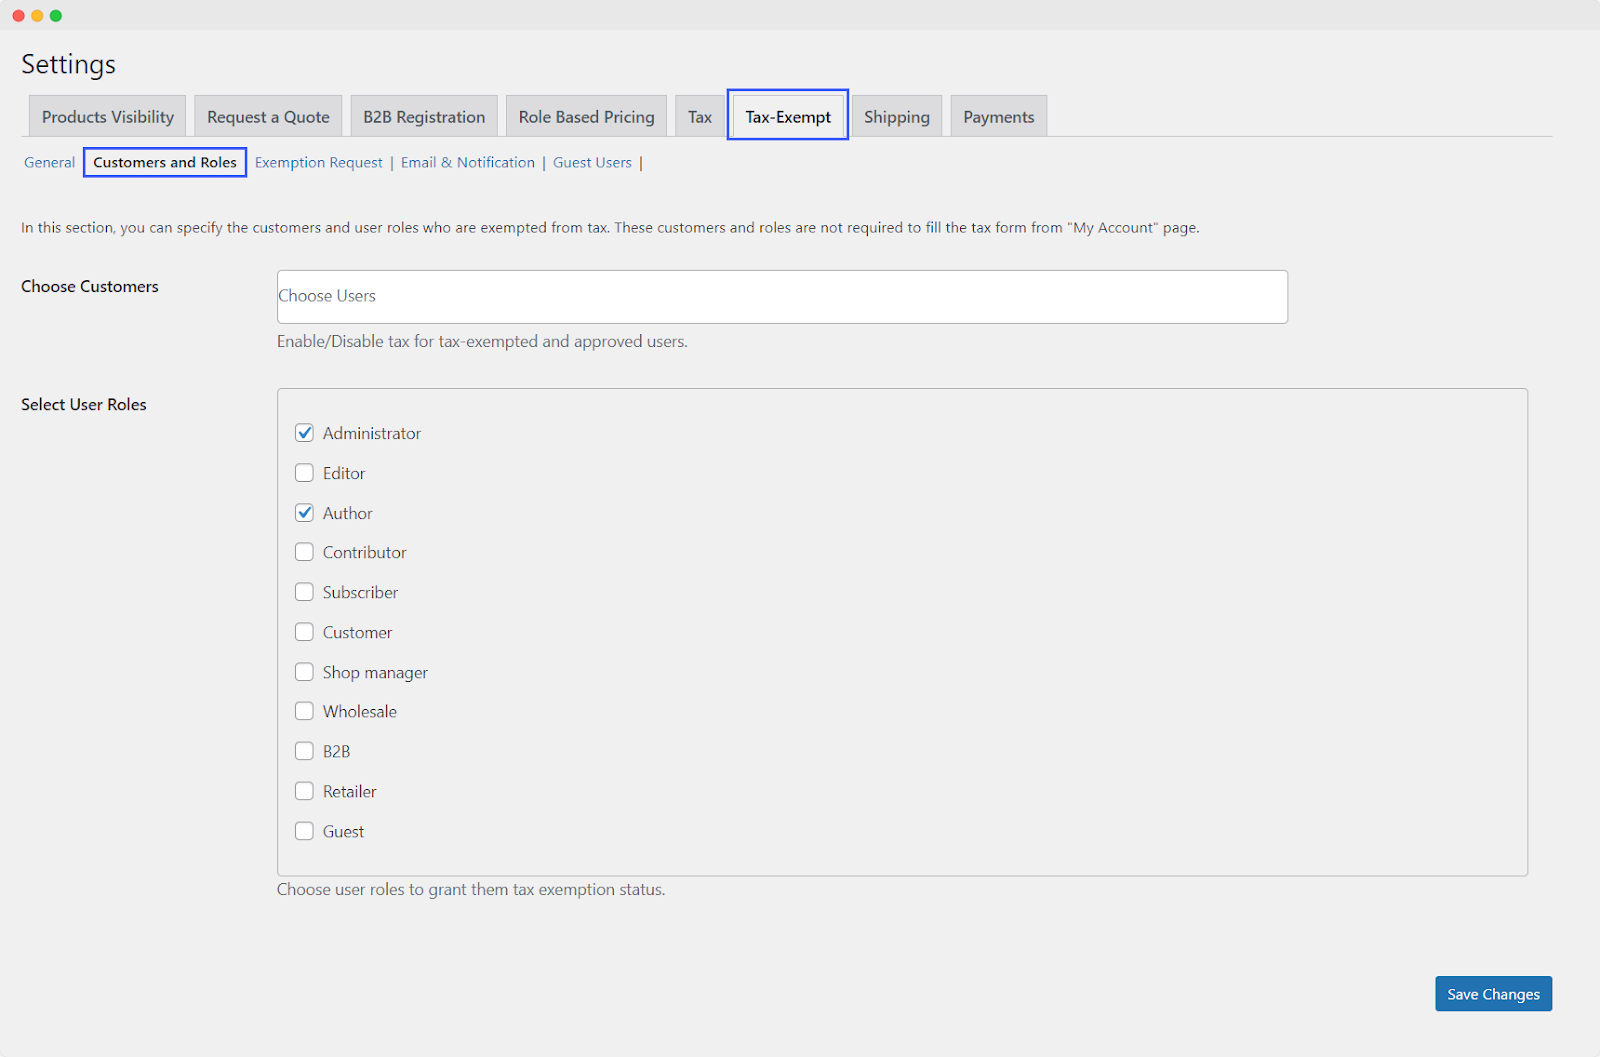
Go to WP Admin Panel > B2B > Settings > Tax-Exempt.
Configuring Tax Exemption Form Fields
General Settings:
You can enable or disable taxes for specific users. Additionally, you can select which field(s) you would like to display on the tax exemption request form.
Remove Tax Automatically: Enable/Disable tax for tax-exempted and approved users
Enable Text Field: Make the text field enabled and/or required to collect name, tax id, etc.
Text Field Label: Add a custom label for the text field
Enable Text Area Field: Make the text area field enabled and/or required to collect additional info, etc.
Text Area Field Label: Add a custom label for the text area field
Enable File Upload Field: Make the text area field enabled and/or required to collect tax certificates, etc.
File Upload Field Label: Add a custom label for the file upload field
Allowed File Types: Specify allowed file types

Exempting Customers and User Roles (By Admin)
Customer and Roles:
Exempted customers and user roles are not required to submit taxes from their account page.
Choose Customers: Enable/Disable tax for tax-exempted and approved users
Select User Roles: Choose user roles to grant them tax exemption status
Setting Up Exemption Request
Exemption Request:
Specify which users have the ability to send tax exemption requests from the “My Account” page. Furthermore, the administrator can enable or disable auto-approval when a customer submits a tax form.
Select User Roles: Choose user roles who can send tax exemption requests
Auto Approve Tax Exempt Request: Enable auto-approve tax-exempt request
Show Tax Exemption Message on Checkout Page: Checkmark to display a message for the above-selected user role users about tax exemption
Message Text: Add a custom message visible to selected user roles
The administrator can review tax exemption requests by accessing the “Edit Profile” section under “All Users” and selecting the specific customer’s name.

Configuring Emails and Other Notifications
Email & Notification:
Customize email and notification preferences for user tax info updates.
Admin/Shop Manager Email: Enter the email address to notify admins regarding any update
Add/Update Tax Info Message: Enter a custom message to display when a user adds or updates tax info in my account
Admin Email Subject: Add a custom subject to notify when a user adds or updates tax info from my account
Admin Email Message: Add a custom message to notify when a user adds or updates tax info from my account
Approve Tax Info Email Subject: Add a custom subject to notify users when the admin approves submitted tax info
Approve Tax Info Email Message: Add a custom message to notify users when the admin approves submitted tax info
Disapprove Tax Info Email Subject: Add a custom subject to notify users when the admin disapproves submitted tax info
Disapprove Tax Info Email Message: Add a custom message to notify users when the admin disapproves submitted tax info

Setting Up Tax Exemption for Guest Users
Guest Users:
Admins can display a text message to non-logged-in customers, informing them about the availability of tax exemption and encouraging them to submit forms to claim the exemption.
Show Tax Exemption Message: Checkmark to display a message for guest users about tax exemption
Message Text: Add a custom message to display for guest users about tax exemption

Displaying Prices & Tax by User Roles
Go to WP Admin Panel > B2B > Settings > Tax tab and choose to display prices inclusive or exclusive of taxes based on user roles.
Tax Display Settings:
Tax Display by User Roles: Choose to include or exclude the tax for each user role

6) Restricting Shipping Methods by User Roles
Go to WP Admin Panel > B2B > Settings > Shipping tab to enable/disable shipping methods for selected user roles and visitors.
Select Shipping Methods for User Roles: Choose all or selected shipping methods from the following:
- Flat Rate
- Free Shipping
- Local Pickup

7) Restricting Payment Methods by User Roles
Go to WP Admin Panel > B2B > Settings > Payments tab to enable/disable payment methods for user roles and visitors.
Select Payment Method for User Roles: Choose all or selected payment methods from the following:
- Direct Bank Transfer
- Check Payments
- Cash on Delivery

9) Restricting Orders (By Cart Quantity, Amount, & User Roles)
Go to WP Admin Panel > B2B > Order Restriction to access restriction settings and rules. You can restrict customers from purchasing below or beyond the specific order amount and quantity.
Enabling Order Restriction on Cart & Checkout Page
General Settings:
Show on Cart Page: Choose to display restriction message(s) on the cart page
Show on Checkout Page: Choose to display restriction message(s) on the checkout page

Creating a New Order Restriction Rule
Click the “Add New Rule” button. While creating a new rule, you can customize the following settings:
Add New Rule:
Add Title: Enter a unique title for future reference
Order Rule:
Select Customer: Choose customers to apply the order rule
Select User Role: Choose user roles to apply the order rule
Order Quantity: Specify the minimum and maximum quantity for the order
Order Amount: Specify the minimum and maximum amount for the order
Compare Cart Amount: Choose from the two options:
- Cart Subtotal
- Cart Total
Restriction Message: Add a custom restriction message to display to a customer


