
Adding Price Calculator to Your Store
Creating Unlimited Pricing Rules
To enhance your WooCommerce store with a Price Calculator feature, go to WooCommerce > Price Calculator and click on “Add New Rule”.
Add Title: Provide a unique title for future reference
Select Products and Categories:
- Select Products: Choose the products you want to include in the price calculation
- Select Categories: Select product categories for price calculation

Select Measurement:
- Unit Text: Enter text to display the unit price, and use {unit} as a placeholder for the measurement unit in the text
- Measurement: Choose the unit for price calculation from the dropdown:
- Weight
- Area (L * W)
- Area (Sq)
- Surface Area 2 (LW + LH + HW)
- Volume (L * W * H)
- Length
- Box (L * H)
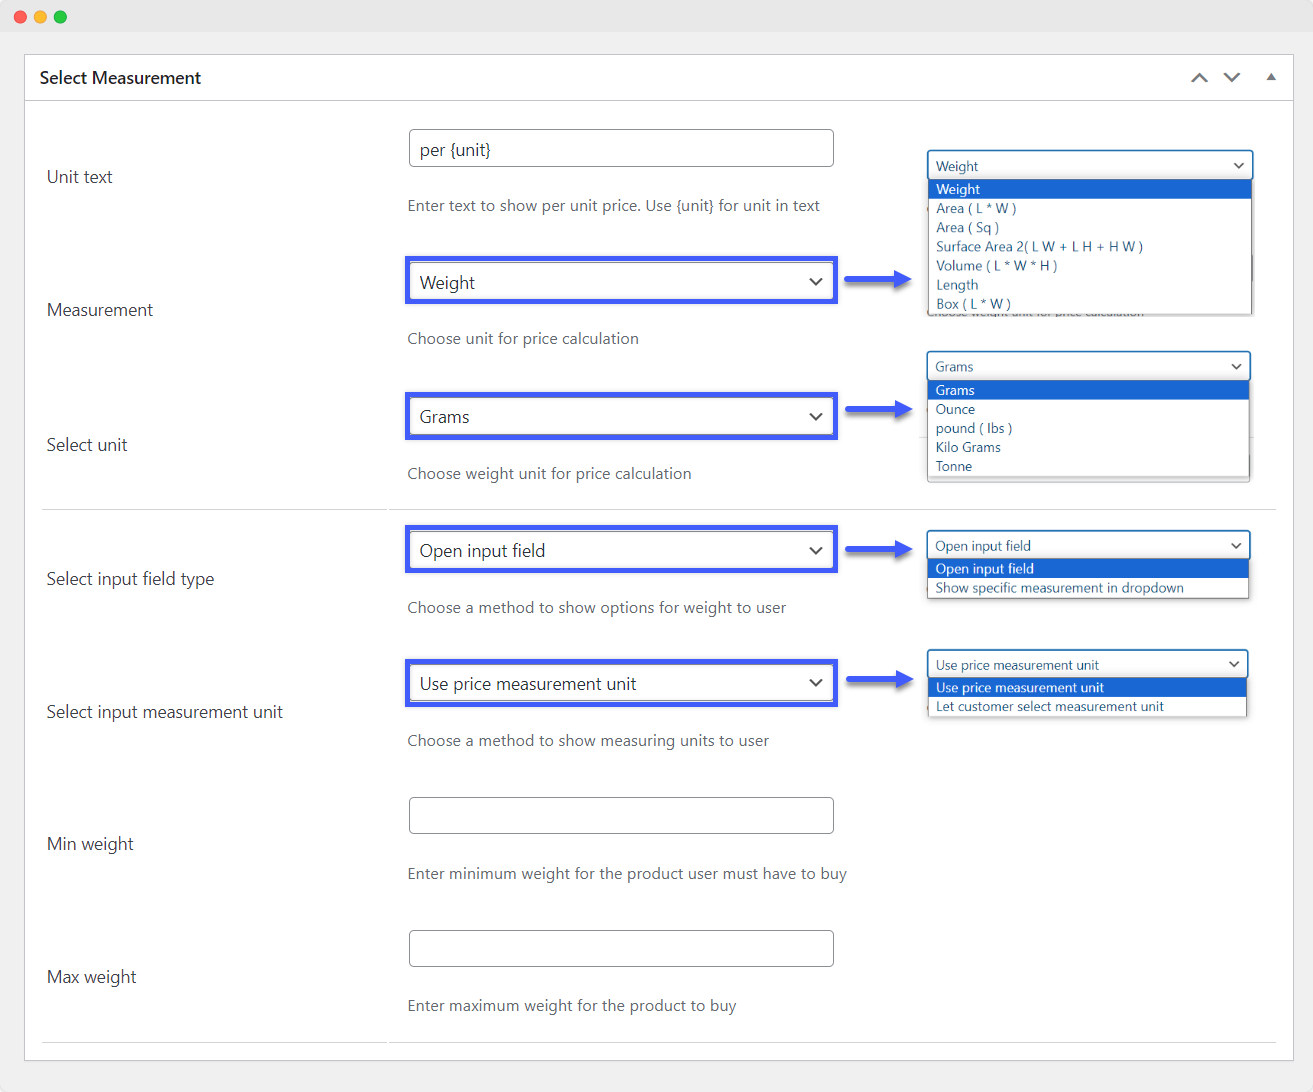
1. Weight:
Select Unit: Choose a weight unit for price calculation:
- Grams
- Ounce
- Pounds (lbs)
- Kilo Grams
- Tonne

Select Input Field Type: Choose a method to show options for weight to user:
- Open Input Field:
- Select Input Measurement Unit: Choose a method to show options for weight to user
- Use Price Measurement Unit
- Let Customer Select Measurement Unit:
- Select Unit: Choose the weight unit you want to show the user
- Min Weight: Enter the minimum weight for the product the user must have to buy
- Max Weight: Enter the maximum weight for the product to buy
- Select Input Measurement Unit: Choose a method to show options for weight to user

- Show Specific Measurement in Dropdown:
- Enter Intervals: Enter intervals for weight separated by a comma “,”

2. Area (L * W)
Select Unit for Area: Choose an area measurement unit for price calculation
Select Input Field Type: Choose a method to show options for an area to the user:
- Open Input Field:
- Select Input Measurement Unit: Choose a method to show measuring units to the user
- Use Price Measurement Unit
- Let Customer Select Measurement Unit:
- Select Unit: Choose the area unit you want to show the user
- Select Input Measurement Unit: Choose a method to show measuring units to the user
- Enable Min and Max for Input Fields: Check if you want to restrict the minimum and maximum vales for individual fields such as length, width
- Min Length: Enter the minimum length for area measurement
- Max Length: Enter the maximum length for area measurement
- Min Width: Enter minimum width for area measurement
- Max Width: Enter maximum width for area measurement
- Enable Min and Max Area Limit: Check if you want to enable an overall area limit for the user to buy the product
- Min Area: Enter minimum area limit
- Max Area: Enter the maximum area limit

- Show Specific Measurement in Dropdown:
- Select Input Type for Length: Choose a method to show options for length to user
- Show Open Input Field
- Show Specific Values in Dropdown
- Select Input Type for Width: Choose a method to show options for width to user
- Show Open Input Field
- Show Specific Values in Dropdown
- Select Input Type for Length: Choose a method to show options for length to user

3. Area (Sq)
Select Unit: Choose an area measurement unit for price calculation
Select Input Field Type: Choose a method to show options for an area to the user:
- Open Input Field:
- Select Input Measurement Unit: Choose a method to show measuring units to the user
- Use Price Measurement Unit
- Let Customer Select Measurement Unit:
- Select Unit: Choose the sq area unit you want to show the user
- Select Input Measurement Unit: Choose a method to show measuring units to the user
- Enable Min and Max Area Limit: Check if you want to enable an overall area limit for the user to buy the product
- Min Area: Enter minimum area limit
- Max Area: Enter the maximum area limit

- Show Specific Measurement in Dropdown:
- Enter Intervals: Enter intervals for weight separated by a comma “,”

4. Surface Area 2 (LW + LH + HW)
Select Unit: Choose a surface area measurement unit for price calculation
Select Input Field Type: Choose a method to show options for surface area to the user:
- Open Input Field:
- Select Input Measurement Unit: Choose a method to show measuring units to the user
- Use Price Measurement Unit
- Let Customer Select Measurement Unit:
- Select Unit: Choose the surface area unit you want to show the user
- Enable Min and Max Vales for Individuals: Check if you want to enable minimum and maximum limits for surface area such as length, width, height
- Min Length: Enter minimum length for surface area measurement
- Max Length: Enter the maximum length for surface area measurement
- Min Width: Enter minimum width for surface area measurement
- Max Width: Enter maximum width for surface area measurement
- Min Height: Enter minimum height for surface area measurement
- Max Height: Enter maximum height for surface area measurement
- Enable Min and Max Surface Area Limit: Check if you want to limit overall surface area for price calculation
- Min Surface Area: Enter minimum surface area for price calculation
- Max Surface Area: Enter maximum surface area for price calculation
- Select Input Measurement Unit: Choose a method to show measuring units to the user

5. Volume (L * W * H)
Select Unit: Choose a volume measurement unit
Select Input Field Type: Choose a method to show options for volume to the user:
- Open Input Field:
- Select Input Measurement Unit: Choose a method to show measuring units to the user
- Use Price Measurement Unit
- Let Customer Select Measurement Unit:
- Select Unit: Choose the volume unit you want to show the user
- Enable Min and Max Vales for Input Fields: Check if you want to enable minimum and maximum limit for volume for individual fields
- Min Length: Enter minimum length for volume measurement
- Max Length: Enter the maximum length for volume measurement
- Min Width: Enter minimum width for volume measurement
- Max Width: Enter maximum width for volume measurement
- Min Height: Enter minimum height for volume measurement
- Max Height: Enter maximum height for volume measurement
- Enable Min and Max Surface Area Limit: Check if you want to enable overall volume measurement
- Min Volume: Enter the minimum volume
- Max Volume: Enter the maximum volume
- Select Input Measurement Unit: Choose a method to show measuring units to the user

6. Length
Select Unit: Choose a measurement unit for length
Select Input Field Type: Choose a method to show options for length to the user:
- Open Input Field:
- Select Input Measurement Unit: Choose a method to show measuring units to the user
- Use Price Measurement Unit
- Let Customer Select Measurement Unit:
- Select Unit: Choose the length unit you want to show the user
- Enable Min and Max Length: Check if you want to enable minimum and maximum length for measurement
- Min Length: Enter minimum length for measurement
- Max Length: Enter the maximum length for measurement
- Select Input Measurement Unit: Choose a method to show measuring units to the user

7. Box (L * H)
Select Unit: Choose a measurement unit for box calculation
Select Input Field Type: Choose a method to show options for area to user:
- Open Input Field:
- Select Input Measurement Unit: Choose a method to show measuring units to the user
- Use Price Measurement Unit
- Let Customer Select Measurement Unit:
- Select Unit: Choose box unit you want to show user
- Enable Min and Max Area Limit: Check if you want to enable minimum and maximum area limit for box measurement
- Min Area: Enter minimum area for box measurement
- Max Area: Enter the maximum area for box measurement
- Select Input Measurement Unit: Choose a method to show measuring units to the user

Select Price:
- Choose Price for Product: Select a price type for calculating the product price:
- Use Standard Price as Unit Price
- Use Product Level Price as Unit Price
- Add Per Unit Price
- Add Min and Max Price to Purchase: Add minimum and maximum prices for purchasing the product by checking the corresponding boxes

Placing the Pricing Table
Go to WooCommerce > Settings > Price Calculator > General Settings to customize the placement of the pricing table on your store.
- Location of Price Table: Set the location by selecting the following options:
- Show Above “Add to Cart” Button: Enable this option if you want to display the pricing table above the “Add to Cart” button
- Create Tab on Product Page: Create a tab on the product page for displaying price-related information
- Button text (Shop page): Add the custom name of the button that is displayed on the shop page.
- Enable stock management: Enable this field to manage the stock by using a price calculator.
- Save changes: Click on the save button to implement all changes.

Configure Measurements for the Table
Go to WooCommerce > Settings > Price Calculator > Table Settings and adjust the measurement for the pricing table.
- Pricing Table – Set form units: Add the starting unit value of the price range.
- Pricing Table – Set to Unit: Add the ending unit value of the pricing range.
- Set unit with regular price: Enter the regular price of each unit that lies between the define range.
- Set unit with sale price: Enter the sale price of each unit if you want to offer the discount rate in the selected range.
- Enable table header style: Enable this option to style the table header. To style the table header, you can:

Set Templates for the Table
By default, no template is selected. You can choose from the available templates using the dropdown menu.
- Design template: Select a template design, such as template 1 or 2, from a dropdown.
You can customize the template by implementing the following settings:
- Enable the Selection option Heading: Enable this to add the heading for the selection option.
- Heading for selection options: Add the custom heading for the selection option.
- Heading text color: Add the custom color for heading text.
- Heading background color: Adjust the custom color for the heading background.
- Enable Result Section Heading: Enable this option to add the heading for the result section.
- Heading for result section: Add custom heading for result section.
- Heading text color: Adjust the custom color for text.
- Heading background color: Add a custom color for the result section background.
- Enable Information Section Heading: Enable this to add the heading for the information section.
- Heading for information section: Add the custom heading for the information section.
- Heading text color: Adjust the custom color for text.
- Heading background color: Add a custom color for the information section background.
- Heading font size: Add the custom size for the heading font.
- Field label font size: Select the font size, such as Normal or Bold, from he dropdown.
- Field label text color: Add the custom color for field label text color.
- Save changes: Click on the Save changes option to apply all modifications.

Enabling Product-Level Pricing for Simple Products
Go to WP Admin Panel > Products > Add New. Proceed to create a new product or add product-level pricing to the existing products of your store.
Choose “Simple Product” in the Product Data field and click on “Price Calculation”. Configure the following settings:
- Regular Price: Enter the regular price per unit for this product
- Sale Price: Enter the sale price per unit for this product
- Create Price Settings: Check this option if you want to create custom price settings on a per-product basis
- Unit Text: Define the text to display the per-unit price, and use {unit} as a placeholder for the measurement unit in the text
- Measurement: Choose the unit for price calculation from the dropdown
- Box Product: Check this option if the product is sold in boxes
- Number of Tiles: Enter the number of tiles in each box
- Each Tile Size: Specify the size of each tile, e.g., 20
- Area Covered by Box ( ): Enter the area covered by a single box
- Enable Price Table: Check this option if you want to enable the price table for this product
In the table, make the following entries:
- From
- To
- Regular Price
- Sale Price

Enabling Product-Level Pricing for Variations
Go to WP Admin Panel > Products > Add New. Proceed to create a new product or add product-level pricing to the existing products of your store.
Choose “Variable Product” in the Product Data field and click on “Variations”. Configure the following settings:
- Enable Price Table: Check this option if you want to enable the price table for variations
In the table, make the following entries:
- From
- To
- Regular Price
- Sale Price
Customize additional variation details as needed:
- Regular Price: Enter the regular price per unit for this variation
- Sale Price: Enter the sale price per unit for this variation
- Stock Status: Set the stock status for the variation
- Weight (kg): Specify the weight of the variation
- Dimensions (LxWxH) (cm): Enter the dimensions of the variation
- Shipping Class: Assign a shipping class to the variation
- Description: Add a description for the variation


