
Creating Multiple Gift Registries
Configuring the Gift Registry on Your Store
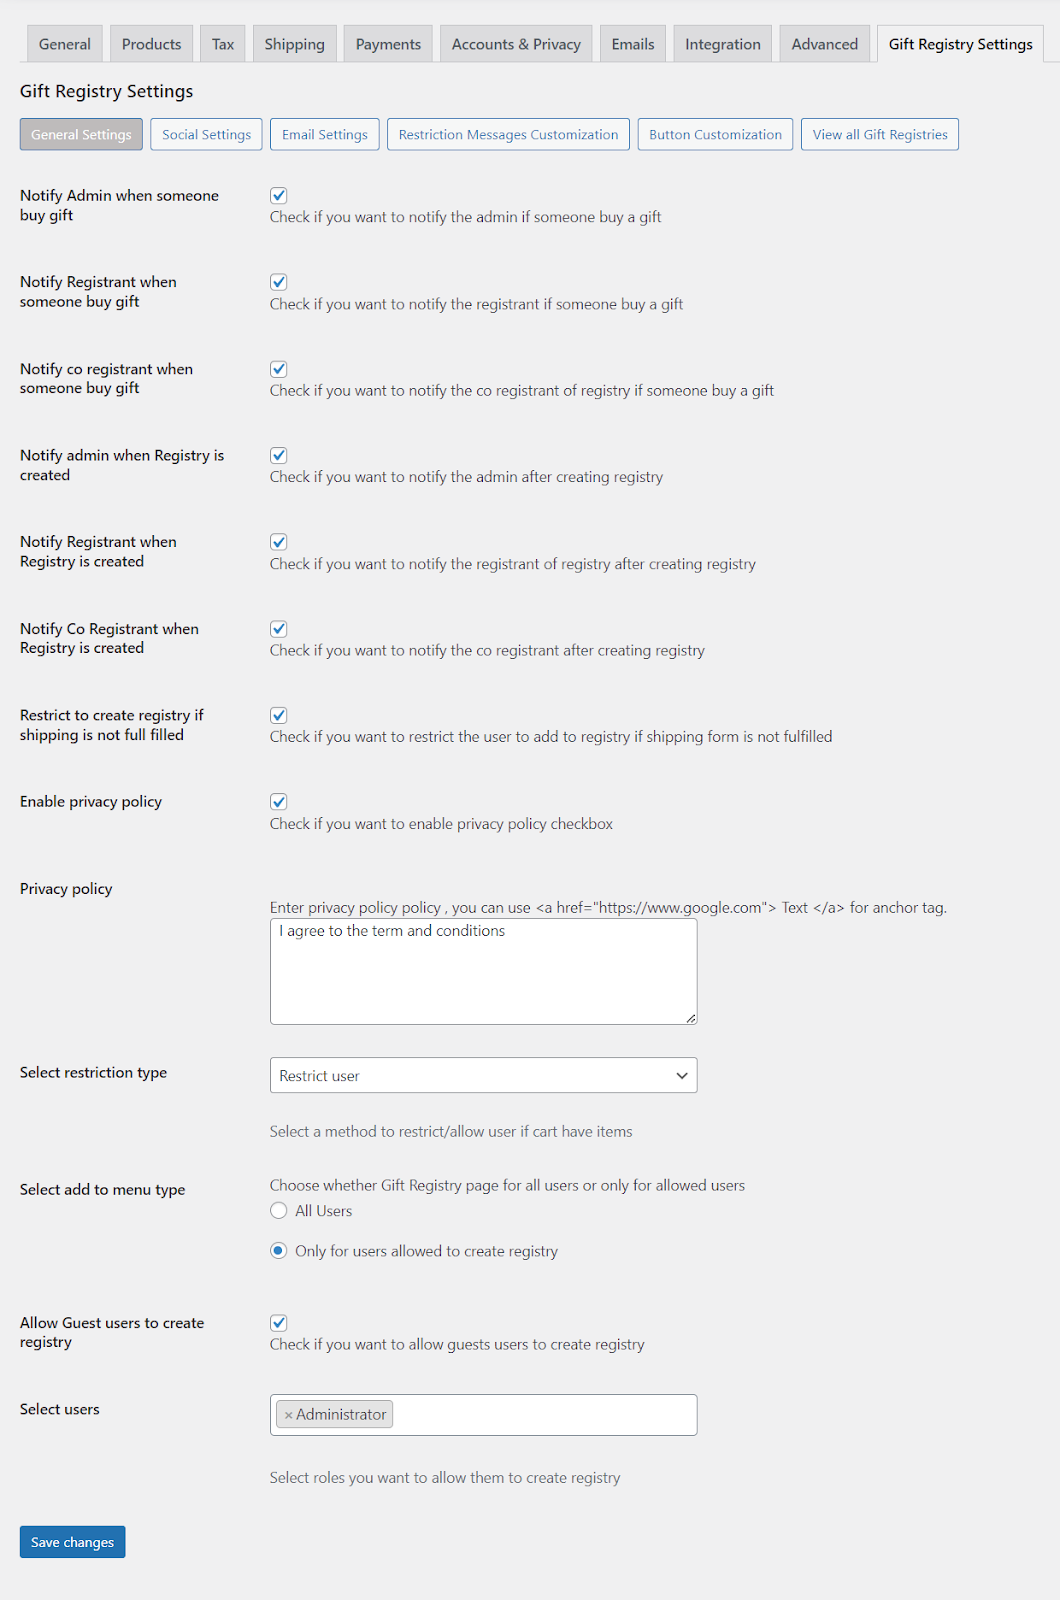
Go to WooCommerce > Settings > Gift Registry Settings > General Settings.
In the “General Settings” section, you can configure various options related to your gift registry:
Notify Admin when Someone Buys a Gift: Check this option if you want to notify the admin when someone purchases a gift from a registry
Notify Registrant when Someone Buys a Gift: Check this option if you want to notify the registrant (the person who created the registry) when someone purchases a gift from their registry
Notify Co-registrant when Someone Buys a Gift: Check this option if you want to notify the co-registrant (if applicable) when someone purchases a gift from the registry
Notify Admin when Registry is Created: Check this option if you want to notify the admin when a new gift registry is created
Notify Registrant when Registry is Created: Check this option if you want to notify the registrant when their gift registry is successfully created
Notify Co-registrant when Registry is Created: Check this option if you want to notify the co-registrant (if applicable) when a new gift registry is created
Restrict to Create Registry if Shipping is Not Fulfilled: Check this option if you want to restrict users from creating a registry if the shipping information is not fully provided
Enable Privacy Policy: Check this option if you want to enable a privacy policy checkbox, which users must agree to before creating a registry
Privacy Policy: Enter the text for your privacy policy and, if needed, include an anchor tag using the format <a href=”https://www.google.com”>Text</a> to link to your privacy policy page
Select Restriction Type: Choose a method to restrict or allow users if their cart contains items:
- Restrict User: Restrict users from adding items to the registry if their cart contains certain items.
- Force to Deliver with Gift Registry Items: Ensure that items from the gift registry are delivered alongside other cart items
Select Add to Menu Type: Choose whether the Gift Registry page should be visible to all users or only to users allowed to create a registry:
- All Users: The Gift Registry page is visible to all users
- Only for Users Allowed to Create Registry: The Gift Registry page is visible only to users with permission to create a registry
Allow Guest Users to Create Registry: Check this option if you want to allow guest users (users who are not logged in) to create a gift registry
Select Users: Select the user roles you want to allow to create a registry. This restricts registry creation to specific user roles if needed
Enabling Social Sharing Buttons
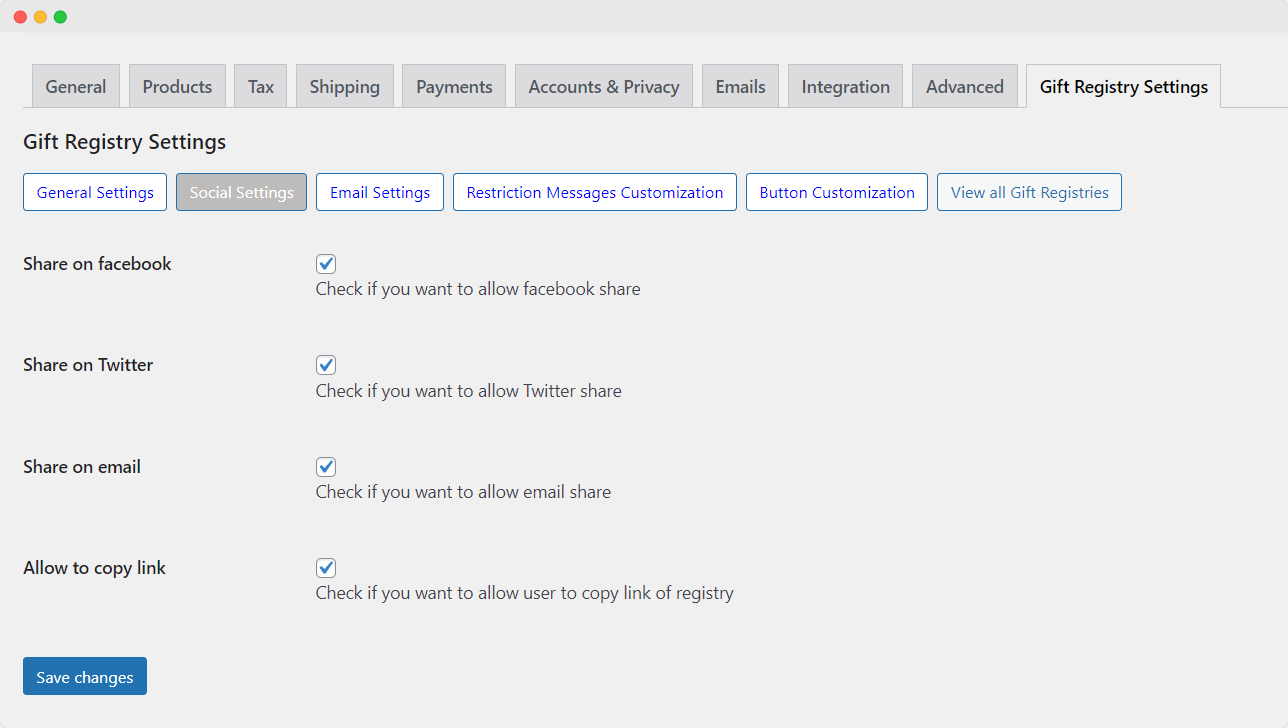
Go to WooCommerce > Settings > Gift Registry Settings > Social Settings.
In the “Social Settings” section, you can enable the following social sharing options:
Share on Facebook: Check this option if you want to allow users to share the gift registry on Facebook
Share on Twitter: Check this option if you want to allow users to share the gift registry on Twitter
Share on Email: Check this option if you want to allow users to share the gift registry via email
Allow to Copy Link: Check this option if you want to allow users to copy the link of the gift registry. This allows them to easily share the link through other communication channels, such as instant messaging or social media platforms.
Sending Customized Emails to Customers, Admins, and Co-registrants
Go to WooCommerce > Settings > Gift Registry Settings > Email Settings.
In the “Email Settings” section, you can customize email notifications for different user roles and actions as follows:
Admin Email Settings:
- Email Address: Enter the admin’s email address for notifications
- Subject of Email for Admin: Specify the subject of the email that will be sent to the admin when a new registry is created
- Heading of Email for Admin: Define the heading in the email sent to the admin for new registry creation
- Email Content for New Registry Created (Admin): Compose the content of the email that will be sent to the admin when a new registry is created. You can use placeholders like {registrant_id}, {registrant_name}, {registry_title}, {current_time}, and {registrant_msg} to personalize the message

Registrant Email Settings:
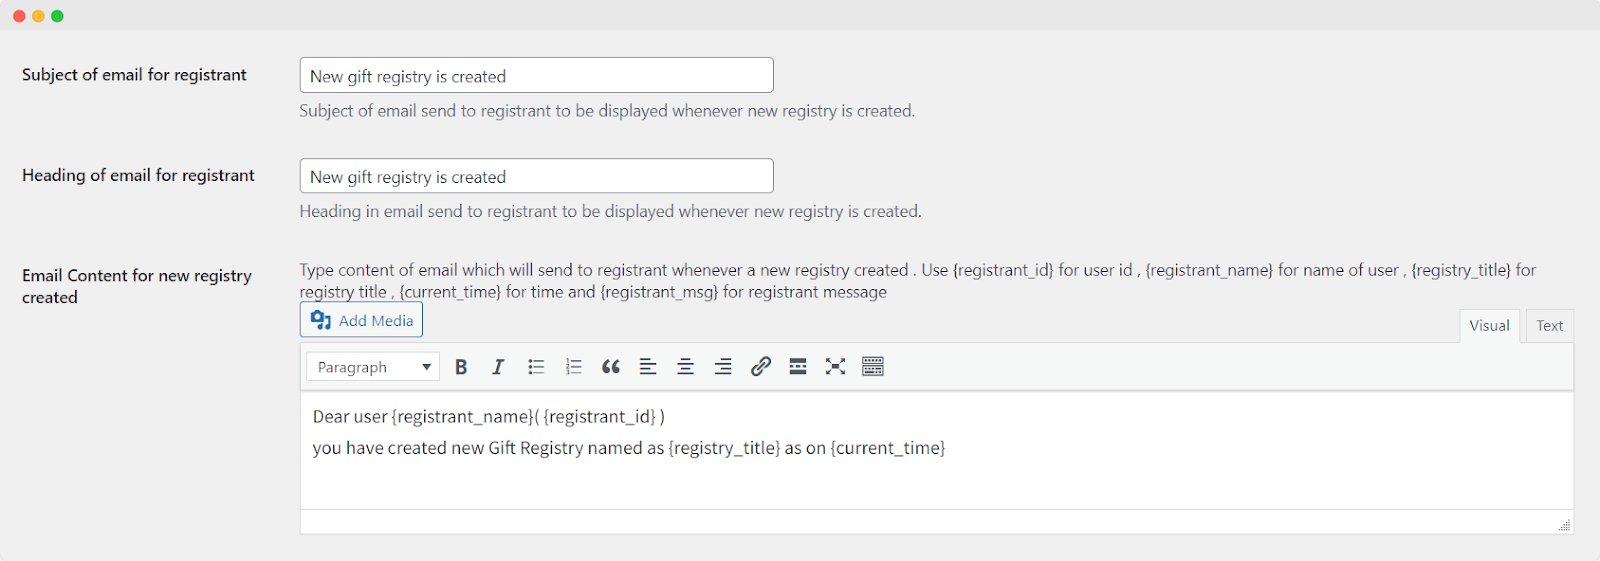
- Subject of Email for Registrant: Set the subject of the email sent to the registrant when a new registry is created
- Heading of Email for Registrant: Specify the heading in the email sent to the registrant for new registry creation
- Email Content for New Registry Created (Registrant): Compose the content of the email that will be sent to the registrant when a new registry is created. Utilize placeholders such as {registrant_id}, {registrant_name}, {registry_title}, {current_time}, and {registrant_msg} to personalize the message
Co-registrant Email Settings:
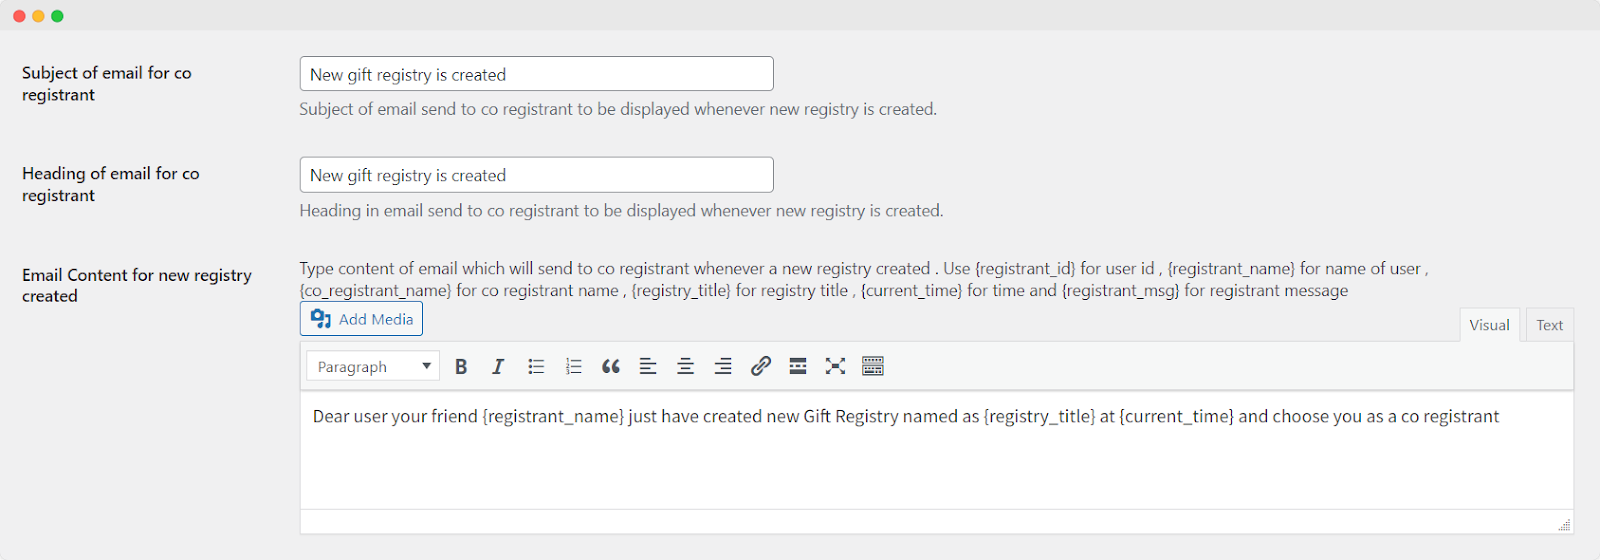
- Subject of Email for Co-registrant: Define the subject of the email sent to the co-registrant when a new registry is created
- Heading of Email for Co-registrant: Specify the heading in the email sent to the co-registrant for new registry creation
- Email Content for New Registry Created (Co-registrant): Compose the content of the email that will be sent to the co-registrant when a new registry is created. Use placeholders such as {registrant_id}, {registrant_name}, {co_registrant_name}, {registry_title}, {current_time}, and {registrant_msg} to personalize the message
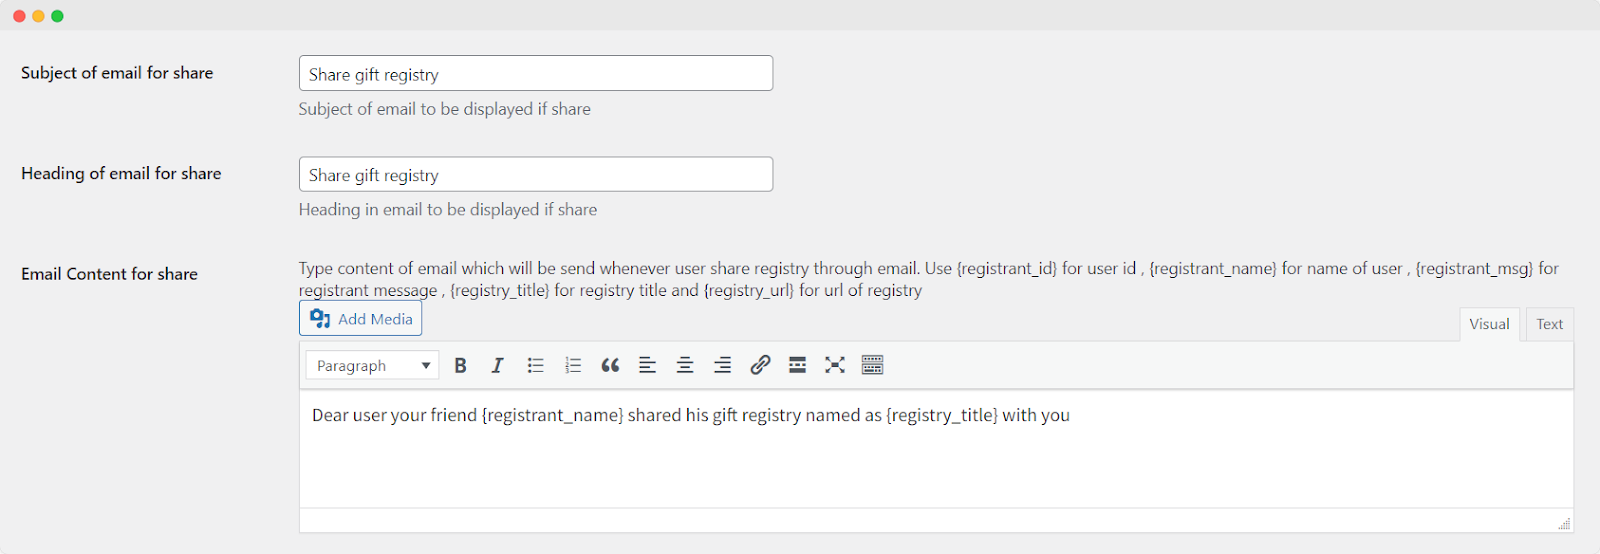
Share Email Settings:
- Subject of Email for Share: Set the subject of the email to be displayed when a user shares a registry
- Heading of Email for Share: Specify the heading in the email displayed when a user shares a registry
- Email Content for Share: Compose the content of the email that will be sent when a user shares a registry through email. Use placeholders like {registrant_id}, {registrant_name}, {registrant_msg}, {registry_title}, and {registry_url} to customize the message
Admin Email Settings for Purchased Products:
- Subject of Email for Admin (Product Purchase): Specify the subject of the email to be displayed when someone buys a product from a registry
- Heading of Email for Admin (Product Purchase): Define the heading in the email displayed when someone buys a product from a registry
- Admin Email Template for Purchased Products: Compose the content that will be sent whenever someone purchases a product from a registry. Use placeholders like {registrant_id}, {registrant_name}, {registry_title}, {product_name}, and {time_of_purchase} to personalize the message

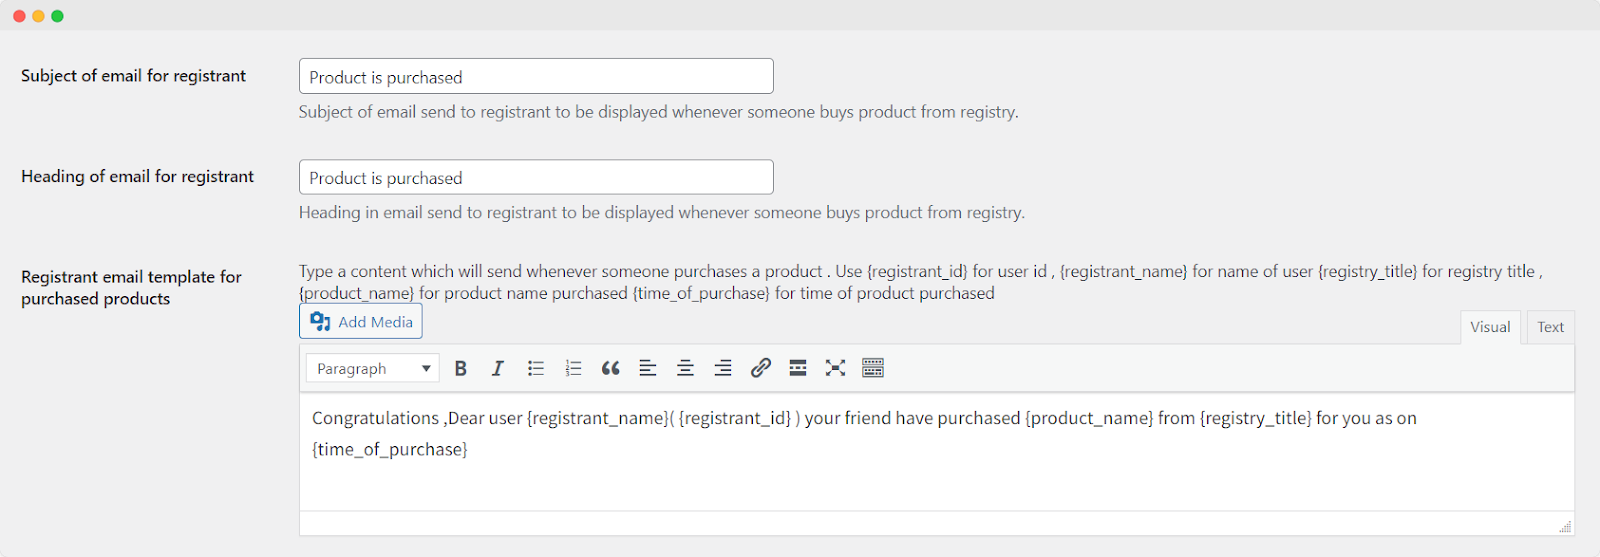
Registrant Email Settings for Purchased Products:
- Subject of Email for Registrant (Product Purchase): Set the subject of the email to be displayed when someone buys a product from a registry
- Heading of Email for Registrant (Product Purchase): Specify the heading in the email to be displayed when someone buys a product from a registry
- Registrant Email Template for Purchased Products: Compose the content that will be sent whenever someone purchases a product from a registry. Utilize placeholders like {registrant_id}, {registrant_name}, {registry_title}, {product_name}, and {time_of_purchase} to personalize the message
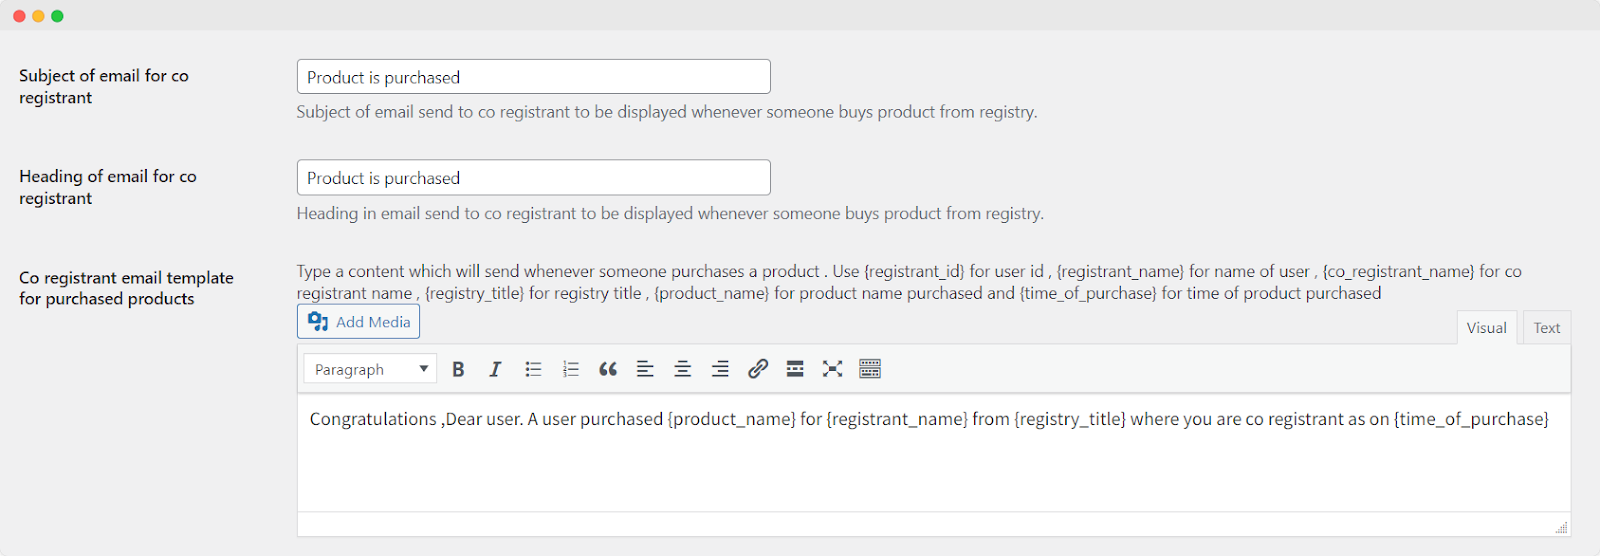
Co-registrant Email Settings for Purchased Products:
- Subject of Email for Co-registrant (Product Purchase): Define the subject of the email to be displayed when someone buys a product from a registry
- Heading of Email for Co-registrant (Product Purchase): Specify the heading in the email displayed when someone buys a product from a registry
- Co-registrant Email Template for Purchased Products: Compose the content to be sent whenever someone purchases a product from a registry. Use placeholders like {registrant_id}, {registrant_name}, {co_registrant_name}, {registry_title}, {product_name}, and {time_of_purchase} to personalize the message
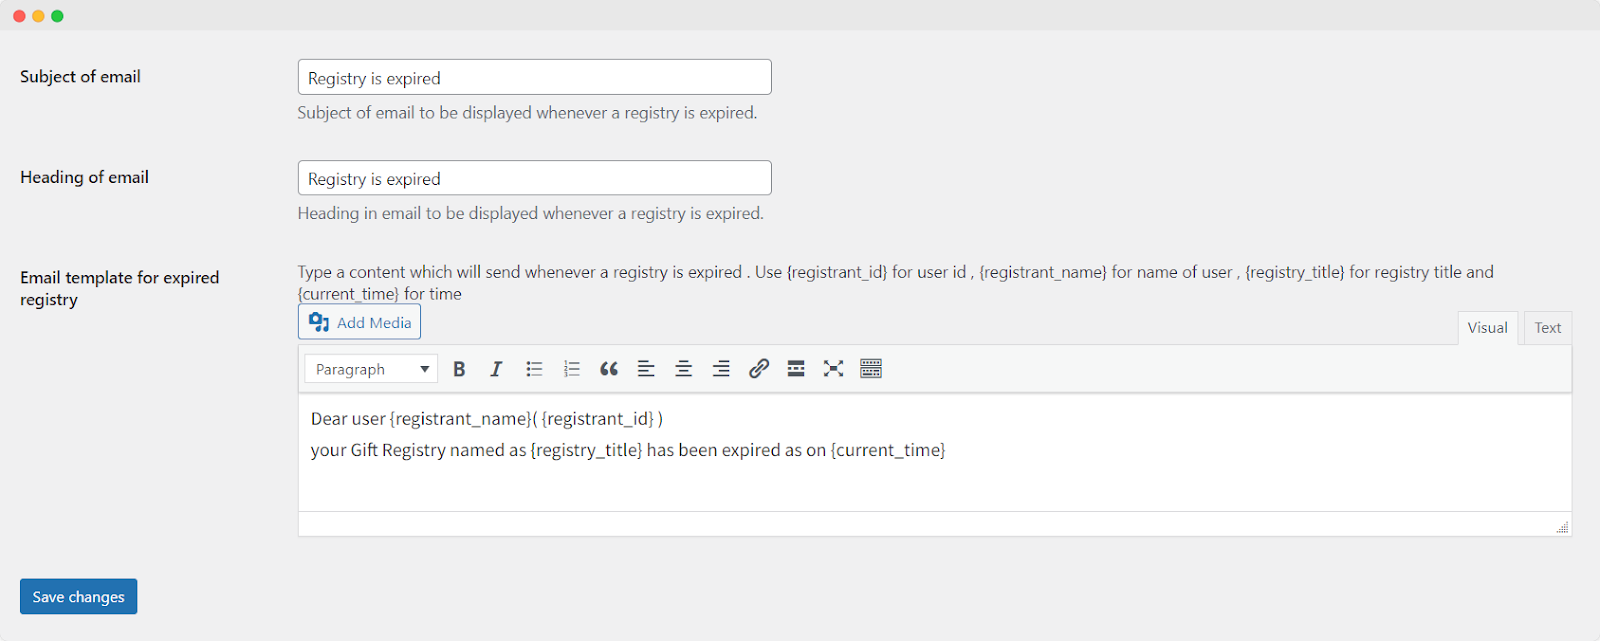
Email for Expired Registry:
- Subject of Email for Expired Registry: Set the subject of the email to be displayed when a registry expires
- Heading of Email for Expired Registry: Specify the heading in the email to be displayed when a registry expires
- Email Template for Expired Registry: Compose the content of the email that will be sent when a registry expires. Utilize placeholders like {registrant_id}, {registrant_name}, {registry_title}, and {current_time} to customize the message
Personalizing Error Messages
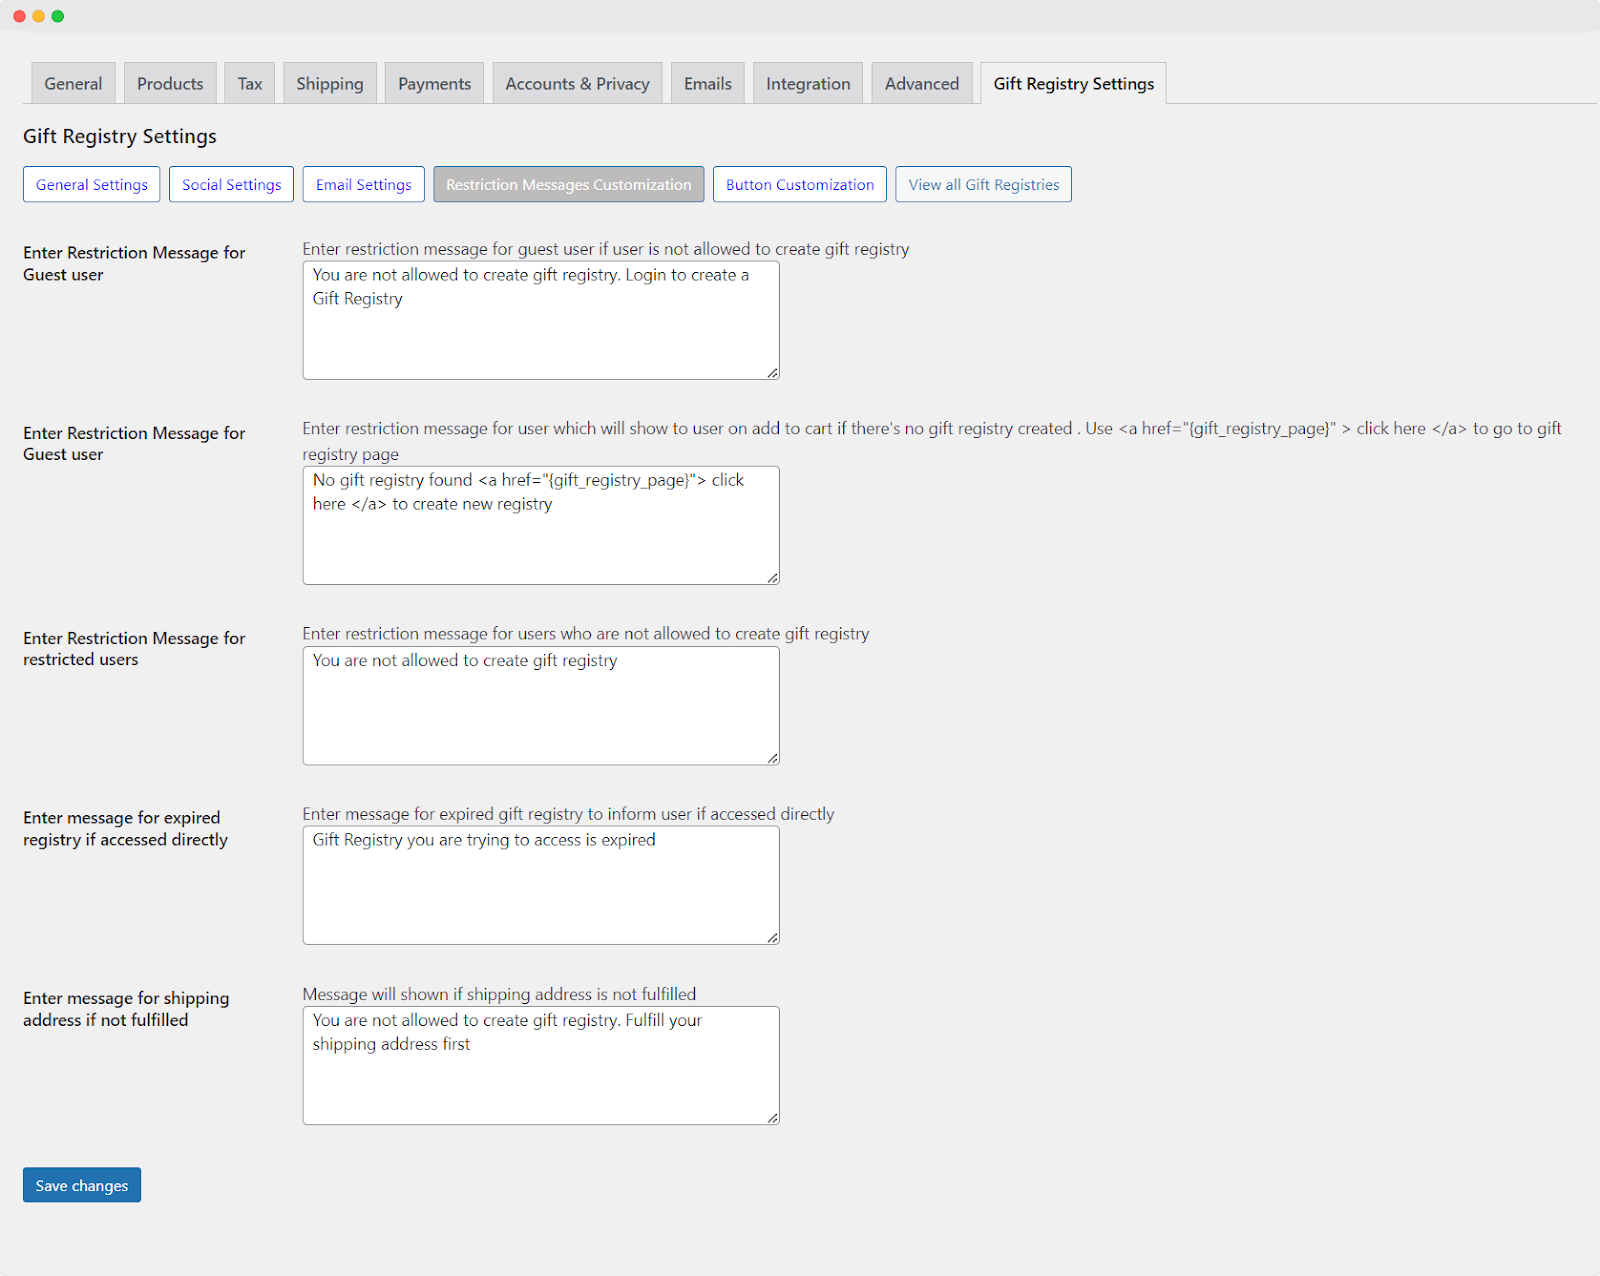
Go to WooCommerce > Settings > Gift Registry Settings > Restriction Messages Customization.
In the “Restriction Messages Customization” section, you can customize error messages for different scenarios as follows:
Enter Restriction Message for Guest User: This message will be displayed to guest users who are not allowed to create a gift registry
Enter Restriction Message for Users Without a Gift Registry: This message will be shown to users when they attempt to add items to their cart but they don’t have a gift registry. You can include a link to the gift registry page using <a href=”{gift_registry_page}” > click here </a> to direct users to create one
Enter Restriction Message for Restricted Users: This message is for users who are not allowed to create a gift registry for some reason
Enter Message for Expired Registry Accessed Directly: Customize this message to inform users if they try to access an expired gift registry directly
Enter Message for Shipping Address Not Fulfilled: This message will be displayed if a user’s shipping address is not complete or fulfilled when interacting with the gift registry
Customizing the Gift Registry Button
Go to WooCommerce > Settings > Gift Registry Settings > Button Customization.
In the “Button Customization” section, you can make the following customizations:
Select Type: Choose a type for the “Add to Cart” button or text. You have the option to select the type that best suits your store’s needs.
- Show Button: Toggle this option to either show or hide the button
- Show Link: Toggle this option to either show or hide the link
Add to Registry Button Text: Enter the text that you want to appear on the “Add to Registry” button. This is the text that users will click on when they wish to add products to their gift registry

Creating Multiple Gift Registries
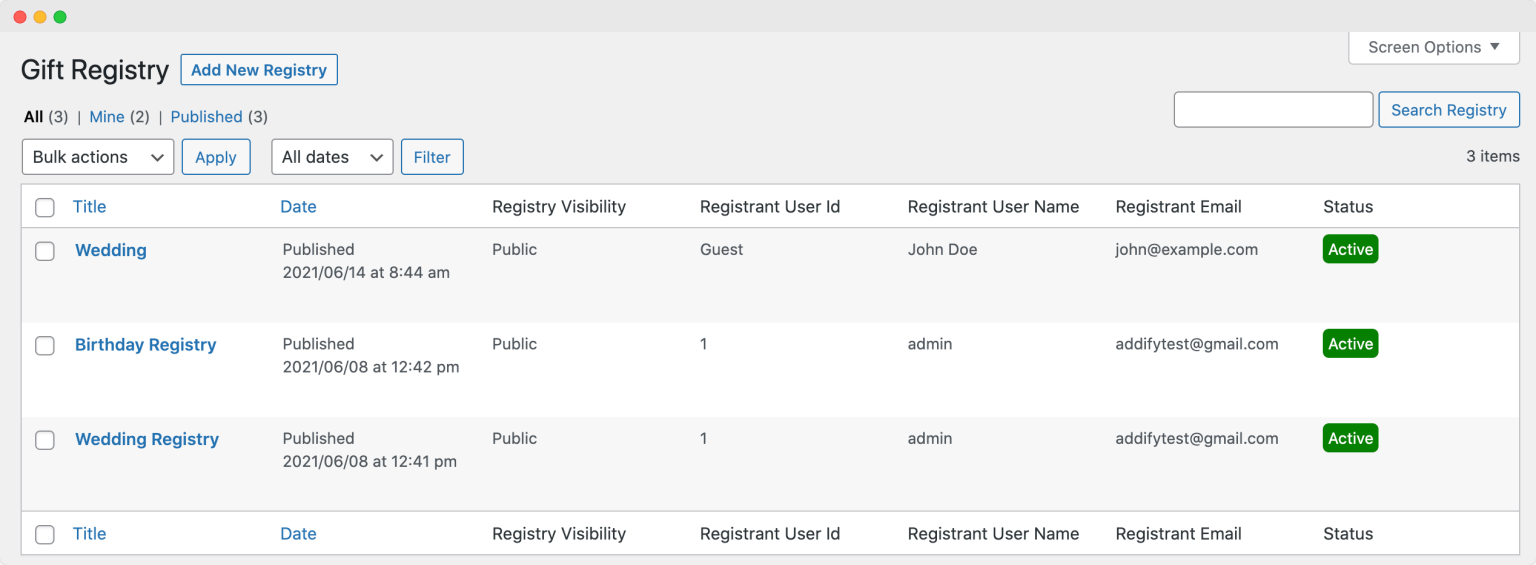
Go to WooCommerce > Settings > Gift Registry Settings > View All Gift Registries.
View All Gift Registries:
In the “View All Gift Registries” section, you will find a list of all created gift registries, along with the following information:
- Title
- Date
- Registry Visibility
- Registrant User Id
- Registrant User Name
- Registrant Email
- Status
Adding a New Registry
In the “View All Gift Registries” section, click on “Add New Registry.”
When adding a new gift registry, you’ll need to provide various details. These details are categorized into the following sections:
Add Title: Add a unique title for future reference
Personal Information:
- Registrant Information:
- Visibility: Choose either “Public” or “Password protected” for the registry’s visibility
- First Name: Enter the first name of the registrant
- Last Name: Enter the last name of the registrant
- Email: Provide the email address of the registrant
- Co-Registrant Information:
- First Name: Enter the first name of the co-registrant (if applicable)
- Last Name: Enter the last name of the co-registrant (if applicable)
- Email: Provide the email address of the co-registrant (if applicable)
Address Information:
- Event Information:
- Event Date: The date of the event
- Event Location: The location of the event
- Event Message: Any additional message or note regarding the event
Products:
To add products to the gift registry, follow these steps:
- Click on “Add a Product”
- Select the desired product from your store’s inventory
- Specify the quantity of the selected product that the registrant wishes to receive
By following these steps, you can create a new gift registry with all the necessary information.


