Configuration of WooCommerce Smart Product Review
Enabling Smart Product Review on Your Store
Go to WooCommerce > Smart Product Review > General Settings > Basic Review Settings.
Enable Review: Check the box if you want to enable reviews.
Default Review Sorting: Select the preferred sorting option from the dropdown menu:
- Most Recent: Reviews are sorted by the date they were posted, with the most recent reviews appearing first.
- Rating High to Low: Reviews are sorted by their rating, with the highest-rated reviews appearing first.
- Rating Low to High: Reviews are sorted by their rating, with the lowest-rated reviews appearing first.
Enable Review Date: Check the box if you want to display the review date.
Enable Review Sorting: Check the box to enable review sorting.
After configuring the settings as per your preference, click the “Save Changes” button to apply the changes.

Allowing Customers to Vote for the Reviews
Go to WooCommerce > Smart Product Review > General Settings > Review Voting Settings.
Enable Upvoting and Downvoting System: Check the box if you want to enable the upvoting and downvoting system.
Display Voting Option: Select the preferred option from the dropdown menu:
- Show Both: Displays both upvoting and downvoting buttons.
- Up Voting Button: Displays only the upvoting button.
- Down Voting Button: Displays only the downvoting button.
After configuring the settings, click the “Save Changes” button to apply the changes.

Activating Pagination on the Review Page
Go to WooCommerce > Smart Product Review > General Settings > Pagination Settings.
Enable Pagination: Check the box if you want to enable pagination.
Number of Reviews: Enter the desired number of reviews to display per page.
After configuring the settings, click the “Save Changes” button to apply the changes.

Restricting User Roles from Submitting the Reviews
Go to WooCommerce > Smart Product Review > General Settings > User Settings.
User Role Restrictions: Control which user roles are permitted to leave reviews. The available options are:
- Guest Users: Allow reviews from users who are not logged in.
- Registered Users: Allow reviews only from users who are logged in.
- Verified Users: Allow reviews only from users who have been verified.
Enable Verified User Badge: Add a badge to reviews left by verified users, indicating their verified status.
Verified Badge Label: Customize the label for the verified user badge.
After configuring the settings, click the “Save Changes” button to apply the changes.

Choosing a Custom Canned Response
Go to WooCommerce > Smart Product Review > General Settings > Canned Response.
Enable Canned Response: Enable the use of canned responses in reviews or user emails.
Canned Response Options: Determine where the canned responses will be used. The available options are:
- Canned Response in Reviews: Enable canned responses in reviews.
- Canned Response in Emails: Enable canned responses in user emails.
- Show Both: Enable canned responses in both reviews and emails.
Canned Message: Enter the custom message that will be used as the canned response.
After configuring the settings, click the “Save Changes” button to apply the changes.

Selecting a Custom Layout to Display Reviews
Go to WooCommerce > Smart Product Review > Layout Settings.
Choose Layout: Select the layout format for displaying reviews. The available options are:
- Grid
- List
- Slider
Choose Template: Select a specific template for the chosen layout.
After configuring the settings, click the “Save Changes” button to apply the changes.

Notifying Admins After a Review is Submitted
Go to WooCommerce > Smart Product Review > Email Settings > Admin Notification.
Admin Notification Message: Configure the message sent to admins when a new review is submitted. Use the following placeholders to include dynamic content:
- {product_title}: Displays the name of the product.
- {review_details}: Displays the details of the review.
- {review_action_button}: Displays action buttons for the review.
Admin Email: Specify the email address where admin notifications will be sent.
After configuring the settings, click the “Save Changes” button to apply the changes.

Limiting Emails to Products & Categories
Go to WooCommerce > Smart Product Review > Email Settings > Review Notification.
Include Product: Select specific products to send review notification emails.
Exclude Product: Select specific products to exclude from review notification emails.
Include Categories: Select specific categories to send review notification emails.
Exclude Categories: Select specific categories to exclude from review notification emails.
Review Notification Message: Enter a visual or text-based message to include in the review notification email.
Review Link Label: Customize the label for the review link included in the notification email.
After configuring the settings, click the “Save Changes” button to apply the changes.

Adding Social Media Links to Emails
Go to WooCommerce > Smart Product Review > Email Settings > Other Settings.
Facebook Profile: Enter the URL of your Facebook profile to include it in the email.
Twitter Profile: Enter the URL of your Twitter profile to include it in the email.
LinkedIn Profile: Enter the URL of your LinkedIn profile to include it in the email.
Instagram Profile: Enter the URL of your Instagram profile to include it in the email.
Pinterest Profile: Enter the URL of your Pinterest profile to include it in the email.
After entering the profile URLs, click the “Save Changes” button to apply the changes.

Setting Up ReCaptcha for Guest Users
Go to WooCommerce > Smart Product Review > ReCaptcha Settings.
Enable ReCaptcha: Enable ReCaptcha verification for guest users submitting reviews.
ReCaptcha Site Key: Enter the site key obtained from Google ReCaptcha.
ReCaptcha Secret Key: Enter the secret key obtained from Google ReCaptcha.
ReCaptcha Label: Customize the label for the ReCaptcha field.
ReCaptcha Required Message: Enter the message that will be displayed if the ReCaptcha verification is not completed.
After configuring the settings, click the “Save Changes” button to apply the changes.

Offering Coupons to Registered & Verified Users
Go to WooCommerce > Smart Product Review > Coupon/Discount Settings.
Coupon Only to Registered Customer: Enable this option to provide coupons to customers with registered email accounts when their reviews are approved.
Coupon Only to Verified Owner: Enable this option to provide coupons to customers with verified purchases when their reviews are approved.
Include Product: Select the products that the coupon will be applied to.
Exclude Product: Select the products that the coupon will not be applied to.
Include Categories: Select the categories that the coupon will be applied to.
Exclude Categories: Select the categories that the coupon will not be applied to.
Coupon Expiry: Set the number of days until the coupon expires.
Rating: Set the minimum rating a user must give in a review to receive a coupon:
- 1-star rating
- 2-star rating
- 3-star rating
- 4-star rating
- 5-star rating
Discount Type: Select the type of discount the coupon will provide. The available options are:
- Percentage Discount: Provides a discount based on a percentage of the order total.
- Fixed Cart Discount: Provides a fixed amount discount on the cart total.
- Fixed Product Discount: Provides a fixed amount discount on specific products.
Coupon Amount: Enter the amount of the discount provided by the coupon.
Coupon Notification Message in User Email: Customize the email message sent to users when they receive a coupon. Use the following placeholders to include dynamic content:
- {user}: Displays the customer’s name.
- {coupon_code}: Displays the coupon code.
- {date_expires}: Displays the expiration date of the coupon code.
After configuring the settings, click the “Save Changes” button to apply the changes.

Displaying a Review Form
Go to WooCommerce > Smart Product Review > Review Form Settings > General.
Review Form Label: Enter a custom label for the review form.
Submit Label: Enter a custom label for the submit button.
After entering the custom labels, click the “Save Changes” button to apply the changes.

Customizing Review Form for Multiple Fields
Go to WooCommerce > Smart Product Review > Review Form Settings.
For Display Name:
- Label: Enter a label for the display name field.
- Placeholder: Enter a placeholder for the display name field.
- Required Field: Check this box to make the display name field mandatory.
- Required Message: Enter a custom message to display if the field is left empty.

For Email:
- Label: Enter a label for the email field.
- Placeholder: Enter a placeholder for the email field.
- Required Field: Check this box to make the email field mandatory.
- Required Message: Enter a custom message to display if the field is left empty.

For Rating:
- Label: Enter a label for the rating field.
- Required Field: Check this box to make the rating field mandatory.
- Required Message: Enter a custom message to display if the field is left empty.

For Review Description:
- Label: Enter a label for the review description field.
- Placeholder: Enter a placeholder for the review description field.
- Required Field: Check this box to make the review description field mandatory.
- Required Message: Enter a custom message to display if the field is left empty.

For Review Title:
- Label: Enter a label for the review title field.
- Placeholder: Enter a placeholder for the review title field.
- Required Field: Check this box to make the review title field mandatory.
- Required Message: Enter a custom message to display if the field is left empty.
After configuring the fields, click the “Save Changes” button to apply the changes.

Providing the Option to Add Images/Videos to Reviews
Go to WooCommerce > Smart Product Review > Review Form Settings > Image/Videos.
Enable Image Upload: Check this box to allow customers to upload images with their reviews.
Choose File Extension for Images: Select the allowed file extensions for image uploads.
- jpg
- jpeg
- png
- gif
Enable Video Upload: Check this box to allow customers to upload videos with their reviews.
Choose File Extension for Videos: Select the allowed file extensions for video uploads.
- mp4
- m4v
- mov
- wmv
- avi
- mpg
- ogv
- 3gp
- 3g2
Upload Button Label: Enter a custom label for the upload button.
Max Upload File Size: Enter the maximum upload size in MB. The default file size is 8MB. Ensure the size is less than what is set in your php.ini for post_max_size and upload_max_size.
Max Upload File Limit: Enter the maximum number of files allowed for multiple uploads. The default maximum number is 3.
Required Field: Check this box to make the image/video upload a required field.
Required Message: Enter a custom message to display if the field is left empty.
After configuring the settings, click the “Save Changes” button to apply the changes.

Adding New Fields to the Review Form
Go to WooCommerce > Smart Product Review > Additional Fields in Review Form.
Here you can:
- Manage all the additional fields of the review form in a simple log.
- Perform bulk actions.
- Create new additional fields.
- Edit any existing field.

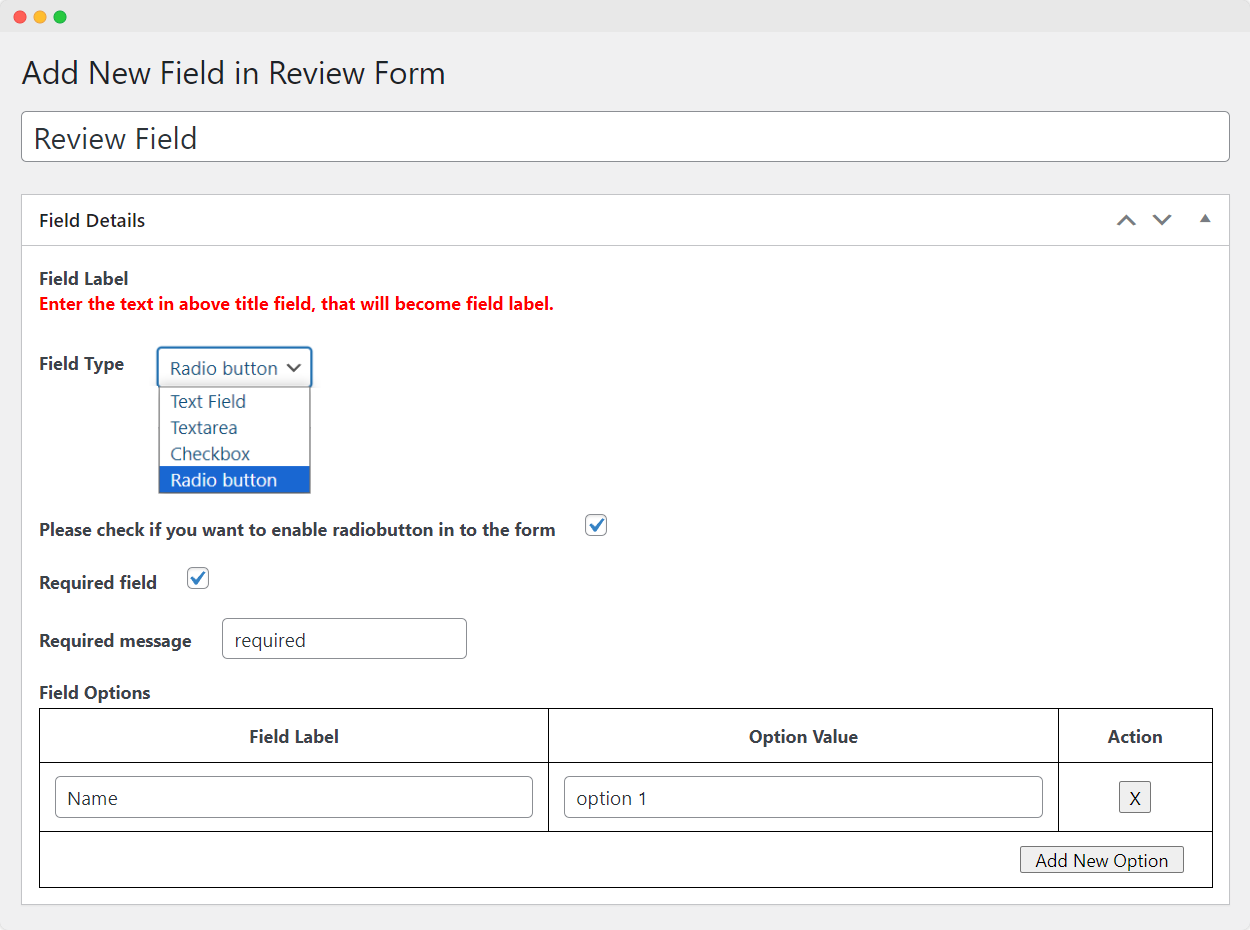
Adding a New Field:
Click on “Add New Field”.
Provide the following details:
Add Title: Enter a title for the new field.
Field Details:
- Field Label: Enter the text in the above title field; this will become the field label.
- Field Type: Select the type of field.
- Text Field
- Textarea
- Checkbox
- Radio Button
- Placeholder: Enter a placeholder for the field.
- Required Field: Check this box to make the field mandatory.
- Required Message: Enter a custom message to display if the field is left empty.
After providing all the details, click “Publish” to add the new field to the review form.