Creating Multiple Quotation Rules
Navigate to Rules, click on “+” to add a new rule, and fill in the following details:
- Add title: Enter a custom title to distinguish each rule by assigning unique titles
- Set Priority: Select any number to keep the rule on to that priority
- Enable Rule: Activate the quote rule
- Hide Price: Enable the option to hide product prices added for the quotation requests. Disable it to show prices of each item separately
- Hide Add to Cart button: Enable the option to hide add to cart button for the items specifically added for quotation requests and disable it to keep both options shown
- Add customizations: You can add the following customizations to new quotation button
- Select Button text color
- Add Button background color
- Enter Button text
- Select group: From the table, you can choose specific user roles to whom you want to offer quotes
- Product Type: Here, you can select two options:
- All Products: This option allows you to add a specific category
- Selected Products: By selecting this option, you can search any product to specify rules only for those items
- Category Selection: Choose categories on which you would like to show request a quote
- Supplier Selection: Enable the option to add specific suppliers on which you want to activate add a quote rule ( such as fashion suppliers)
- Manufacturer Selection: Choose a manufacturer on which you would like to show add to quote

Add Quotations on Behalf of Customers
To create a new quotation on behalf of any customer, click on Quotations and select the “ + “symbol to add a Quote. Now follow the steps:
- Enter Quote name: Add a custom name for the quote
- Select Customer: From the search bar, you can select any customer to create a quote for them
- Add Products: Search and select desired products for the quote
- Create discounts: From the dropdown, select any discount you want to apply to the quote
- Choose shipping: For shipping method, you can select two options:
- Click and Collect
- My Carrier

Now, you have successfully added a new quote on behalf of a customer. Save it, and it will be displayed on the main list.
Configure Pre-Defined Fields
Navigate to Pre-defined Fields and enable the following options:
- Company Name: Enable the option to display it on the quote form and keep it disabled to make the field hidden. You can also:
- Add a custom label for the field
- Make it Mandatory/Optional
- Website Field: Enable the option or disable it to hide the field. Assign it a unique label and make it mandatory/optional
- Phone Number: Add a phone field and customize its label. Also, make it optional or mandatory
- VAT Details: Enable the option to add a VAT field or disable it to remove the field. Also, make it mandatory while assigning it a unique label
- File Upload: Add a file upload option, make it mandatory/optional, and give it a custom label
- Text Type: Add a text type field and customize its label. Choose to make the field mandatory or optional
- Dropdown: Enable a new dropdown field and assign it a custom label.
- Checkbox: Enable a checkbox field and add a custom text for its label.
Once you have configured each field, all these fields will be displayed on the quotation form for users.

Customize Quote Form Fields
In order to add a custom field, navigate to the Custom Field setting. Here, you can click on the” + “symbol to Add New field; now configure the following settings:
- Activate Field: By enabling the option, you are adding a new field to your quotation form
- Add Field Name: Now enter a title for the new field
- Select field type: From the dropdown, you can choose the following field types:
- Text
- Textarea
- Number
- Select
- Multi-text
- Checkbox
- Radio button
- Date
- Switch
- Attachment
- Time
- Color
- Customize Label: Add a custom text to assign it a unique label
- Add Place Holder: Enter the placeholder for the new field
- Value Required: Enable the button to make this input field mandatory. Disable it to keep the field optional for users

This is how you can add multiple custom fields on the quotation form. On selecting different field types, you will get multiple options to make that field specific for users.
View Messages from Customers Regarding Requested Quotes
From the settings, click on Quoation Messages setting, and from that, you can view the following details:
Now you can view a detailed list of messages with cutsomer’s email and quote ID mentioned on it. By clicking any specific query, you can open the personal inbox of that specific customer.

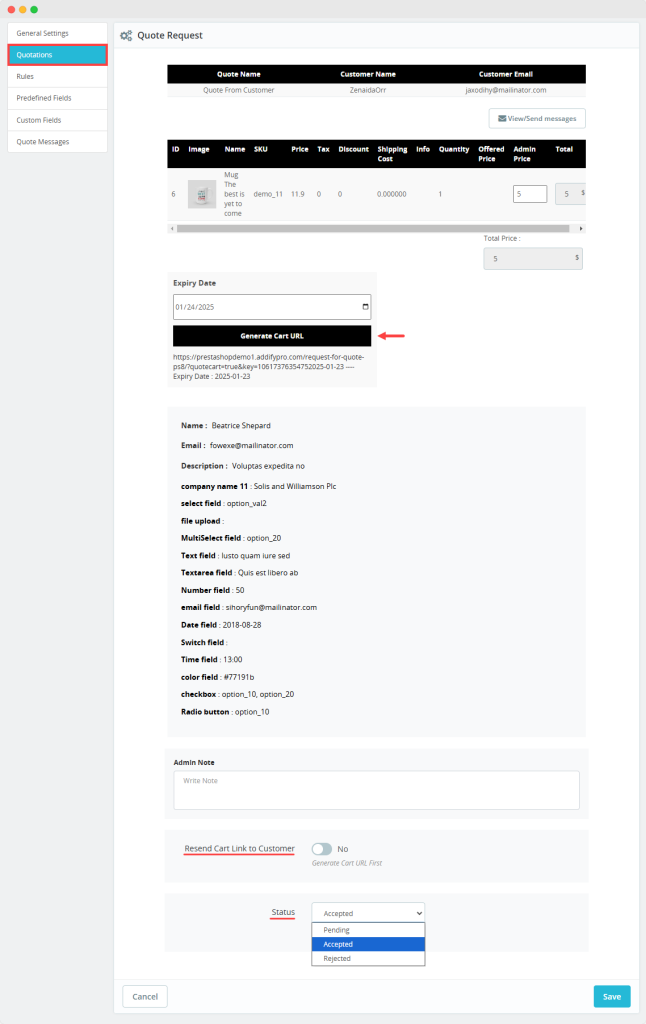
View and Edit Requested Quotations From Customers
Navigate to Quotation settings, and you can manage the following details:
- View Customer’s Requested Quotations: From the log, you can view multiple requested quotations along with their status, date of submission, and buyer’s name. On clicking any specific quote, you can view the following:
- Quoted Products
- Quantity
- SKU
- Shipping Cost
- Discount ( if applicable )
- Tax ( if applicable)
- Offered Price
- By remaining on the same page, admins can:
- Edit Prices: View offered prices and add your desired amount
- Set Expiry Date: Adjisut the dates until the quotation expires
- Generate Cart link: Send direct cart link via email to customers
- Define status: Update the status of quotation as:
- Pending
- Accepted
- Rejected
Add a custom note: Navigate to View/Send Message option and click on that. Once clicked, you will move on to the inbox. Here, you can send a personal note to the owner.